
关于并发、并发安全、线程通信的浅谈
该笔记将会从并发的基础概念、Java中线程实现和管理、线程安全(JVM级别上下文切换线程安全、变量级别线程安全、代码块级别线程安全、分布式服务并发安全)、常见的线程优化进行介绍。笔记本身会比较长,阅读前请注意。
版本信息
JAVA源码版本:17 / 21
JVM源码: Hotpot
Curator: 5.3.0
Redisson:3.36.0
并发的基础概念
并发实际上指代的是一段时间内在处理计算机在处理多件事,往往实际有两种不同的方式实现这一效果
- 稍微了解过计算机基础知识的都知道,CPU的使用权限其实主要是建立在时间片轮转算法上的,从这一算法基础上就自然会出现一段时间同时处理多个任务。
- 由于CPU具有多个核心/使用超线程技术,从而导致同一个时刻计算机也能同时处理多个任务
并发的本质其实就是依靠在该基础上实现同时处理多个任务,尽可能通过提高资源的利用率提高程序的性能。(当然也不要为了用而用,还是要取决于业务做实际情况分析处理)
线程的实现和管理
多线程实现
在Java之中常见的线程创建无非就三种,Thread、Runnable、Callable
Thread
        Thread thread = new Thread() {
            @Override
            public void run() {
                // do something in thread
            }
        };
        thread.start();
Runnable
实现Runnable,并将实现类对象交付给Thread调用start执行 (Thread源码实现了Runnable)
        Thread thread = new Thread(new Runnable() {
            @Override
            public void run() {
                //do something in thread
            }
        });
        thread.start();
Callable
实现Callable,并将Callable对象交付给FutureTask (初代线程Future接口,可针对线程做处理 [取消、获取结果、判断状态等基本操作])
        FutureTask futureTask = new FutureTask(new Callable() {
            @Override
            public Object call() throws Exception {
                // do something in thread
                return null;
            }
        });
        try {
            Object res = futureTask.get();
        } catch (InterruptedException e) {
            throw new RuntimeException(e);
        } catch (ExecutionException e) {
            throw new RuntimeException(e);
        }
简单扩展:Future - RunnableFuture - FutureTask
对于Future的作用和功能直接看Future源码注解就能大概知道了/* A Future represents the result of an asynchronous computation. Methods are provided to check if the computation is complete, to wait for its completion, and to retrieve the result of the computation. The result can only be retrieved using method get when the computation has completed, blocking if necessary until it is ready. Cancellation is performed by the cancel method. Additional methods are provided to determine if the task completed normally or was cancelled. Once a computation has completed, the computation cannot be cancelled. If you would like to use a Future for the sake of cancellability but not provide a usable result, you can declare types of the form Future<?> and return null as a result of the underlying task. */ //Sample Usage (Note that the following classes are all made-up.) interface ArchiveSearcher { String search(String target); } class App { ExecutorService executor = ...; ArchiveSearcher searcher = ...; void showSearch(String target) throws InterruptedException { Callable<String> task = () -> searcher.search(target); Future<String> future = executor.submit(task); displayOtherThings(); // do other things while searching try { displayText(future.get()); // use future } catch (ExecutionException ex) { cleanup(); return; } } } /*The FutureTask class is an implementation of Future that implements Runnable, and so may be executed by an Executor. For example, the above construction with submit could be replaced by:*/ FutureTask<String> future = new FutureTask<>(task); executor.execute(future); /*Memory consistency effects: Actions taken by the asynchronous computation happen-before actions following the corresponding Future.get() in another thread.*/大概意思就是可以针对线程任务做取消、获取结果、判断是否取消成功。并且提供了一个简单的使用示例
ArchiveSearcher其中将Callable交付给了Future接口调用get获取结果。
而下面一小部分其实就是介绍了该部分FutureTask,并告知FutureTask是基础的Future的实现类
多线程常见用法
@Async
基于Spring AOP动态代理实现的多线程,这种实现方式往往只适合比较简单的方法,因为实际上这种方式实现的多线程,是将调用这部分方法的调用交给其他线程来进行处理,而原先的线程可以不被阻塞。这种方式简单,但是他也因为简单而存在一个问题。
Async默认情况下会将线程池交付给 SimpleAsycThreadExecutors 执行,但该执行器的本质是拿到一个线程任务就开一个新线程执行,而这样的线程处理方式,只要线程任务消费得不够快几乎百分百的会导致 堆外内存导致的OOM (unable to create native thread)
解决:我们可以通过使用@Configuration实现AsyncConfigurer接口,重写getAsyncExecutor创建自定义的线程池从而重写线程池。
CompletableFuture
Future接口的高级实现,是FutureTask的升级版,大概的介绍可以参考:多线程使用 - Async+CompletableFuture - LeticiaFENG Note
线程的管理
一般来说为了避免项目之中线程乱用,只要服务器压力稍微一大,那么就会导致导致服务器线程堆积就可能会出现一种OOM (java.lang.OutOfMemoryError: unable to create new native thread),关于这个部分,可以参考另外一篇笔记的介绍JVM及扩展内容介绍;当然除了我们本身的Java程序以外还会有其他的应用程序其实也会被影响到。
为了避免上述的问题,在实际项目之中,我们会通过使用公共线程池的方式来为项目提供统一服务从而避免该问题的出现。常见的线程池的创建方式有Java JUC (java.util.concurrent包) 提供的Executors可以直接生成的几种线程池,还有通过ThreadPoolExecutors。
Executors下的线程池
-
SingleThreadExecutor:只有一个线程的线程池,一般不会用来充当线程池来使用
源码上等同于 Executors.newFixedThreadPool(1)
-
CacheThreadPool:将创建使用完毕的线程缓存起来,比较接近标准的线程池
public static ExecutorService newCachedThreadPool(/*ThreadFactory threadFactory*/) { return new ThreadPoolExecutor(0 /* 核心线程数 */, Integer.MAX_VALUE /* 最大线程数 */, 60L /*线程最大存活时间*/ , TimeUnit.SECONDS /*存活时间单位*/, new SynchronousQueue<Runnable>(), /*阻塞队列的一种(后面介绍)*/ threadFactory /*线程工厂,若不传入则默认DefaultThreadFactory*/); }问题:
- CacheTheadPool本身的最大线程数没有根据实际CPU做限制,而是配置的Integer.MAX_VALUE (这跟上文没有配置线程池时,一样有可能会出现特定OOM unable create new native thread的问题)
- 阻塞队列使用的是SynchronousQueue,本质上是一个虚假的阻塞队列,最多只能存入一个等待任务 (因为最大线程总数是Integer.MAX_VALUE,根本不需要考虑暂存线程任务)
顺带解释一下为什么CacheThreadPool不用 2 * Runtime.getRuntime().availableProcessors() 代替 Integer.MAX_VALUE,两者其实都是阻塞队列选型相对应的,SynchronousQueue导致必须马上拿走线程任务。
当然或许又会产生新的问题,那为什么不把阻塞队列也换了?其实说到底本质上Executors提供的线程池都是尽量保证简单上手即用的设计,这使得他们都显得并不是那么“考虑的很充分”。 -
FixedThreadPool:类似于CacheThreadPool,但是始终维持一定的线程数 (由创建时参数决定)
public static ExecutorService newFixedThreadPool(int nThreads, ThreadFactory threadFactory ) { return new ThreadPoolExecutor(nThreads, nThreads, /* 线程池固定线程数 */ 0L, TimeUnit.MILLISECONDS, /*设置0s但并不会回收,通过阻塞线程实现的*/ new LinkedBlockingQueue<Runnable>(), /* 阻塞队列的一种 */ threadFactory /*线程工厂,若不传入则默认DefaultThreadFactory*/); }问题:
- FixedThreadPool的线程总数始终是固定的,不会发生变化,因为没有动态调整能力,这使得FixedThreadPool并不太适合使用当项目公共线程池
- LinkedBlockingQueue在默认的情况下的默认边界大小是Integer.MAX_VALUE,这也导致我们如果直接使用LinkedBlockingQueue,仍然有可能会导致OOM,当然这个OOM就不再是unable to create native thread了,而是普通的java heap space。
-
WorkStealingPool (本质是ForkJoinPool):借用Fork/Join框架实现的线程池,利用工作窃取算法让空闲的线程从忙碌的线程手上窃取任务进行执行。(简单的来说,其实是Fork/Join框架下会对大线程任务的拆解出现的,在Fork/Join框架下会对大的线程任务拆解为多个小的任务后,再具体交付给某个线程进行处理,这些小的任务会被放到该线程预处理队列之中,此时工作窃取的机制就能从该等待队列中窃取任务给其他的线程进行处理) 有机会的话,在未来可以展开对该部分进一步了解和介绍
public static ExecutorService newWorkStealingPool(/*int parallelism*/) {
    return new ForkJoinPool
        (Runtime.getRuntime().availableProcessors(),  // 有意思的是WorkStealingPool却用了动态线程数,当然如果指定这里会变为parallelism
         ForkJoinPool.defaultForkJoinWorkerThreadFactory,
         null, true);
}
相比于CacheThreadPool或者FixedThreadPool,基于Fork/Join的WorkStealingPool的支持任务窃取和拆分的设计显然更加讨喜,但实际上仔细一想ForkJoin的机制就会明白,这种设计只适合CPU密集型的任务,也就是计算工作远远大于IO类型的任务的场景,而线程池本身作为项目之中的共享资源,应当更大层面上考虑全局的使用。
**总结:**WorkStealingPool设计计算型任务很好,但他不适合当共享线程池 -
SingleThreadScheduledExecutor:周期执行的单线程的线程池
public static ScheduledExecutorService newSingleThreadScheduledExecutor(ThreadFactory threadFactory) { return new DelegatedScheduledExecutorService // 单线程周期线程池装饰类,保证串行执行效果 (new ScheduledThreadPoolExecutor(1)); // 单线程指定 } // newScheduledThreadPoolExecutor public ScheduledThreadPoolExecutor(int corePoolSize) { super(/*super是ThreadPoolExecutor*/ corePoolSize, Integer.MAX_VALUE, // 由于DelayedWorkQueue无界队列的存在,Integer.MAX_VALUE不会起作用 DEFAULT_KEEPALIVE_MILLIS, MILLISECONDS, new DelayedWorkQueue(), /* Delay等待队列进行延迟消费 */ threadFactory /*线程工厂,若不传入则默认DefaultThreadFactory*/); }问题:
- 除了线程池本身只有一个线程根本不实用,一旦任务复杂设计长时间IO,只能耗着
- SingleThreadScheduledExecutor一样存在着线程任务堆积导致OOM(GC overheader limit exceeded、java heap space)的可能,这是由于DelayedWorkQueue导致的,DelayedWorkQueue的设计就是一个最大为Integer.MAX_VALUE的队列。他的也采用了我们熟悉的初始默认大小是16,但不足时在扩容的处理机制。
static class DelayedWorkQueue extends AbstractQueue<Runnable> implements BlockingQueue<Runnable> { ······ private void grow() { int oldCapacity = queue.length; int newCapacity = oldCapacity + (oldCapacity >> 1); // grow 50% if (newCapacity < 0) // overflow newCapacity = Integer.MAX_VALUE; // 如果出现扩容溢出,下一次最大大小为 Integer.MAX_VALUE queue = Arrays.copyOf(queue, newCapacity); } ······ } -
ScheduledThreadPool:周期执行的线程池
public static ScheduledExecutorService newScheduledThreadPool( int corePoolSize, ThreadFactory threadFactory) { return new ScheduledThreadPoolExecutor(corePoolSize, threadFactory); } // ScheduledThreadPoolExecutor public ScheduledThreadPoolExecutor(int corePoolSize, ThreadFactory threadFactory) { super(/*super是ThreadPoolExecutor*/ corePoolSize, Integer.MAX_VALUE, /* 要注意的是,这个最大线程数也是无意义的 也是DelayedWorkQueue导致的*/ DEFAULT_KEEPALIVE_MILLIS, MILLISECONDS, new DelayedWorkQueue(), /* Delay等待队列进行延迟消费 */ threadFactory /*线程工厂,若不传入则默认DefaultThreadFactory*/); }问题:
跟SingleThreadScheduledExecutor一样,他的阻塞队列用的是最大值为Integer.MAX_VALUE的DelayedWorkQueue (常被称为无界队列) ,也因此,本质上他也会导致OOM,当然OOM类型要么是GC overheader limit exceeded、要么是java heap space一类堆内存不足的报错信息。
ThreadPoolExecutors的线程池
就如同上文对Executors的线程池介绍一样,几乎所有JUC内置的线程池其实都不适合用来充当项目的公共线程池,并且这些线程池都不支持我们自定义拒绝策略、阻塞队列等。而满足这一点的,其实只能使用Executor创建内置线程池的实际工具:ThreadPoolExecutors。通过ThreadPoolExecutors我们可以定义线程池常见的参数
/* 常用的构造函数 */
public ThreadPoolExecutor(int corePoolSize,
                          int maximumPoolSize,
                          long keepAliveTime,
                          TimeUnit unit,
                          BlockingQueue<Runnable> workQueue,
                          ThreadFactory threadFactory,
                          RejectedExecutionHandler handler) {
    if (corePoolSize < 0 ||
        maximumPoolSize <= 0 ||
        maximumPoolSize < corePoolSize ||
        keepAliveTime < 0)
        throw new IllegalArgumentException();
    if (workQueue == null || threadFactory == null || handler == null)
        throw new NullPointerException();
    this.corePoolSize = corePoolSize;
    this.maximumPoolSize = maximumPoolSize;
    this.workQueue = workQueue;
    this.keepAliveTime = unit.toNanos(keepAliveTime);
    this.threadFactory = threadFactory;
    this.handler = handler;
}
-
corePoolSize:核心线程数
-
maximumPoolSize:最大线程数
根据《Java并发编程实战》一书中P140-P141,对设置线程池大小的介绍,我们可以知道针对不同类型的任务,我们配置线程池可以根据线程任务的主要类型来做适配配置。针对CPU密集型、IO密集型,综合型都会有所不同。
针对计算密集型,推荐设置为 CPU 线程数 + 1
针对IO密集型,推荐设置为 2 * CPU 线程数
而综合类型推荐通过测试推出当前项目的线程池数量:CPU线程数 * 利用率 ( 1 + 计算时间 / IO等待时间)原文如下:
比较理想的最佳设计方案是,当前项目的服务独享一台服务器,这样在项目最初时,可以设置核心线程数为:CPU线程数 + 1 ,最大线程数为 2 * CPU线程数。
并通过一定时间内,通过利用OpertaionSystemMXBean下的getSystemLoadAverage采集CPU线程利用率,再通过在项目之中,通过定时任务每隔一段时间采集一次CPU线程利用率、而针对IO时间,我们可以通过利用Mybaits的拦截器、利用静态代理@Aspect做拦截调用方法进行计算,而CPU时间可以通过总体时间 - IO时间做一个简单的计算。
最终将线程池的核心线程数换成CPU线程数 * 利用率 ( 1 + 计算时间 / IO等待时间) 并将最大线程数换成 2 * CPU线程数。 -
keepAliveTime:最大存活时间
可以根据实际情况做配置,比如短时间任务比较多,常见是配置为30S - 60s -
TimeUnit:最大存活时间的时间单位
-
BlockingQueue:阻塞队列,常用值如下:
-
ArrayBlockingQueue:基于数组构成的阻塞队列,基于固定长度的数组来作为Queue提供线程任务的装载。并通过ReentrantLock做并发控制 + Condition做线程完成任务的通信机制,一旦当前工作线程完成线程任务就通知阻塞队列提供下一个任务。
-
LinkedBlockingQueue:基于链表构成的阻塞队列,跟LinkedList类似,而在线程安全控制方面又跟ArrayBlockingQueue实现方式是一致的,也是通过ReentrantLock做并发控制 + Condition做线程的通信。
LinkedBlockingQueue在声明的时候,必须显式的固定他的容量,否则最大容量将是 Integer.MAX_VALUE,当出现长时间任务堆积,就会导致OOM (java heap space、GC overhead limit execeeded)的出现。 -
SynchronousQueue:虚假的队列,只能接纳一个任务,然后马上交付出去,除非是特殊场景用于要求必须马上处理的线程任务的线程池。否则几乎没见过
-
PriorityBlockingQueue:具有优先级的队列,可以自定义任务优先级使其消费顺序可以自定义的场景。
同样需要注意的是,他的最大容纳大小是Integer.MAX_VALUE,并且是动态扩容的机制,这也使得用它来充当阻塞队列自然是要冒OOM风险的。在《Java并发编程实战》一书中 第十章 第三节 P180-181,同样提及到,设置线程任务的优先级对其消费优先级做定义在一般场景下并不是一个明智的选择,这往往会导致饥饿问题,特别当出现拥锁线程的优先级低长期无法获得CPU执行的机会的时候,往往会导致资源长期锁定,反而会降低性能。
这也是为什么,在许多的自旋处理的代码之中,往往会通过使用Thread下的sleep和yield/yieldAll或者阻塞唤醒机制,让其他线程有机会获得CPU使用权,因为我们的服务本身始终是一个整体,过度考虑某一些业务的线程优先级的话,往往会导致适得其反。
原文如下:
-
DelayedWorkQueue:为实现定时任务的编写的延迟队列,它的实现跟DelayQueue一样。需要注意的是DelayedWorkQueue他最大容量为Integer.MAX_VALUE。因此如果想要基于它做任何线程池配置或者是直接利用它但延迟消费的效果都是需要注意OOM的可能。
当然一般来说也没有谁会通过Java自带的周期线程池来实现定时任务的执行效果。也因此我也不打算详细来介绍这个队列了 (并且值得一提的是,除了SingleThreadScheduledExecutor、ScheduledThreadPool之中用到了这个延迟阻塞队列以外,没有其他的用过...)
-
-
ThreadFactory:线程工厂 常用值 Executors.defaultThreadFactory()
-
RejectedExecutionHandler:拒绝策略,常用值如下:
- TheadPoolExecutor.AbortPolicy 终止策略,如果超过阻塞队列满、最大线程数也达到了,那么将拒绝接收新的线程任务,报错 RejectedExecutionException 。
- TheadPoolExecutor.DiscardPolicy 抛弃策略,该策略直接抛弃新尝试执行的线程任务
- TheadPoolExecutor.DiscardOldestPolicy 抛弃最老策略,该策略抛弃当前阻塞队列之中最老的一个线程任务
- TheadPoolExecutor.CallerRunsPolicy 调用者执行策略,简单来说就是干不了,你自己干。
- UserDefinedPolicy (自定义类实现RejectedExecutionHandler接口,重写方法即可)
需要注意的是在当前的互联网环境下,仍然只依靠该公式来计算线程池的线程池已经不太合适,这也导致了动态线程池和一些其他理论的出现,以后有机会会补充该部分的内容。
线程安全
在线程安全方面,我们可以先从较为基础的单个Java应用服务作为出发点先做一些简单的介绍,随着作用范围的扩大来进行介绍。(直接从Java JUC(java.util.concurrent包)来介绍容易混乱,个人觉得不如这种介绍,按照级别来介绍更符合人的思维方式)
单服务(单机)服务下的线程安全
在单服务的上实现线程安全其实需要结合一定的计算机底层原理,从底层到代码块级别对线程安全实现做介绍。
原子命令(原语)级别的线程安全
针对原子命令级别的线程问题,其实主要有三种类型的问题,1. 保证原语不可再拆、2. 避免指令重排导致线程不安全 3. 避免CPU N级临时缓存可能会导致的线程安全问题。这三个问题可以简述为遵守AOV原则(Atomic、Order、Visible),也因此AOV原则是多线程能够顺利执行的基础原则。只有满足该原则的情况下,我们才能说他是线程安全的。
Java为了实现原子命令级别的线程安全,制定了一些标准,这些标准和其他的一些规则一并被称为 JMM (Java Memory Model)
- Atomic(原子性):实际上是保证单个原子操作本身是不可以做进一步的拆分的,在Java代码之中这一类的操作类似于 a = 10 变量赋值等,我们普遍理解为一步完成的动作
- Order(有序性):有序性其实是指代的是前后的原子操作的顺序性,这个顺序性其实是指代CPU的一种优化方式导致的问题 (它会导致没有直接关系的两个原子命令执行顺序被打乱,而该行为会导致一些线程上下文切换会出现的一些线程安全的问题。
这种CPU执行的优化处理,实际上被称为“指令重排”,而这个部分其实在 指令重排笔记 中我已经做了介绍,核心解决方案其实就是 happen-before 处理的 [规定某个行为必须在某个行为之前,从而限定了重排的顺序] )
有序性这个部分其实放到原子命令级别的这一部分其实不太合理,但把它拆出去也怪怪的 - Visible(可见性):有序性问题其实是由于线程操作对象时的副本与实际堆内存对象值需要保持一致性导致的。简单来说就是如果两个线程都在修改某个值,怎么保证另外一个已经加载缓存到CPU缓存的线程知道另外一个线程可能存在的修改结果的值,从而避免修改丢失的问题。
(注意这里的线程操作对象时的副本不是ThreadLocal,而是指代线程在操作对象时会将对象加载到CPU的N级缓存中的缓存对象,不要混淆了)
解决方案:其实是指定了线程操作对象的一整套流程 + 读、写屏障的标准,再由硬件厂商做具体的实现解决的。- 针对单次修改的并发控制:会通过 lock -> read -> load -> use -> assign -> store -> write -> unlock 流程进行修改。
- 保证对象副本同步:定义了“屏障”的概念,依托于标准化的修改流程中的read 和 write操作触发屏障机制,因此在线程上下文切换之后,获得CPU使用权的线程就能得知自己做过加载的对象有被修改的可能,需要重新从堆内存之中加载 (CPU拷贝)。
标准的符合AOV原则的原子性线程安全控制的就是我们熟知的 volatile 关键字,它的实现就依靠在 happen-before 和 读写屏障上。当然在其他的一些场景下,也有用到这些机制。比如以Parnew + CMS为代表的新生代回收器 感兴趣的可以阅读我的另外一篇笔记 GC回收器深入深出
对象级别的线程安全
首先明确一点,对象级别的线程安全问题其实是指代对象类内部方法操作的线程安全,本质上等同于代码级别的线程安全,但对于我们平常开发来说,面对并发问题的时候,我们经常会使用 ThreadLocal做线程变量副本 或者 JUC 下的一些线程的线程安全基本数据类型类和集合类 来开发,而不是全都由我们自己写。
为什么不能通过volatile实现多原语线程安全?volatile 不保证对象线程安全 - 不保证代码块的原子性:在原子级别的线程安全的实现之中,我们其实已经介绍了一个重要的关键字 volatile ,通过它我们可以将保证对象的可视性,但只保证多线程的可见性,它并不能保证值操作的原子性。volatile的经典问题:i = i + 1 以及 i++ ,实际上可以拆为两步,i + 1和 i 赋值,所以只依靠volatile其实是不行的,这个道理一样可以扩展到对象集合上。
ThreadLocal
使用ThreadLocal来解决线程安全问题的方式,其实就是让每一个线程都拥有自己的操作对象,不同的线程操作的对象完全是独立的,自然就不存在所谓的线程安全问题,当然这种方式其实要求对象本身不是真正意义上的共享性对象。
ThreadLocal其实理解起来非常简单,他就是一个入口 (它在堆中只是一个哈希值) ThreadLocal源码中threadLocalHashCode 、 nextHashCode、HASH_INCREMENT 魔数 可以佐证 ,不同的线程可以通过ThreadLocal获取到自身的ThreadLocalMap (ThreadLocalMap其实是Thread的成员变量),该Map跟我们熟悉的HashMap是一样的都是记录Entry,甚至他的初始大小和扩容(2^n)都是一样的,但它有两个点是比较特殊的:
-
ThreadLocalMap中所有的Entry的key都是ThreadLocal,而value则为我们的隔离对象。
-
ThreadLocalMap的Entry 继承 WeakReference 弱引用,这使得ThreadLocalMap的效果是,只要当前线程不再使用ThreadLocal,那么根据弱引用原则Entry的Key随时都会被GC回收。但Entry的Value是我们在填入的显然的它本身是一个强引用。因此实际结果来看,只有Key是弱引用,而Value却不是。为什么会Entry设计成弱引用,而不是强引用呢?
先贴一下源码
/*ThreadLocalMap is a customized hash map suitable only for maintaining thread local values. No operations are exported outside of the ThreadLocal class. The class is package private to allow declaration of fields in class Thread. To help deal with very large and long-lived usages, the hash table entries use WeakReferences for keys. However, since reference queues are not used, stale entries are guaranteed to be removed only when the table starts running out of space.*/
static class ThreadLocalMap {
    static class Entry extends WeakReference<ThreadLocal<?>> {
        /** The value associated with this ThreadLocal. */
        Object value;
        Entry(ThreadLocal<?> k, Object v) {
            super(k);
            value = v;
        }
	······
我们知道ThreadLocal存在的意义就是用来存储当前线程的隔离对象,那他的生命周期最大也应该只是当前线程存活的生命周期。为了避免由整个Entry由于强引用效果导致在当前线程销毁后仍然存在,不断堆积导致的OOM,JDK官方将Entry继承了WeakReference。
-
ThreadLocal的内存泄露 ThreadLocalMap的Value无法回收导致的内存泄漏 的 OOM (java heap space / Gc overhead limit exceeded)。
根据上面提到的ThreadLocalMap的Entry 继承 WeakReference 弱引用,这使得Entry会在线程不再调用它的时候被GC回收器回收。但Entry的Value是我们在填入的,那么他必然是一个强引用,如果存在大量线程的堆积,一样会OOM。
解决也很简单,只要用完了该value之后,调用TheadLocal.remove显式移除即可。
JUC
实际上要保证变量的线程安全一样是通过锁机制来处理的,而JUC给出的答案是乐观锁的经典实现方案 - CAS 来实现基本数据类型的线程安全。
JUC基本数据线程安全类
针对基础数据类型,JUC的实际上都是通过UnSafe / VarHandle类下的compareAndSetInt方法利用CAS + volatile实现的线程安全。包括有:AtomicBoolean、AtomicInteger、AtomicIntegerArray (对整个整体做CAS)、 AtomicLong、AtomicLongArray、LongAdder*( AtomicInteger / AtomicLong高并发版本 - 通过拆分多个long值解决高并发计数,实际计算时再统计和)*
两个问题:
-
为什么没有AtomicByte、AtomicShort、AtomicFloat、AtomicDouble?
从Java官方的说法来看没有这些的Atomic实现,是因为这些类型本质上不常用,并给出代替方案。原文如下:
For example, there is no atomic class for representing
byte. In those infrequent cases where you would like to do so, you can use anAtomicIntegerto holdbytevalues, and cast appropriately. You can also hold floats usingFloat.floatToIntBitsandFloat.intBitstoFloatconversions, and doubles usingDouble.doubleToLongBitsandDouble.longBitsToDoubleconversions. -
UnSafe 和 VarHandle是什么,区别是什么?
UnSafe和VarHandle(变量句柄)其实都是非常底层的操作类,内部多个方法都是直接通过对内存地址进行的操作 (putInt、arrayBaseOffset)、CAS的并发控制实现 等等,可以理解为底层操作的封装类。
区别在于:VarHandle(变量句柄)是JDK9的新API,他出现的目的其实是为了代替UnSage,这是由于UnSafe的危险性,UnSafe可以类似于C语言一样,指定内存做手动的分配,而这部分分配的内存,完全不受限于JVM,并且不会被GC回收器回收,而且他的一些不恰当的时候会破坏JVM的内存安全,导致JVM实例崩溃。VarHandle(变量句柄)则是将它从操作系统的层面拉回到JVM的应用层面了,当然VarHandle(变量句柄)内有一些方法还是通过UnSafe实现的。
(其实就是将程序设计拉回到C / C++一样的更为底层的实现了,而这相当考验程序员的能力)
JUC集合线程安全类
JUC下的线程安全集合有两种实现方案,第一种是基于 CopyOnWrite ;第二种是基于 锁机制
-
CopyOnWrite:简言意赅,其实就是在发生并发写的时候,直接拷贝一个副本出来提供查询阅读。
代表集合:CopyOnWriteArrayList、CopyOnWriteArraySet (需要注意的一点,CopyOnWriteArrayList底层存储是数组,一旦调用add的时候,实际上是重新通过JVM以指针碰撞 / TLAB的方式申请一块数组地址 n + 1,再将数据拷贝过去;而如果是修改操作,也是需要重新申请内存 -> 也就是每一次修改操作,其实都是要花费新内存来实现的)
两者其实都是通过在修改方法之中通过 synchronized 加锁,并创建对象副本提供实际查询 (也就是实现所谓的同时读写) ,另外值得一提的是CopyOnWriteArraySet其实是利用CopyOnWriteArrayList实现的,他们底层都是数组,需要的时候再去申请。
稍微贴一下源码
// CopyOnWriteArrayList 实现 (add -> addIfAbsent(负责扩容 / 实际插入处理)) private boolean addIfAbsent(E e, Object[] snapshot) { synchronized (lock) { Object[] current = getArray(); int len = current.length; if (snapshot != current) { // Optimize for lost race to another addXXX operation int common = Math.min(snapshot.length, len); for (int i = 0; i < common; i++) if (current[i] != snapshot[i] && Objects.equals(e, current[i])) return false; if (indexOfRange(e, current, common, len) >= 0) return false; } Object[] newElements = Arrays.copyOf(current, len + 1); newElements[len] = e; setArray(newElements); return true; } } // CopyOnWriteArraySet 实现完全基于CopyOnWriteArrayList -
锁机制:
-
乐观锁:我们可以通过使用最常见的 CAS (Compare And Sweep) 实现线程安全 详细悲观锁介绍在后续会展开细说
ConcurrentLinkedDequeue、ConcurrentLinkedQueue、ConcurrentSkipListMap、ConcurrentSkipListSet本质上都是通过CAS的方式来实现的线程安全,但在具体上会有些不同。
-
队列结构 - ConcurrentLinkedDeque 和 ConcurrentLinkedQueue
ConcurrentLinkedDeque 和 ConcurrentLinkedQueue是通过UnSafe / VarHandle(变量句柄)的原子CAS + Michael & Scott无锁算法实现线程安全
(Michael & Scott无锁算法:简单来说是针对队列这种特殊数据结构不安全只发生在首、尾两个节点的特性实现的无锁线程安全,在不详细介绍时,简单的可以认为是在头、尾两个节点上做CAS处理)
有兴趣了解该算法的可以参考论文原文:Simple, Fast, and Practical Non-Blocking and Blocking Concurrent Queue Algorithms问题:在使用上值得一提的是,ConcurrentLinkedDequeue、ConcurrentLinkedQueue两个线程安全的Queue的最大长度都是Integer.MAX_VALUE,也说明了在极端场景下几乎是一定会出现OOM
-
Entry键对值类型结构 - ConcurrentSkipListMap、ConcurrentSkipListSet (如果不记得SkipList是什么可以参考另外一篇笔记 SkipList-跳表)
在不同的JDK版本之中,对于ConcurrentSkipListMap的实现是不太一样的,比如在Java8及之前其实是通过AtomicReference实现的线程安全,而在JDK9之后由于varHandle (变量句柄)的引入对他的实现做了一定的优化调整。
但不管是哪一种具体实现都好,本质上的其实都是针对每一个Node做CAS竞争的方式来实现并发修改的 (其实主要就是在修改Node、right Node探寻、left Node探寻、Head、Last时做 CAS),当然具体的CAS操作其实是交给了UnSafe (compareAndSwapObject、objectFieldOffset) / VarHandle (acquireFence、releaseFence、fullFence)做原子实现的。
如果有兴趣,以后可能会稍微深入介绍一下Unsafe和VarHandle的具体方法,但感觉过于底层可能未必会去详说
-
-
悲观锁:Lock (ReentrantLock、ReentranReadWriteLock、Synchronized) 详细悲观锁介绍在后续会展开细说
ConcurrentHashMap JDK1.6 以分段 + ReentrantLock实现的 。(JDK1.8之后更改为区间 + Synchronized)。关于ConcurrentHashMap其实有点老生常谈的感觉,毕竟一堆面试题会对它做重点介绍。但无论如何还是得稍微谈一下,实际上ConcurrentHashMap本质上是针对HashTable 和 Collections.synchronizedMap的改进实现。
早在JDK1.0 HashTable作为基础Map Entry结构就已经存在了,跟其他语言类似的它甚至都被划分到Dictionary包下。但HashTable他的性能差的问题也非常明显,主要其实就是差在他的 “锁太重” ,换种说法有点类似于 “过激” ,我们都知道其实一般场景下我们并发往往程度并不高,而且经常是自己给自己重入。但HashTable线程安全的实现,却是几乎在所有有可能会出现并发问题的方法上统统加上synchronized,而我们也知道1.6之前Synchronized甚至是无脑直接 JVM Monitor Enter Exit。可想而知,HashTable的并发性能会如何。
针对这一问题,我们都知道在代码之中如果想要让涉及到加锁的程序性能能得到提升,无非就是以下几种办法:
- 降低锁粒度 (减少锁时间和作用区域)
- 并发强度不高的场景下,用乐观锁代替悲观锁
- 锁消除:将没必要加锁的代码块去掉锁
- 特殊场景下,通过读写锁直接替换独占锁
JVM的优化思路其实也是大概如上,在设计ConcurrentHashMap的时候,也是大概根据上面的原则做的设计。也就出现了1.6之前的ConcurrentHashMap (基于1、2 [当然了JVM会自动做锁消除])。
针对锁粒度问题,通过分段加锁的方式将加锁的范围进行了限制。值得一提的是,这个时候的Segment(分段),默认的情况下该段的数量是 16 个,如果有需要可以在创建ConcurrentHashMap的时候指定数量。
针对并发强度不高,锁强度过度问题上,由于在1.6之前 Synchronized 过于拉胯,也不够灵活,所以实际加锁的方式采用的是基于AQS实现的ReentrantLock,并且是默认的非公平锁状态,关于这部分会在后面介绍代码块的线程安全时介绍,这里就简陋的提供一个信息,ReentrantLock其实内部的state重入记录和exclusiveOwnerThread竞争用到了CAS,其实也相当于引入CAS做了一定程度的优化 (虽然小,但还算是有)。
面对读操作,ConcurrentHashMap通过voliate的修饰保证了读不用加锁。所以,实际上在早期的ConcurrentHashMap之中数据结构的底层是长度为十六的Segment数组,而这些Segment的内部又包含有实际的哈希表结构。(这一点其实有一点类似于分布式一致解决方案的 Hash环,当然本质上其实更像Hash槽 也从侧面看出其实都是拆分的处理方案)
看起来,似乎ConcurrentHashMap在这个时候已经很好了,那为什么还要针对他做优化呢?
成也萧何败萧何,ConcurrentHashMap独立层面上最大的优化,其实就是引入Segment,但Segment首先是默认的情况下只有16个,哪怕是建的时候我手动显式指明更多,但对象在后续使用扩展时还是会带来并发的限制。这个分段的设计,还对维护、size方法统计数量(要遍历Segment统计) 等都带来了不便。
所以,也就出现了经典的,1.8针对ConcurrentHashMap做的优化和调整。主要包括以下内容:
针对并发的层面上:
- 底层从Segment改为了Node数组 (锁的粒度从Segment变为单一的Node)
- 锁的方式从ReentrantLock改为Synchronized,利用1.6之后Synchronized重大优化中的CAS进一步提升性能 (锁消除 + 低并发烈度下 CAS)
- 并发扩容做了其他线程协助迁移的处理
- 1.6 Size的统计改为了基于 baseCount (无竞争时) 和 CounterCell[] (解决并发时不同线程addCount的压力,根据hash值对应到某个index 跟LongAddr非常相似) 数组来存储大小
其他层面上的优化则类似于HashMap从1.7 -> 1.8的改进,包括并且不仅限于:哈希碰撞从单纯用链表做拉链法改为引入红黑树进一步提升性能、元素index的计算等。
-
代码级别的线程安全
在对象级别的线程安全其实已经提到了,要做到多原子(原语)操作的原子性,只可能通过锁机制。常见的锁机制从理论上来说有两种:乐观锁和悲观锁
乐观锁 - CAS
最经典的一种非锁算法的其实就是通过CAS实现的,当然CAS在上文之中介绍也不少。这个说起来相当简单,其实就是在业务代码进行处理之前先将要被修改的数据的值先查出来 (本质上等同于快照) 。经过业务代码进行修改之后,在做数据更改提交的时候,先检查值是否发生过改动,如果跟原先的值不一样了那么此次改动将被撤销一般是直接回报操作失败,让用户重新操作,当然如果跟原先的值一样,那么将会允许他做提交处理。当然,在实际场景下只对比值进行操作显然是不行的,往往很有可能会出现ABA问题。
ABA问题:经典的就是ABA问题,本质上其实就是指代在我们业务代码处理时,有其他的线程完成了修改和最后的提交的工作,将原先的值由 A (也是快照的值) 更改为B,又有一个事务将B值重新改为A值。对于处理完业务代码准备提交的事务来说看起来是同一个A,但其实完全不是一回事。
解决:解决ABA的问题的方式也非常简单,无非就是将对比的值从实际修改的值本身替换为版本号对比,当然这需要我们对实际数据添加一个字段作为版本号记录的方式来处理。
CAS的局限性:
- 在实际的代码实现之中,CAS其实往往是通过自旋 (轮询) 的方式来检查是否可以直接提交修改的,这种方式如果不做任何的处理措施往往会对CPU造成一定的压力影响,也因此实际上往往会限制自旋的次数,并通过 Thread.sleep / yield 、Object wait - notify / notifyAll、JUC下的Condition、LockSupport等等让其限制轮询的次数避免造成性能压力。
- CAS的方式因为本质上是无锁的,这样的修改导致了实际上很有可能会出现轮询后发现数据已经被修改过了,无法提交只能重试,如果并发量达到一定的量,这使得实际上用户使用的时候,非常容易造成一些不良的体验。(例如多人同时修改Excel表格类似的业务)
悲观锁(Lock & Synchronized)
- Lock接口下 ReentrantLock
- 关键字Synchronized
- ReentranReadWriteLock - StampedLock
- Semaphore(1) waiting······
早期Synchronized
我们要从历史的角度来Java之中最初的锁机制其实是通过Synchronized来实现的加锁。我们都知道Synchronized的实现比较尴尬,只有单一的重量级锁的实现方式,本质上就是通过JVM [C++]调用Monitor [ObjectMonitor] Enter Exit指令对来实现的线程安全。而这一对指令集底层实现逻辑,要更详细介绍的话则需要稍微介绍一下OS本身提供的线程安全的实现机制。
我们都知道实际上不管是OS还是我们具体语言和实际的实现都好,往往实现锁(非乐观锁)本质上其实都是通过不同的线程去竞争某个公共变量的方式,并禁止了该信号量拥有后的可以抢夺的效果来实现线程安全的。而实际上OS之中也是类似的。
在Linux之中,就通过 Futex(Fast Userspace mutex),cmpxchg指令将用户空间中的一个整数值(32位)从 0 -> 1,并以此作为实际的加锁动作,并通过内核让其他线程进入到等待状态之中。等到拥锁线程完成了自己的所需要的操作之后,则可以通过futex_wake来唤醒等待的线程的任务。
在Windows之中,mutex其实是一个内核对象,CreateMutex可以用于创建mutex、并发的线程则可以通过使用WaitForSingleObject / WaitForMultipleObjects获取mutex、再通过ReleaseMutex释放mutex。但无论是哪一种都好,其实都是通过外部标记的方式来做处理。
在mutex的乐观自旋锁之中还引入了MCS锁,引入了一定的CAS加锁机制来提高性能,但毕竟由用户态向OS的内核态的mutex锁机制做处理,所以它的性能一定是不好的。
也就是因为1.0 - 1.4的Synchronized性能过差 (用户态 -> 内核态 -> 用户态来回切换、只有重量级锁这一部分),使得Java在Jdk5之中提供了ReentrantLock。
ReentrantLock
ReentrantLock的实现其实还是比较简单的,它的底层其实就是通过 AQS (AbstractQueuedSynchronizer)。在JDK源码中开头就是这样的一段介绍。(大部分人对ReentranLock的理解也基本可以在AbstractQueuedSynchronizer这段注解找到)。
ReentrantLock原理解释
-
AQS其实基于CLH(虚拟线程双向链表队列)
/*The wait queue is a variant of a "CLH" (Craig, Landin, and Hagersten) lock queue. CLH locks are normally used for spinlocks. We instead use them for blocking synchronizers by including explicit ("prev" and "next") links plus a "status" field that allow nodes to signal successors when releasing locks, and handle cancellation due to interrupts and timeouts. The status field includes bits that track whether a thread needs a signal (using LockSupport.unpark). Despite these additions, we maintain most CLH locality properties. */其实就是通过所谓的 CLH 其实简单的来看,就是一种比较另类、特殊的队列,他将并发竞争线程通过直接关联起来,并按照该顺序去竞争锁对象的方式来实现的并发控制和公平 (fairSync)、非公平锁(unFairSync)的实现,通过信号量来进行加锁和锁的释放,并通过超时、中断等机制的处理,通过LockSupport.park、unpark来控制下一个线程的唤醒等等。
-
AQS并发控制实现介绍
/*To enqueue into a CLH lock, you atomically splice it in as newtail. To dequeue,
you set the head field, so the next eligiblewaiter becomes first.*/
+------+  prev +-------+       +------+
| head | <---- | first | <---- | tail |
+------+       +-------+       +------+
Insertion into a CLH queue requires only a single atomic operation on "tail", so there is a simple point of demarcation from unqueued to queued. The "next" link of the predecessor is set by the enqueuing thread after successful CAS. Even though non-atomic, this suffices to ensure that any blocked thread is signalled by a predecessor when eligible (although in the case of cancellation, possibly with the assistance of a signal in method cleanQueue). Signalling is based in part on a Dekker-like scheme in which the to-be waiting thread indicates WAITING status, then retries acquiring, and then rechecks status before blocking. The signaller atomically clears WAITING status when unparking.
Dequeuing on acquire involves detaching (nulling) a node's "prev" node and then updating the "head". Other threads check if a node is or was dequeued by checking "prev" rather than head. We enforce the nulling then setting order by spin-waiting if necessary. Because of this, the lock algorithm is not itself strictly "lock-free" because an acquiring thread may need to wait for a previous acquire to make progress. When used with exclusive locks, such progress is required anyway. However Shared mode may (uncommonly) require a spin-wait before setting head field to ensure proper propagation. (Historical note: This allows some simplifications and efficiencies compared to previous versions of this class.)
A node's predecessor can change due to cancellation while it is waiting, until the node is first in queue, at which point it cannot change. The acquire methods cope with this by rechecking "prev" before waiting. The prev and next fields are modified only via CAS by cancelled nodes in method cleanQueue. The unsplice strategy is reminiscent of Michael-Scott queues in that after a successful CAS to prev field, other threads help fix next fields. Because cancellation often occurs in bunches that complicate decisions about necessary signals, each call to cleanQueue traverses the queue until a clean sweep. Nodes that become relinked as first are unconditionally unparked (sometimes unnecessarily, but those cases are not worth avoiding).
······
CLH queues need a dummy header node(虚拟的头结点) to get started. But we don't create them on construction, because it would be wasted effort if there is never contention. Instead, the node is constructed and head and tail pointers are set upon first contention.
······这一段的介绍其实直接指明了,AQS其实就是跟ConcurrentLinkedDequeue和ConcurrentLinkedQueue实现无锁线程安全的算法基础Michael-Scott队列非常相似通过较为特殊的方式实现了队列的无锁线程安全 (专注于队列头和队列尾的控制,甚至额外多个虚拟头结点都是一模一样的处理)
-
AQS公平锁和非公平锁的实现
A thread may try to acquire if it is first (frontmost) in the queue, and sometimes before. Being first does not guarantee success; it only gives the right to contend. We balance throughput, overhead, and fairness by allowing incoming threads to "barge" and acquire the synchronizer while in the process of enqueuing, in which case an awakened first thread may need to rewait. To counteract possible repeated unlucky rewaits, we exponentially increase retries (up to 256) to acquire each time a thread is unparked. Except in this case, AQS locks do not spin; they instead interleave attempts to acquire with bookkeeping steps. (Users who want spinlocks can use tryAcquire.)
这一段相当间接的介绍了ReentrantLock的非公平锁的实现,本质上就是在队列首个线程可以参与竞争,但是并非是百分百能够获得锁的,其他还没进入到队列之中的锁也一样能参与到竞争之中。按照官方的说法是,这有利于吞吐量、开销等性能指标的提高。并且值得一提的是,现在很多人都只记得面经之中的介绍的内容,但其实ReentranLock内部是包含有CAS的处理的,这段注解就已经表明了这点,最多CAS 256(2^8)次
-
共享性AQS / 非共享性AQS的具体实现
Shared mode operations differ from Exclusive in that an acquire signals the next waiter to try to acquire if it is also Shared. The tryAcquireShared API allows users to indicate the degree of propagation, but in most applications, it is more efficient to ignore this, allowing the successor to try acquiring in any case.
Threads waiting on Conditions use nodes with an additional link to maintain the (FIFO) list of conditions. Conditions only need to link nodes in simple (non-concurrent) linked queues because they are only accessed when exclusively held. Upon await, a node is inserted into a condition queue. Upon signal, the node is enqueued on the main queue. A special status field value is used to track and atomically trigger this.
Accesses to fields head, tail, and state use full Volatile mode, along with CAS. Node fields status, prev and next also do so while threads may be signallable, but sometimes use weaker modes otherwise. Accesses to field "waiter" (the thread to be signalled) are always sandwiched between other atomic accesses so are used in Plain mode. We use jdk.internal Unsafe versions of atomic access methods rather than VarHandles to avoid potential VM bootstrap issues.
Most of the above is performed by primary internal method acquire, that is invoked in some way by all exported acquire methods. (It is usually easy for compilers to optimize call-这一段介绍无非就是说AQS其实分为两种模式,第一种是共享模式,第二种是独享模式;大概介绍了一下是怎么实现的,并稍微介绍了一下CAS的实现,以及为什么使用了UnSafe的CAS而不是使用varHandles做实现 (避免潜在的VM引导问题)
其实AQS的使用非常常见于JUC之中的线程通信、并发控制(前面介绍的基本都没怎么用到,所以放到现在介绍了)。
共享性常见使用:LockSupport、CountDownLatch、CycleBarrier、Semaphore之中 (通过state重入次数实现的限制);
独享型常见使用:ReentranLock、阻塞队列(SynchronousQueue等) -
垃圾回收部分的优化(过于不重要,不多介绍了)
To improve garbage collectibility, fields of nodes not yet on list are null. (It is not rare to create and then throw away a node without using it.) Fields of nodes coming off the list are nulled out as soon as possible. This accentuates the challenge of externally determining the first waiting thread (as in method getFirstQueuedThread). This sometimes requires the fallback of traversing backwards from the atomically updated "tail" when fields appear null. (This is never needed in the process of signalling though.) /* AQS在垃圾回收的处理上的优化处理,会将离开列表的节点尽快的回收掉 */
ReentrantLock加锁解析
Waiting······ (由于这部分很常见,先不写以后再写)
ReentrantLock解锁解析
Waiting······ (由于这部分很常见,先不写以后再写)
总结
跟OS的mutex互斥量来实现的线程安全相比,整个互斥的效果其实从OS降低到了当前的引用程序,避免了服务器状态的切换。 (当然这样安全互斥效果也仅限于当前程序,而非OS)。ReentrantLock使用AQS来进行实现,而AQS的底层实际上参考了Michael-Scott队列 AQS中包含了两个关键的参数 state(记录重用)、exclusiveOwnerThread(CAS修改对象)。本质上其实是通过针对state做CAS来实现的占用,在实际修改State成功之后,在设置exclusiveOwnerThread为当前拥锁线程。本质上也通过 CAS 实现了一定程度锁优化,而设置的exclusiveOwnerThread会用于重入判断。
总的来说,其实ReentrantLock是完全基于AQS来实现的,并且因为实现了Lock接口。并提供了扩展功能,这使得ReentrantLock支持 锁获取查询、拥锁线程检查、锁中断、超时、公平、非公平 (只需要在创建的时候传入true即可使用公平锁模式) 的实现。
static final class NonfairSync extends Sync {
        private static final long serialVersionUID = 7316153563782823691L;

        final boolean initialTryLock() {
            Thread current = Thread.currentThread();
            if (compareAndSetState(0, 1)) { // first attempt is unguarded
                setExclusiveOwnerThread(current);
                return true;
            } else if (getExclusiveOwnerThread() == current) {          // 重入判断
                int c = getState() + 1;
                if (c < 0) // overflow
                    throw new Error("Maximum lock count exceeded");
                setState(c);
                return true;
            } else
                return false;
        }

        /**
         * Acquire for non-reentrant cases after initialTryLock prescreen
         */
        protected final boolean tryAcquire(int acquires) {
            if (getState() == 0 && compareAndSetState(0, acquires)) {
                setExclusiveOwnerThread(Thread.currentThread());
                return true;
            }
            return false;
        }
    }
以下是ReentranLock的一个常见的使用模板,以后有需要可以参考该内容。
/* 常见使用模板 */
public class TemplateClass {
    private final ReentrantLock lock = new ReentrantLock(true / false); // 使用公平锁
    // 较为完整的使用示例
    public ResultModel bussineseMethod(ParamClass param) {
        try {
            ResultModel res = null;
            // 尝试在 5 秒内获取锁
            if (lock.tryLock(5, TimeUnit.SECONDS)) {
                try {
                    // Conduct business operations here.
                } finally {
                    lock.unlock();
                }
            } else {
                System.out.println("Could not acquire lock, try again later");
                return res;
            }
        } catch (InterruptedException e) {
            Thread.currentThread().interrupt();
            System.out.println("Operation was interrupted");
            return res;
        }
    }
    // 极简使用
    public int getStockQuantity() {
        lock.lock();
        try {
            return stockQuantity;
        } finally {
            lock.unlock();
        }
    }
}
Semaphore(1)
既然大概简述了一些基于AQS实现线程安全的ReentrantLock,那么也可以再介绍一个同样基于AQS可以实现线程安全的方式。找Semphore的注解之中就提到了这种互斥的实现方式。
A semaphore initialized to one, and which is used such that it only has at most one permit available, can serve as a mutual exclusion lock.
但是需要注意的是Semaphore实现的,但是他不能支持 中断、Condition机制、重入等效果。Semphore同样在基于AQS的基础上提供了公平锁、非公平锁的实现方案。但为了避免出现线程饥饿的问题,官方在注释之中建议配置为公平锁。实际上Semaphore使用在一些需要限定资源使用的场景。具体Semphore的使用案例会在后续线程间通讯之中介绍,这里仅提供一个简单的将共享量限制为1的示例
// 最简单的案例
public class ConcurrentSecurity {
    private final Semaphore semaphore = new Semaphore(1);

    public void concurrentTask () {
        // do some preliminary work
        try {
            semaphore.acquire();
            // do some Synchronous operation
            semaphore.release();
        } catch (InterruptedException e) {
            throw new RuntimeException(e);
        }
    }
}
public class concurrentCall {
    public static ConcurrnetSecurity cs = new ConcurrnetSecurity();

    public void concurrentCall(){
        for(int i = 0; i < X; i++) {
            executor.sumbit(() -> {
           		  cs.concurrentTask();
        		}
        	});
        }
    }
}
现在的Synchronized
在1.5之后Jdk官方最终并没有选择完全抛弃Synchronized,而是尝试几乎照抄ReentrantLock的优化,将标记位、CAS的实现完全改进到了Synchronized的实现底层之中。值得一提的是1.6之后的Synchronized实际牵扯到三个部分,第一个是线程中的锁记录、第二个是锁对象的Mark Word、第三个则是JVM Monitor [C++ ObjectMonitor]。由于JVM Monitor其实完全属于重量级锁的内容,这部分将在重量级锁内进行介绍。
锁组成部分
-
对象头支持
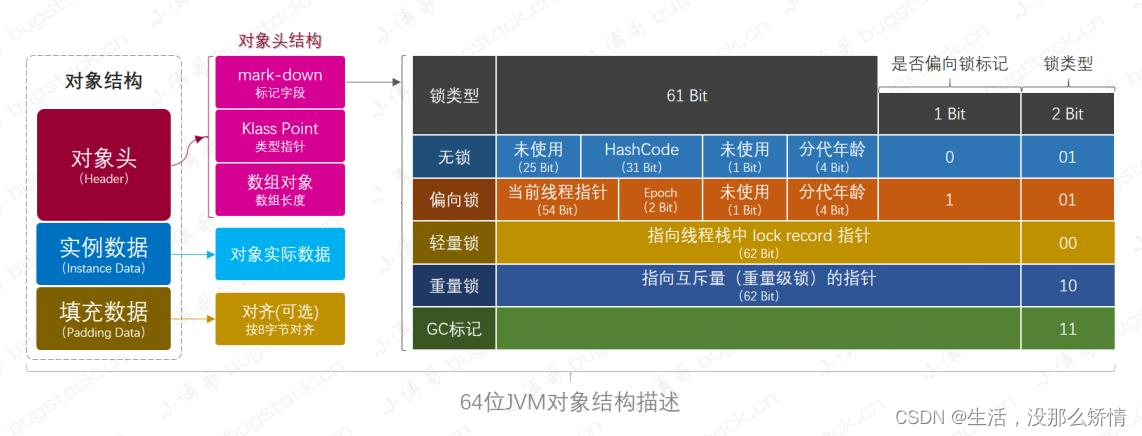
不得不说的是,Java官方对Synchronized的支持还是非常夸张的,为了能够更好的支持甚至直接在对象头中(默认16个字节,压缩指针12字节,但在自动扩展的基础上还是会变回16字节),让出过半的字节,超过8字节的空间来实现。 (MarkWord + 偏向锁标记为(1bit) + 锁标记为(2bit) MarkWord大小62 - 63变动) = 64bit
- MarkWord:充当的实际上就是ReentrantLock中exclusiveOwnerThread的作用
- 偏向锁标记位:其实就是记录是否开启偏向锁。而在实际JVM之中其实可以通过配置来关闭偏向锁
- 锁标记位:有两个bit位,在不同的值下代表着不同的信息。当值为:00的时候代表是轻量级锁状态;01的时候是无锁的状态;10是重量级锁
(线程池的 ctl 也用到类似实现,感兴趣的自行百度 [本质上无非是做了信息压缩,典型整型压缩方式])
-
锁记录 (Lock Record)
主要包含两个部分:1. displaced_mark_word:用于存储锁对象的Mark Word的拷贝 2. owner:指向锁对象的指针
- displaced_mark_word 原MarkWord:用于解锁后将做锁释放
- owner 锁对象指针:为了方便拥锁线程能快速找到自己当前拥锁的锁对象做重入、解锁等等操作,构建了指向锁对象的地址。
Synchronized锁阶段
-
无锁
无锁阶段非常好理解,也非常简单其实就是Mark Word完全为空、偏向锁标记位0 / 1、锁标记位01、线程内的锁记录为空即可。
-
偏向锁 (Biased Lock)
在JDK1.6之中,为了进一步提高锁重入的处理性能,Java利用对象头的3bit锁标记,做了特殊的优化处理。
-
无锁 -> 偏向锁流程:
- 初始状态: 新创建的对象的 Mark Word 中的锁标志位为 "01",偏向锁标志位为 "1",表示可偏向但未偏向。
- 第一次获取锁: 线程通过 CAS 操作将自己的线程 ID 写入对象的 Mark Word。
- 后续获取锁: 如果 Mark Word 中的线程 ID 等于当前线程 ID,直接获取锁,无需任何同步操作。
- 偏向锁的撤销: 当其他线程尝试获取这个锁时,偏向锁会被撤销,升级为轻量级锁或重量级锁。
-
偏向锁升级:偏向锁只能处理无竞争下的线程安全的处理,并无法实际处理多线程竞争的场景,在真正出现多个线程并发处理的情况下,Synchronized就会将锁状态从偏向锁往轻量级锁进行加锁处理。
-
偏向锁撤销:实际上偏向锁撤销其实包含两种场景。
-
针对具体的某一个锁对象的偏向锁撤销
场景:当一个偏向锁对象被一个不是偏向线程的其他线程访问时,JVM 需要撤销该对象的偏向状态的过程。
流程:在STW之中,暂停拥有偏向锁的线程;然后撤销偏向锁,根据情况将锁升级为轻量级锁或重量级锁;恢复原先暂停的线程即可。 -
针对一类的锁对象的偏向锁撤销
场景:JVM检测到针对某一个类的对象充当锁对象的并发处理往往会频繁触发锁升级的时候 (超过40次 -XX:BiasedLockingBulkRevokeThreshold),会自动的针对这个类的对象关闭偏向锁的标记位,使得后续所有该对象的创建后的对象头都会变为无偏向锁支持的对象,这个机制又被成为批量偏向锁撤销。关于该功能其实涉及到一个JVM参数配置,JVM实际就是通过统计的方式来计算某个类的偏向次数的。-XX:+PrintBiasedLockingStatistics: 打印偏向锁统计信息
流程:首先在STW之中,将目前所有该类锁对象的偏向锁先进行撤销,然后在后续创建该类的对象时,又会根据对象创建流程初始化对象头时将其偏向标记为设置为不可偏向。(对象创建流程: [加载 -> 验证 -> 准备 -> 解析 -> 初始化] -> 内存分配(指针碰撞、TLAB、空闲内部列表) -> 零值初始化 -> 对象头设置)
-
-
批量重偏向:批量重偏向其实理解起来也很简单,就是当出现一批锁对象都被某个线程占用,该线程释放锁资源之后批量的转给另外一个线程。这个功能就被称为批量重偏向。
-
-
轻量级锁
在JDK1.5之中引入的优化,目前的实际效果其实等同于,只要在实际加锁的过程之中尝试修改偏向锁的Mark Word失败,那么就会触发轻量级锁,从结果来看轻量级锁其实就做了两件事,第一件事是在对象头创建锁记录,第二件事就是通过CAS尝试修改对象头的Mark Word。
-
偏向锁 -> 轻量级锁流程:
- 线程在自己的栈帧中创建锁记录(Lock Record)。
- 尝试使用 CAS 操作将对象头的 Mark Word 复制到锁记录中。
- 如果成功,则将对象头的 Mark Word 指向锁记录,表示线程获得了锁。
-
轻量级锁升级:如果 CAS 操作失败(表示有竞争)一般来说会尝试10次的自旋重试,值得一提的是如果此次锁获取成功,那么下一次自旋尝试获取锁的次数将会增加,如果说获取失败那么就会触发退避机制降低下一次自旋次数。而如果持续失败,则锁会升级为重量级锁。
-
轻量级锁释放:
- 尝试使用 CAS 操作将 Mark Word 从线程栈中的锁记录复制回对象头。
- 如果成功,则表示锁已经被释放。
-
-
重量级锁
重量级锁其实相当简单,实际上就是我们的1.5优化之前的Synchronized的加锁方式。无非就是通过调用JVM之中预编译的基于C++的ObjectMonitor的monitorenter、monitorexit指令集。
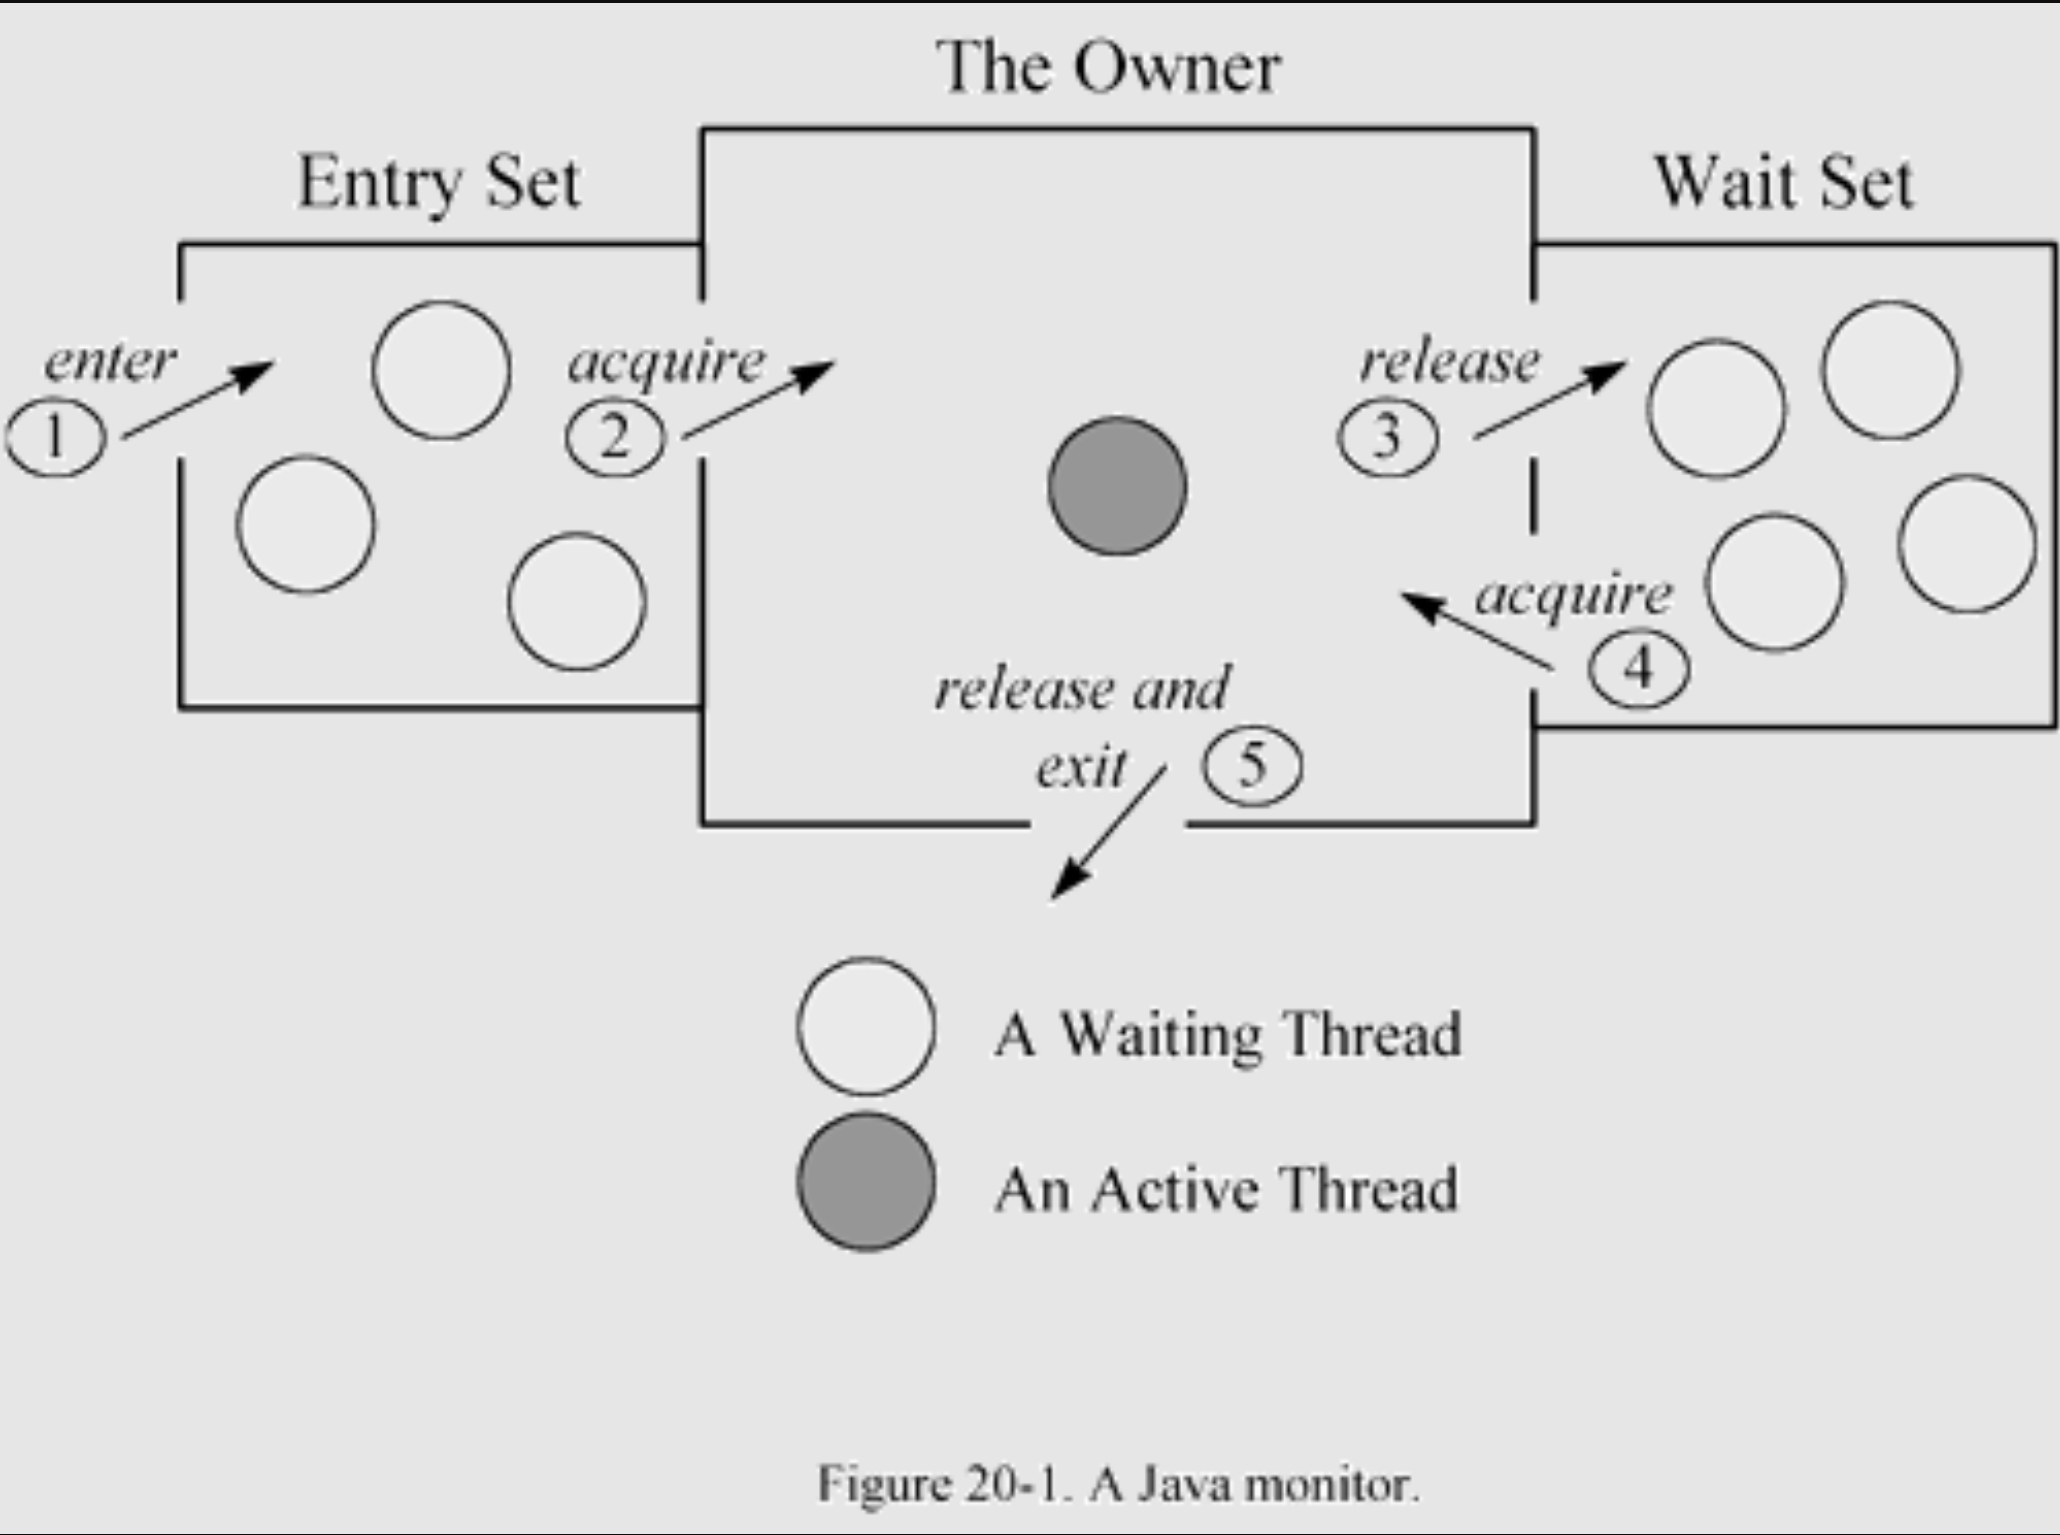
- entrySet集合:C++中AddWaiter方法使没有获得锁的竞争线程进入到entrySet中,他们会被OS操作系统先挂起(操作系统的park方法),然后等待拥锁线程释放锁后由操作系统调用unpark*(操作系统的unpark)*,而EntrySet实际上就是通过mutex来实现互斥。
- waitSet集合:C++通过WaitSet集合来管理调用wait方法的线程,一旦有notify / notifyAll则会唤醒WaitSet中的线程,使他们前来竞争
当然了entryList集合中线程实际获得锁的标记和互斥的,是OS的mutex机制,这点上面提到过了。这里就不再赘述了,这部分其实更多的是涉及到jvm底层和C++的代码部分,感觉没有必要细说。感兴趣的可以看看下面这篇技术文章 (该技术文档其实来源于 Inside the Java Virtual Machine - 深入Java虚拟机) 中第20章。Thread Synchronization and the Java Monitor
Synchronized加降锁总结
-
锁升级总结
所谓的锁升级其实根据Mark Word + 3bit的锁标记递增的逻辑,从并发的级别来看,实际上根据并发的程度,Synchronized的加锁程度也会有所区别,这跟上文的 偏向锁、轻量级锁、重量级锁 三段不同的加锁方式来实现加锁效果。
直接用图能非常好的解释这段锁升级的流程。
- 无锁 -> 偏向锁:无非就是由实际的线程获取锁对象进行锁获取动作操作,就会导致这段锁升级,这一过程甚至不需要发生CAS,而是单纯的设置一下线程指针即可
- 偏向锁 -> 轻量级锁:并发的线程数由单个转换为多个线程的时候,就会导致这段锁升级,发生这一过程往往是原本没有线程竞争的锁发生了竞争,这一阶段才是真正意义上的 CAS
- 轻量级锁 -> 重量级锁:并发的线程数变更多 CAS 争夺持续失败,超过10次之后,就会导致锁从轻量级锁升级为重量级锁
-
锁降级总结
对应着锁升级的机制,实际上往往会出现并发的程度后续持续降低,如果持续的维持重量级锁的机制往往也会在一定的程度上造成性能问题。
因此JVM还存在的锁降级的处理机制,针对锁降级的介绍其实相当简单。无非就是在JVM检查到对象锁并发程度低 ,再由JVM来将Synchronized锁状态往前回退。当然这些回退的处理部分都必须发生在STW之中。Safe point
实际上整个锁降级的处理其实要看具体的情况,如果是从重量级锁 -> 轻量级锁的降级,只会发生在 ObjectMonitor中的entrySet和waitSet全部清空之后,才会做降级处理。
而轻量级锁到偏向锁的降级则显得复杂一些,实际上JVM 会周期性检查锁跟踪锁的竞争情况,并根据该记录来决定是否将轻量级锁降为偏向锁。
而最终的偏向锁向无锁降级则相当简单,无非是在最后如果有需要可以直接翻源码,推荐OpenJDK,核心Synchronized文件是
src/hotspot/share/runtime/synchronizer.cpp / biasedLocking.cpp -
Synchronized优化为什么不改为AQS?
从根本角度来说,其实是因为历史发展导致的,最初Synchronized直接采用了C++ ObjectMonitor来进行实现,并且和Object wait - notify / notifyAll等线程通信机制有关系,几乎不可能在1.5 1.6的优化中改为AQS进行优化。
ReentrantReadWriteLock
JDK在1.5版本之中,推出针对ReentrantLock的优化方案,主要的优化其实是针对锁的粒度上做优化处理,而ReentrantReadWriteLock的其实是建立在ReentrantLock的基础上进一步做的优化,在前文提及的四种优化方式中属于典型的拆解为读写锁的方式做的优化处理,需要注意的是这种读写锁的优化主要体现在并发读的支持上,但这种并发读的支持其实是建立在同时没有写的基础上的,这显然的表明了,如果想要发挥读写锁的优化效果,那就必然要求读的处理远大于写的处理。
ReentrantReadWriteLock使用示例
考虑到ReentrantReadWriteLock使用的频率不高,先提供一个基础的使用模板来提供参考
private final ReadWriteLock rwLock = new ReentrantReadWriteLock();
private final Lock readLock = rwLock.readLock();
private final Lock writeLock = rwLock.writeLock();
// 读锁的使用
public void readMethod() {
    readLock.lock();
    try {
        /* do something */
    } catch (InterruptedException e) {
        Thread.currentThread().interrupt();
    } finally {
        readLock.unlock();
    }
}
// 写锁的使用
public void writeData(int value) {
    writeLock.lock();
    try {
        /* do something */
    } catch (InterruptedException e) {
        Thread.currentThread().interrupt();
    } finally {
        writeLock.unlock();
    }
}
读锁的实现
-
读锁加锁
ReentrantReadWriteLock将一个读和写的记录压缩到了同一个int之中,其中高16位表示读状态,高16位的值表示为获得读锁的次数。更加值得一提的是,这个int其实就是AQS的state。
/**
 ReentrantReadWriteLock在实现AQS的时候,就做了以下声明,直接指定了最大读并发线程数是 2^16
 Read vs write count extraction constants and functions. Lock state is logically divided into two unsigned shorts:
 The lower one representing the exclusive (writer) lock hold count, and the upper the shared (reader) hold count.
*/
static final int SHARED_SHIFT   = 16;         // 偏移量
static final int SHARED_UNIT    = (1 << SHARED_SHIFT);          // 偏移后上界
static final int MAX_COUNT      = (1 << SHARED_SHIFT) - 1;      // 读锁最大并发值
static final int EXCLUSIVE_MASK = (1 << SHARED_SHIFT) - 1;      // 写锁最大并发值
整个读锁的流程还是非常简洁的,关键方法无非就两个方法 tryAcquireShared + fullTryAcquireShared
/* Walkthrough:
	1. If write lock held by another thread, fail.
	2. Otherwise, this thread is eligible for lock wrt state, so ask if it should block because of queue policy. If not, try to grant by CASing state and updating count. Note that step does not check for reentrant acquires, which is postponed to full version to avoid having to check hold count in the more typical non-reentrant case.
	3. If step 2 fails either because thread apparently not eligible or CAS fails or count saturated,
   chain to version with full retry loop.
大概意思:
	1. 如果已经加了写锁,且不是自己,那么直接失败   (读写锁本身互斥)
	2. 否则,该线程有机会可以获取该锁。然后检查是否应该阻塞此次读获取 (是否应该公平锁阻塞),如果不需要阻塞,那么会通过CAS操作更新状态并增加计数,该工作不检查重入获取,重入处理交给 fullTryAcquireShared
	3. 如果第2步失败(线程不符合条件 / CAS 操作失败 / 计数饱和),则调用fullTryAcquireShared
*/
protected final int tryAcquireShared(int unused) {
    Thread current = Thread.currentThread();
    int c = getState();
    if (exclusiveCount(c) != 0 &&
        getExclusiveOwnerThread() != current)
        return -1;
    int r = sharedCount(c);
    if (!readerShouldBlock() && r < MAX_COUNT && compareAndSetState(c, c + SHARED_UNIT)) {
        if (r == 0) {
            firstReader = current;
            firstReaderHoldCount = 1;
        } else if (firstReader == current) {
            firstReaderHoldCount++;
        } else {
            HoldCounter rh = cachedHoldCounter;
            if (rh == null || rh.tid != LockSupport.getThreadId(current))
                cachedHoldCounter = rh = readHolds.get();
            else if (rh.count == 0)
                readHolds.set(rh);
            rh.count++;
        }
        return 1;
    }
    return fullTryAcquireShared(current);
}
可以看出来,只要没有已经被加写锁、不是公平锁读锁的线程数量过大,基本都交给tryAcquireShared处理掉了,当然如果没有成功,那么还会更具体的调用 fullTryAcquireShared 进行处理。
final int fullTryAcquireShared(Thread current) {
/*
This code is in part redundant with that in tryAcquireShared but is simpler overall by not
complicating tryAcquireShared with interactions between retries and lazily reading hold counts.
*/
    HoldCounter rh = null;
    for (;;) {
        int c = getState();
        if (exclusiveCount(c) != 0) {               // 写锁判断
            if (getExclusiveOwnerThread() != current)           // 判断是否为自己
                return -1;
            // else we hold the exclusive lock; blocking here
            // would cause deadlock.
        } else if (readerShouldBlock()) {             // 阻塞判断
            // Make sure we're not acquiring read lock reentrantly
            if (firstReader == current) {                 // 队列中下一个是否为自己 (firstReader)
                // assert firstReaderHoldCount > 0;
            } else {                       // 不是,则判断当前的holdCounter是否非0
                if (rh == null) {
                    rh = cachedHoldCounter;
                    if (rh == null ||
                        rh.tid != LockSupport.getThreadId(current)) {  // 如果计数器为空或者不属于当前线程
                        rh = readHolds.get();             // 获取自己的ThreadLocal中的HoldCounter
                        if (rh.count == 0)
                            readHolds.remove();
                    }
                }
                if (rh.count == 0)  // 这里是避免 CPU时间片轮转 在特殊场景下导致原firstReader进来做锁获取处理
                    return -1;
            }
        }
        if (sharedCount(c) == MAX_COUNT)                 // 检查读锁的上限,确保不会超过最大限制值
            throw new Error("Maximum lock count exceeded");
        if (compareAndSetState(c, c + SHARED_UNIT)) {       // 尝试通过CAS来获得锁,ReadLock重入/获取计数
            if (sharedCount(c) == 0) {         // 如果是firstReader做特殊处理
                firstReader = current;
                firstReaderHoldCount = 1;
            } else if (firstReader == current) {
                firstReaderHoldCount++;
            } else {                          // 如果是其他holdCounter获取锁,做普遍性处理
                if (rh == null)
                    rh = cachedHoldCounter;
                if (rh == null ||
                    rh.tid != LockSupport.getThreadId(current))
                    rh = readHolds.get();
                else if (rh.count == 0)
                    readHolds.set(rh);
                rh.count++;
                cachedHoldCounter = rh; // cache for release
            }
            return 1;
        }
    }
}
不打算一行一行的介绍他的具体处理,这样描述也不方便理解。整个方法无非就是建立在死循环的基础上:
- 通过检查写锁的状态看是否已经被占用,并检查是否为自己拥有锁做重入处理。
- 如果第一步失败,那么就检查是否应该阻塞 (公平锁 / 非公平锁),如果处于阻塞状态检查当前是否轮到自己加锁,如果不是则通过ThreadLocal的HoldCounter做读锁次数的记录
- 检查当前读锁的计数是否已经达到最大值,超过直接抛出Error
- 如果上述全部都合适(没有被写锁占用、不需要阻塞、没有达到读锁的最大限制),通过CAS尝试获得读锁更新ReadLock锁的读锁记录状态和相关状态
从整个方法来看,一旦进入了 fullTryAcquireShared 只有两种可能会成功退出 1. 写锁加锁 (读写互斥)、2. 计数器为0 (特殊情况)、3. 成功获得了锁资源
- 总结:比较有意思的是,仔细看ReentrantReadWriteLock有几个设计比较耐人寻味。
- ReentrantReadWriteLock并没有采用最为常见的在AQS级别加计数器的方式来实现重入次数的记录而是利用每个Thread内部都会有的ThreadLocalMap来记录发生多少次重入,针对普遍并发的单个线程重复获得读锁的场景来进行了优化。
- 本质上获取锁的可以是firstReader也可以是其他 holdCounter 不为 0 的线程,本质上firstReader的机制也是为了处理低并发场景(只有一个线程获取 / 重入的场景)做性能优化而存在的,而实际做并发控制和重入记录的根本还是依靠在holdCounter的基础上的。
- ReentrantReadWriteLock中ReadLock其实是在AQS的基础上、ThreadLocal的机制、自身类的一些扩展成员变量 firstReader、firstReaderHoldCount做实现的
- 还有一个细节:整个 fullTryAcquireShared 本身是死循环!带来的性能损耗还是需要注意的。
-
读锁释放的方法 tryReleaseShared
@ReservedStackAccess
protected final boolean tryReleaseShared(int unused) {
    Thread current = Thread.currentThread();
    if (firstReader == current) {
        // assert firstReaderHoldCount > 0;
        if (firstReaderHoldCount == 1)
            firstReader = null;
        else
            firstReaderHoldCount--;
    } else {
        HoldCounter rh = cachedHoldCounter;
        if (rh == null ||
            rh.tid != LockSupport.getThreadId(current))
            rh = readHolds.get();
        int count = rh.count;
        if (count <= 1) {
            readHolds.remove();
            if (count <= 0)
                throw unmatchedUnlockException();
        }
        --rh.count;
    }
    for (;;) {
        int c = getState();
        int nextc = c - SHARED_UNIT;
        if (compareAndSetState(c, nextc))
            // Releasing the read lock has no effect on readers,
            // but it may allow waiting writers to proceed if
            // both read and write locks are now free.
            return nextc == 0;
    }
}
相对来说还是比较简单的,说到底就两个大步骤,1. 拿调用线程的holdCounter来做扣减,当然如果是firstReader做了一些不同的处理,本质上是一个性能优化的处理;2. 将ReadLock中的统计技术进行扣减
写锁的实现
-
写锁的加锁
写锁的实现相比于读锁相对来说简单一些,从代码的行数就能显然看出来。
protected final boolean tryAcquire(int acquires) {  // 写锁次数一般是1
   /*
   Walkthrough:
   1. If read count nonzero or write count nonzero and owner is a different thread, fail.
   2. If count would saturate, fail. (This can only happen if count is already nonzero.)
   3. Otherwise, this thread is eligible for lock if it is either a reentrant acquire or
      queue policy allows it. If so, update stateand set owner.
   翻译:
   1. 如果读锁的加锁不为0或者写锁的技术非0且他们两个又不是同一个线程,那么就会失败
   2. 如果计数器已经满了,那么就会直接失败
   3. 否则,如果是重入获取或队列策略允许,那么当前线程是有资格获取锁的,将会更新状态并设置持有者
   */
   Thread current = Thread.currentThread();
   int c = getState();   // 底层AQS重入次数计数,在这代表着 写锁 & 读锁两种情况
   int w = exclusiveCount(c);   // 获取当前写锁的并发数
   if (c != 0) {            // 如果已经加锁了 (可能是读锁可能是写锁)
         // (Note: if c != 0 and w == 0 then shared count != 0)
         if (w == 0 || current != getExclusiveOwnerThread())  // 如果当前没有写锁 或 当前线程没有独占
            return false;
         if (w + exclusiveCount(acquires) > MAX_COUNT)   // 检查此次加锁是否超过最大写锁阈值
            throw new Error("Maximum lock count exceeded");
         // Reentrant acquire
         setState(c + acquires);   // 进行加锁重入设置 (由于写锁的互斥效果,这里不用担心并发问题)
         return true;
   }
   if (writerShouldBlock() || !compareAndSetState(c, c + acquires))  // 公平 / 非公平加锁 + CAS加锁处理
         return false;
   setExclusiveOwnerThread(current);  // 设置AQS占用线程
   return true;
}
整个写锁其实几乎完全就是依靠AQS做处理的,重入、互斥可以说是完全依赖于AQS的state,并针对其做CAS实现的。
-
写锁的解锁
解锁的代码处理大概如下,更是简单,就不详细说了
/*
Note that tryRelease and tryAcquire can be called by Conditions.
So it is possible that their arguments contain both read and write holds
that are all released during a condition wait and re-established in tryAcquire.
注释介绍了tryRelease 和 tryAcquire两者可以通过 Conditions 来调用,并介绍在处理加解锁的时候,应该保持一致处理
*/
protected final boolean tryRelease(int releases) {
    if (!isHeldExclusively())           // 判断是否为当前线程拥有,不是则抛异常
        throw new IllegalMonitorStateException();
    int nextc = getState() - releases;           // 计算释放后state
    boolean free = exclusiveCount(nextc) == 0;       // 判断是否为全部释放
    if (free)
        setExclusiveOwnerThread(null);   // 如果全部释放设置线程标记位
    setState(nextc);
    return free;
}
总结
ReentrantReadWriteLock作为可读锁将以往的锁粒度拆分为读锁和写锁两种不同级别的加锁,本质上来说还是有着较大的性能提升的,当然了这种设计本质上根据并发的烈度做了一定程度区分处理最终达到锁性能提高的效果。但是ReentrantReadWriteLock也存在着显著的问题,其中最为关键的就是 饥饿问题 。在实际场景之中,因为ReentrantReadWriteLock的特性我们往往会将它使用在读多写少的场景之中,大量的读进程占用对写锁的互斥效果,而这往往就会导致写进程的饥饿长期无法获取修改的机会。
StampedLock
在JDK1.8之中,针对ReentrantReadWriteLock做了进一步的优化处理,本质上是引入了乐观读的处理方案,使得读锁从实际的互斥锁降低为乐观锁。喜欢咬文嚼字的也可以从这个类的名字就能看出来 Stamp 印章 / 邮戳,他的调整其实就是通过volatile保证了锁的标志位,然后将原先针对holdCounter的调整修改为成员变量的state的调整,当然这种方式相比于ReentrantReadWriteLock来说单独Thread.ThreadLocalMap记录重入次数的核心设计对比StampedLock显然是无法支持重入处理的。
StampedLock相比于ReentranReadWriteLock来说,其实主要的区别在于实际的加锁处理上会有所不同,ReentrantReadWriteLock不管是读锁还是写锁都是通过直接加锁的方式进行处理的,但是StampedLock其实存在三种不同的锁模式:
StampedLock的锁模式
- 乐观读锁 (tryOptimisticRead):允许线程进行读操作而不获取读锁,本质上就是在查询的时候获取这个部分的实现跟CAS检查是否发生过修改的方式几乎是一模一样的,它会通过validate进行检查。
- 悲观读锁 (PessimisticRead):一旦在乐观锁进行读取的状态处理下,出现了stamp值发生变动的话,就会导致锁从乐观读锁升级为悲观读锁。(需要注意的一点是,悲观读锁和写锁之间是相互冲突的)
- 写锁 (Write Lock):基于排他锁来实现的互斥锁效果,这点其实跟ReentrantReadWriteLock一样的
三种锁如何表示
// 以下的源码来源于JDK17,JDK8的源码有所不同
private static final int LG_READERS = 7; // 127 readers (锁标记偏移量,也意味着表达范围)
private static final long RUNIT = 1L;   // 读操作掩码值
private static final long WBIT  = 1L << LG_READERS;   // 写操作掩码值,需要偏移 7 位给读操作
private static final long RBITS = WBIT - 1L;   // 读操作掩码范围
private static final long RFULL = RBITS - 1L;   // 读操作最大值
private static final long ABITS = RBITS | WBIT;    // 读操作计算掩码 state ^ ABITS可得stamp
private static final long SBITS = ~RBITS; // note overlap with ABITS  写锁的位掩码
// not writing and conservatively non-overflowing
private static final long RSAFE = ~(3L << (LG_READERS - 1));   // 读锁安全掩码 (防溢出)
private static final long ORIGIN = WBIT << 1;   // 锁状态的初始值;
private static final long INTERRUPTED = 1L;    // 中断判断处理
static final int WAITING   = 1;   // 等待状态
static final int CANCELLED = 0x80000000; // 取消状态
private transient volatile Node head; // CLH队列头
private transient volatile Node tail; // CLH队列尾
/* 以下这些View其实是为了提供能给 ReadWriteLock 视图做兼容的准备 (不打算展开说) */
transient ReadLockView readLockView;
transient WriteLockView writeLockView;
transient ReadWriteLockView readWriteLockView;

/** Lock sequence/state */
private transient volatile long state;            // 读写锁共用的标记位
/** extra reader count when state read count saturated */
private transient int readerOverflow;               // 额外的读统计标志位

而在判断当前读锁和写锁的部分相对比较简单,无非就是将信息压缩到state之中 (state本质上其实就是AQS的state,如果需要进一步了解可以自行查阅源码),state的低7位用于写锁标记位,第8位则是用于标记当前AQS是否为写锁标记位,另外state的几位还会针对写锁技术进行记录。读锁,占用54位数据,显然读的stamp标记位的上限要高写的很多,甚至如果还是超过stamp的表达范围还有 tryIncReaderOverflow 方法来进一步扩展表达范围 (用int类型的readerOverflow进行扩展,所以理论上最大记录数是 Integer.MAX_VALUE * 54位计数),这也显示出StampedLock适合读多写少的场景。
StampedLock state占位分配情况
| 9-64位 | 8位 | 1-7位 |
|---|---|---|
| Stamp CAS标记位 | 写锁状态位 | 写锁标记位 |
乐观读锁使用&实现
class Point {
   private double x, y;
   private final StampedLock sl = new StampedLock();
   // 乐观读 + 悲观读 示例
   double distanceFromOrigin() {
     long stamp = sl.tryOptimisticRead();
     double currentX = x, currentY = y;
     if (!sl.validate(stamp)) {
        stamp = sl.readLock();
        try {
          currentX = x;
          currentY = y;
        } finally {
           sl.unlockRead(stamp);
        }
     }
     return Math.sqrt(currentX * currentX + currentY * currentY);
   }
 }
乐观读锁的核心实现其实相当简单,从示例之中,我们就可以大概看出来他的具体实现。
-
tryOptimisticRead的源码
public long tryOptimisticRead() {
    long s;
    return (((s = state) & WBIT) == 0L) ? (s & SBITS) : 0L;  // 检查是否在写锁状态,如果不在则返回 s & sbits;如果在写锁状态则返回 0
}
tryOptimisticRead无非就是根据当前state的值返回stamp标记为的数值,我们继续看官方的示例,很显然是需要我们在进行操作之前自己调用 validate 检查数值是否发生变动,如果没有那么就可以直接利用原先的值进行计算处理,如果无法匹配那么就需要加悲观锁进行处理。
-
validate的源码
public boolean validate(long stamp) {
    U.loadFence();        // 添加内存屏障,避免指令重排导致并发不安全问题 -有兴趣以后补充UnSafe介绍
    return (stamp & SBITS) == (state & SBITS);  // 检查之前获取的stamp和现在的stamp是否一致
}
在这种情况下,stamp的改变分为三种情况,第一种是有线程获取读锁导致的stamp发生改变,第二种是写锁导致stamp发生改变,第三种锁释放。
private boolean casState(long expect, long update) {
    return U.compareAndSetLong(this, STATE, expect, update); // UnSafe CAS修改值
}
@ReservedStackAccess
private long tryAcquireWrite() {
    long s, nextState;
    if (((s = state) & ABITS) == 0L && casState(s, nextState = s | WBIT)) {// 造成stamp变化
        U.storeStoreFence();
        return nextState;
    }
    return 0L;
}
@ReservedStackAccess
private long tryAcquireRead() {
    for (long s, m, nextState;;) {
        if ((m = (s = state) & ABITS) < RFULL) {
            if (casState(s, nextState = s + RUNIT))  // 造成stamp变化
                return nextState;
        }
        else if (m == WBIT)
            return 0L;
        else if ((nextState = tryIncReaderOverflow(s)) != 0L)
            return nextState;
    }
}
// 其他方法也有涉及到 writeLock、readLock、tryUnlockRead、unlockRead、tryConvertToWriteLock等等
总而言之,只要发生加锁操作,那么就会导致stamp发生改动而最终导致乐观读锁升级为悲观读锁。这也就印证了实际上StampedLock最大的优化引入了乐观锁机制。
悲观读锁的实现
看上面的[示例](#乐观读锁使用&实现)就能知道实际上整个加锁的流程相当简单,悲观读锁的关键其实就是 readLock 方法,我们可以大概看看这个方法内部到底干了什么。
-
readLock方法
/*** Non-exclusively acquires the lock, blocking if necessary until available. @return a read stamp that can be used to unlock or convert mode*/ @ReservedStackAccess public long readLock() { // unconditionally optimistically try non-overflow case once long s = U.getLongOpaque(this, STATE) & RSAFE, nextState; // 基于CAS获取state值与RSAFE进行与操作处理 if (casState(s, nextState = s + RUNIT)) // 做CAS处理增加读锁的记录次数 return nextState; // 如果CAS成功,那么直接返回nextState即可 else return acquireRead(false, false, 0L); // 否则进行竞争处理方法 }- 调用 getLongOpaque 获取 state 值判断,并且将其跟 RSAFE 进行位与操作判断是否合理,RSAFE的本身是掩码,这一点在上面也已经介绍过了,无非就是用于保证读锁的数量不会溢出,做极端场景下的限制。
- nextState = s + RUNIT (读锁单位),表明只要实际上涉及到读锁,那么读锁的计数次数就会加上一个读锁单位的记录
-
acquireRead 方法
acquireRead 的调用和实际处理则相当复杂,这里不打算完全展开来说,大概说说代码在干嘛怎么实现的就跳过,但其实还是依托在AQS的基础上进行处理的,整个方法其实主要就包含有两个循环。
- Loop1第一个循环的会尝试检查并发的数量级是否足够小,如果cowaiter队列本身为空,又或者是刚好是cowaiter队列的尾巴那么就尝试等到 (还涉及到超时和中断机制的处理),如果还是失败那么就交由第二个循环体进行处理;(可以直接总结为对并发处理队列进行初始化和排队处理)
- Loop2第二个循环则是针对Loop1初始化创建的cowaiter队列进行循环消费,通过对队列头进行唤醒竞争如果成功竞争读锁,那么则唤醒所有其他阻塞线程一起竞争。
写锁示例&实现
class Point {
   private double x, y;
   private final StampedLock sl = new StampedLock();
   // 写锁 示例
   void move(double deltaX, double deltaY) {
     long stamp = sl.writeLock();
     try {
       x += deltaX;
       y += deltaY;
     } finally {
       sl.unlockWrite(stamp);
     }
   }
   ······
   // 锁升级处理机制
   void moveIfAtOrigin(double newX, double newY) {
     long stamp = sl.readLock();
     try {
       while (x == 0.0 && y == 0.0) {
         long ws = sl.tryConvertToWriteLock(stamp);
         if (ws != 0L) {
           stamp = ws;
           x = newX;
           y = newY;
           break;
         }
         else {
           sl.unlockRead(stamp);
           stamp = sl.writeLock();
         }
       }
     } finally {
       sl.unlock(stamp);
     }
   }
 }
-
写锁的加锁
一般来说,写锁发生在进行读后在某些业务场景下需要做修改动作的时候才需要进一步做加锁处理,其中主要设计的方法就是 tryConvertToWriteLock 和 writeLock 两个方法。
-
tryConvertToWriteLock 方法
/**
If the lock state matches the given stamp, atomically performs one of the following actions. If the stamp represents holding a write lock, returns it.
Or, if a read lock, if the write lock is available, releases the read lock and returns a write stamp.
Or, if an optimistic read, returns a write stamp only if immediately available. This method returns zero in all other cases.
@param stamp a stamp
@return a valid write stamp, or zero on failure
*/
public long tryConvertToWriteLock(long stamp) {
    long a = stamp & ABITS, m, s, nextState;
    while (((s = state) & SBITS) == (stamp & SBITS)) {    // 保证改动线程的stamp和目前一致
        if ((m = s & ABITS) == 0L) {  // 如果当前没有加锁
            if (a != 0L)
                break;
            if (casState(s, nextState = s | WBIT)) {
                U.storeStoreFence();    // 较为特殊的内存屏障 (保证在屏障前后修改不重排)
                return nextState;
            }
        } else if (m == WBIT) {   // 如果当前已经出现加锁
            if (a != m)
                break;
            return stamp;   // 返回当前stamp
        } else if (m == RUNIT && a != 0L) {   // 如果当前发生读锁且只有一个线程加读锁
            if (casState(s, nextState = s - RUNIT + WBIT)) // 解开读锁并替换为写锁
                return nextState;
        } else
            break;
    }
    return 0L;
}
这个方法相对来说还是较为简单的,可以尝试将一个已经存在的锁 (可能是读锁或者是写锁) 将其转换为写锁,方法的主要目的是在不阻塞的状态下将当前的锁状态转变为写锁状态。
-
writeLock 方法
/**Exclusively acquires the lock, blocking if necessary until available. @return a write stamp that can be used to unlock or convert mode*/ @ReservedStackAccess public long writeLock() { // try unconditional CAS confirming weak read long s = U.getLongOpaque(this, STATE) & ~ABITS, nextState; // cas获取当前锁状态 if (casState(s, nextState = s | WBIT)) { // 设置锁标记位 U.storeStoreFence(); return nextState; } return acquireWrite(false, false, 0L); }跟readLock几乎是一模一样的,失败之后都会调用一个复杂的处理方法,而writeLock的方法则是acquireWriter以下是具体的方法内容。(稍微好一点的是,acquireWrite相比acquireRead还是简单不少)
-
acquireWrite 方法
acquireWrite的方法其实在JDK8和JDK17两个版本之间的改动还是较大的,在JDK8之中跟acqiureRead类似拆分为两个循环进行处理,但是在acquireWrite之中变成了单一的一个循环。但是具体的调用处理工作是类似的。
/**
For explanation, see above and AbstractQueuedSynchronizer internal documentation.
就如注释所说,acquireWrite其实就是依托于AQS实现的
@param interruptible true if should check interrupts and if soreturn INTERRUPTED
@param timed if true use timed waits
@param time the System.nanoTime value to timeout at (and return zero)
@return next state, or INTERRUPTED
*/
private long acquireWrite(boolean interruptible, boolean timed, long time) {
    byte spins = 0, postSpins = 0;   // retries upon unpark of first thread
    boolean interrupted = false, first = false;
    WriterNode node = null;
    Node pred = null;
    for (long s, nextState;;) {
        // 对队列进行检查和清理工作
        if (!first && (pred = (node == null) ? null : node.prev) != null &&
            !(first = (head == pred))) {  // 检查队列前缀节点情况和队列节点数等
            if (pred.status < 0) {
                cleanQueue();           // predecessor cancelled 前缀节点清除
                continue;
            } else if (pred.prev == null) {
                Thread.onSpinWait(); // ensure serialization  前缀的前缀null自旋等待
                continue;
            }
        }
        // 判断队列状态,若队列无锁 + 临到获取锁资源
        if ((first || pred == null) && ((s = state) & ABITS) == 0L &&
            casState(s, nextState = s | WBIT)) { // 如果队列本身是空的那么做CAS锁获取
            U.storeStoreFence();
            if (first) {
                node.prev = null;
                head = node;
                pred.next = null;
                node.waiter = null;
                if (interrupted)
                    Thread.currentThread().interrupt();
            }
            return nextState;
        }
        // 创建节点加入队列
        else if (node == null) { // retry before enqueuing 尝试创节点,后续加入队列
            node = new WriterNode();
        } else if (pred == null) {          // try to enqueue  尝试入队
            Node t = tail;
            node.setPrevRelaxed(t);       // 加入队列
            if (t == null)    // 队列头初始化
                tryInitializeHead();
            else if (!casTail(t, node))  // 加入队列尾
                node.setPrevRelaxed(null);  // back out
            else
                t.next = node;
        }
        // 自旋和等待
        else if (first && spins != 0) {   // reduce unfairness 如果队列头那么做自旋
            --spins;
            Thread.onSpinWait();
        } else if (node.status == 0) {  // enable signal  设置节点处于等待状态
            if (node.waiter == null)
                node.waiter = Thread.currentThread();
            node.status = WAITING;
        } else {
            long nanos;            // 如果设置了超时,那么LockSupport做阻塞
            spins = postSpins = (byte)((postSpins << 1) | 1);
            if (!timed)
                LockSupport.park(this);
            else if ((nanos = time - System.nanoTime()) > 0L)
                LockSupport.parkNanos(this, nanos);
            else
                break;
            node.clearStatus();
            if ((interrupted |= Thread.interrupted()) && interruptible) // 如果中断
                break;
        }
    }
    return cancelAcquire(node, interrupted);  // 如果循环被break打断,那么取消获取
}
/**
If node non-null, forces cancel status and unsplices it from queue,
wakes up any cowaiters, and possibly wakes up successor to recheck status.

@param node the waiter (may be null if not yet enqueued)
@param interrupted if already interrupted
@return INTERRUPTED if interrupted or Thread.interrupted, else zero
*/
private long cancelAcquire(Node node, boolean interrupted) {
    if (node != null) {    // 如果节点不为空
        node.waiter = null;
        node.status = CANCELLED;
        cleanQueue();
        if (node instanceof ReaderNode)
            signalCowaiters((ReaderNode)node);   // 通知vowaiter节点
    }
    return (interrupted || Thread.interrupted()) ? INTERRUPTED : 0L;
}
-
总结
总的来说,StampedLock的就是在ReentrantReadWrite的基础上引入了乐观锁的机制进一步提高了锁的性能,从一个锁来说,他在Java之中几乎是性能处理最好的锁了,这也是为什么会有人称其为锁王。
而在具体的锁实现上StampedLock却舍弃了Thread.ThreadLocalMap的重入记录机制,这也导致了StampedLock的一个显著的缺点,不支持重入处理。并且针对ReentrantReadWriteLock的 饥饿问题 还是没有缓解处理措施,所以仍然存在着饥饿问题。
缺点:
- 不可重入
- 饥饿
- 代码复杂,使用不当容易引发 CPU high等问题
分布式下的线程安全
在分布式项目之中往往某一个业务方法的处理会涉及到多个资源数据库的修改,这些资源数据库在集群的服务器往往是分散到不同的服务器上的,这种结构就注定了,无法直接通过单机的加锁方式解决问题。
从整个集群角度来说,其实无非就是要做到两个层面上的线程安全的效果:
- 一个集群共享资源被不同的两个服务节点 (引进第三方组件实现保证)
- 避免实际消费任务的服务在消费的时候出现线程不安全的问题 (继续延续单机线程安全的实现即可)
显然的,核心问题其实就是需要解决效果一的功能,也就是避免不同服务节点同时使用到了某一个资源。其实如果我们回头看一下我们在上文之中所有的介绍,不管是原子级、对象级别、代码块级别,悲观锁实现方案、无锁方案,他们的本质上都是通过了一个公共信号量来判断当前资源是否被占用。以下的三种实现方式,其实也是依靠这个理念实现的。
分布式锁的一些要求
- 可重入:通过修改加锁的数据类型等方式记录锁的重入次数
- 自动续费:在某些业务场景下,会需要持续执行 / 避免反复的加解锁开销,往往会要求服务中的线程可以续费,让业务继续执行 (当然这样做的代价是,可能会出现死锁)
- 避免死锁:在分布式场景分布式锁的死锁,影响的范围会更大,因此我们往往会需要
- 安全:要求只有加锁服务的线程可以解开锁
Zookeeper
基本原理
我们都知道,实际上Zookeeper其实相当类似于文件夹结构的一种存储结构 (这也是为什么Zookeeper介绍之中会将其称为分布式存储中间件) 。Zookeeper包含有四种不同的节点 (非顺序-非持久化节点、非顺序-持久化节点、顺序-非持久化节点、顺序-持久化节点)
Zookeepr实现分布式锁的效果其实是基于 有序节点 和 Watch机制。具体的实现逻辑如下:
- 通过Zookeper创建临时分布式锁目录节点
- 所有并发资源使用者前往临时分布式锁目录节点上尝试构建构建一个同名的非持久化顺序节点,并且设置watcher事件 (监听前一个节点的状态)。
- 调用getChildren()判断当前自己的节点是否为最小节点,如果序号是最小的节点,那么表示获取到了锁,执行自身操作;如果序号并非是最小节点那么继续监听前一个节点的状态 // 基于顺序节点的实现就保证了公平的要求
- 当自身操作完成后调用delete方法删除当前自己的节点
(具体实现之中还有一种短暂节点锁的实现方案,大体上其实大差不差,唯一不同在于不再监构造多个watcher嵌套监听前一个节点,而是监听全局最小节点)
类似于Redis,实际上开发的时候往往我们会通过组件来使用Zookeeper,我这里使用的是Curator并且也会基于Curator的源码对其分布式锁的实现进行介绍。(Curator的功能除了接下来介绍的内容以外还有客户端维持、连接管理等功能,并为节点的创建和修改提供了异步实现,但这些都跟我们的分布式锁主题没关,所以在此不介绍)
Curator分布式锁示例
在实际使用之中,往往是直接通过Curator来实现分布式锁效果,(Curator之中支持多种锁实现方案包括:可重入互斥锁、不可重入互斥锁、读写锁的实现 [需要注意的是Curator并不支持非公平锁]) 以下提供一个基于其使用Zookeeper的分布式锁使用示例 需要注意的是我使用的Curator版本是 5.3.0 其他的版本需要重新看
public class ZookeeperDisLock {
    @Value("${zookeeper.host}")
    private String host;
    public static final String LOCK_PATH = "/zookeeperPath/lock";
    private CuratorFramework client; // Curator客户端
    private InterProcessMutex mutex; // 可重入锁

    public ZookeeperDisLock() {
        client = CuratorFrameworkFactory.newClient(this.host, new ExponentialBackoffRetry(1000,3));
        // Template
        // int baseSleepTimeMs = 1000;  基础睡眠时间 ,单位是MS
        // int maxRetries = 10;  最大重试次数
        // int maxSleepMs = 30000;   最大睡眠时间
        // RetryPolicy retryPolicy = new ExponentialBackoffRetry(baseSleepTimeMs, maxRetries, maxSleepMs);
        // CuratorFramework client = CuratorFrameworkFactory.newClient(zkConnectString, sessionTimeoutMs, connectionTimeoutMs, retryPolicy);
        client.start();
        // 创建可重入锁
        mutex = new InterProcessMutex(client, LOCK_PATH);
    }
    // 执行业务逻辑,使用可重入锁
    public void executeBusinessLogic() {
        try {
            // 获取锁
            mutex.acquire(1000, TimeUnit.MILLISECONDS);
            // 业务处理 (内部可能会有重入处理)
            /* do something in business */
        } catch (Exception e) {
            e.printStackTrace();
        } finally {
            // 确保释放锁
            if (mutex.isAcquiredInThisProcess()) {
                try {
                    mutex.release();
                } catch (Exception e) {
                    throw new RuntimeException(e);
                }
            }
        }
    }
}
核心实现
Zookeeper分布式锁的实现主要涉及 InterProcessMutex 类,该类内部通过 acquire 来实现加锁效果,在加锁时会设置锁的超时时间,后续再由 StandardLockInternalsDriver 负责锁的超时监控 (LockInternals 对结果进行处理),如果超时那么就释放锁 (InterProcessMutex.release)。
这三个类的共同工作保证了,zookeeper分布式锁的基本功能
-
InterProcessMutex: 提供加、解锁、锁重入
public class InterProcessMutex implements InterProcessLock { private final LockInternals internals; private final String basePath; @Override public boolean acquire(long time, TimeUnit unit) throws Exception { String lockPath = internals.attemptLock(time, unit, getLockNodeBytes()); if (lockPath != null) { return true; } return false; } } -
LockInternals:加锁内部核心实现,底层实现
class LockInternals { private final CuratorFramework client; private final String path; private final String lockName; // 尝试获取锁 String attemptLock(long time, TimeUnit unit, byte[] lockNodeBytes) throws Exception { // 调用internalLockLoop,并提供获取锁的开始时间处理获取锁的超时工作 final long startMillis = System.currentTimeMillis(); final Long millisToWait = (unit != null) ? unit.toMillis(time) : null; String ourPath = null; boolean hasTheLock = false; boolean isDone = false; while (!isDone) { isDone = true; try { // 创建临时节点 ourPath = createLockNode(client, path, lockNodeBytes); // 获取锁 hasTheLock = internalLockLoop(startMillis, millisToWait, ourPath); } catch (Exception e) { if (ourPath != null) { client.delete().guaranteed().forPath(ourPath); } throw e; } } return hasTheLock ? ourPath : null; } private boolean internalLockLoop(long startMillis, Long millisToWait, String ourPath) throws Exception { boolean haveTheLock = false; boolean doDelete = false; try { while (!haveTheLock) { // 获取所有子节点并排序 List<String> children = getSortedChildren(); // 通过StandardLockInternalsDriver判断是否获得锁 PredicateResults predicateResults = driver.getsTheLock(client, children, ourPath, maxLeases); if (predicateResults.getsTheLock()) { haveTheLock = true; } else { // 如果没获得锁,则监视前一个节点 String previousSequencePath = makePath(predicateResults.getPathToWatch()); synchronized (this) { Stat stat = client.checkExists().usingWatcher(watcher).forPath(previousSequencePath); // 对状态进行检查,如果超时则放弃加锁 if (stat != null) { if (millisToWait != null) { millisToWait -= (System.currentTimeMillis() - startMillis); startMillis = System.currentTimeMillis(); if (millisToWait <= 0) { doDelete = true; break; } } wait(millisToWait); } } } } } catch (Exception e) { doDelete = true; throw e; } finally { if (doDelete) { deleteOurPath(ourPath); } } return haveTheLock; } } -
StandardLockInternalsDriver:锁获取、节点监控、节点排序等工作
public class StandardLockInternalsDriver implements LockInternalsDriver {

    @Override
    public PredicateResults getsTheLock(CuratorFramework client,
                                      List<String> children,
                                      String sequenceNodeName,
                                      int maxLeases) throws Exception {
        // 获取当前节点的索引位置
        int ourIndex = children.indexOf(sequenceNodeName);
        validateOurIndex(ourIndex);

        // 判断是否获得锁(是否在前maxLeases个节点中)
        boolean getsTheLock = ourIndex < maxLeases;

        // 确定需要监视的节点
        String pathToWatch = getsTheLock ? null : children.get(ourIndex - maxLeases);

        return new PredicateResults(getsTheLock, pathToWatch);
    }
}
优点
- 可靠性、一致性强:Zookeepeer基于Paxos算法实现,基于这个算法实现的Zookeeper之中就使得其分布式锁的一致性和可靠性更强
- 基于客户端超时 (Zab协议通讯超时移除节点)、分布式锁的超时释放机制可以很好的避免 客户端崩溃 / 超长事务 等情况可能会导致的死锁问题。
缺点
- 基于paxos的算法,每一次的节点创建其实都会触发多数派选举,如果我们的资源并发处理的要求较高,那么势必会造成较高的资源损耗
- Zookeeper不支持内置的锁重入实现效果 (可以通过Curator依赖实现支持)
- 引入Zookeeper必须要解决羊群、集群网络延迟、性能延迟
问题
活锁处理
Zookeeper基于Paxos协议的实现通讯协议zab的基础导致其存在活锁的可能,本质上其实就是多个客户端同时尝试获得锁时,因为Zookeeper集群中ZID在多数派选举通过之前不断被更新为更大的值。导致不断更新失败而最终出现活锁效果的情况。这就被称为活锁。
其实很显然就能看出来活锁的关键其实是客户端申请失败之后不停的重试,最终才导致了大量的请求尝试。而实际上Zookeeper获取分布式锁的方式并不是轮询尝试,而是通过构建Zookeeper的队列来实现的,这种的实现方式避免了活锁的出现 (有需要可以查看一下 ExponentialBackoffRetry 类的两个方法 (getSleepTimeMs、validateMaxRetries))
Curator死锁处理
-
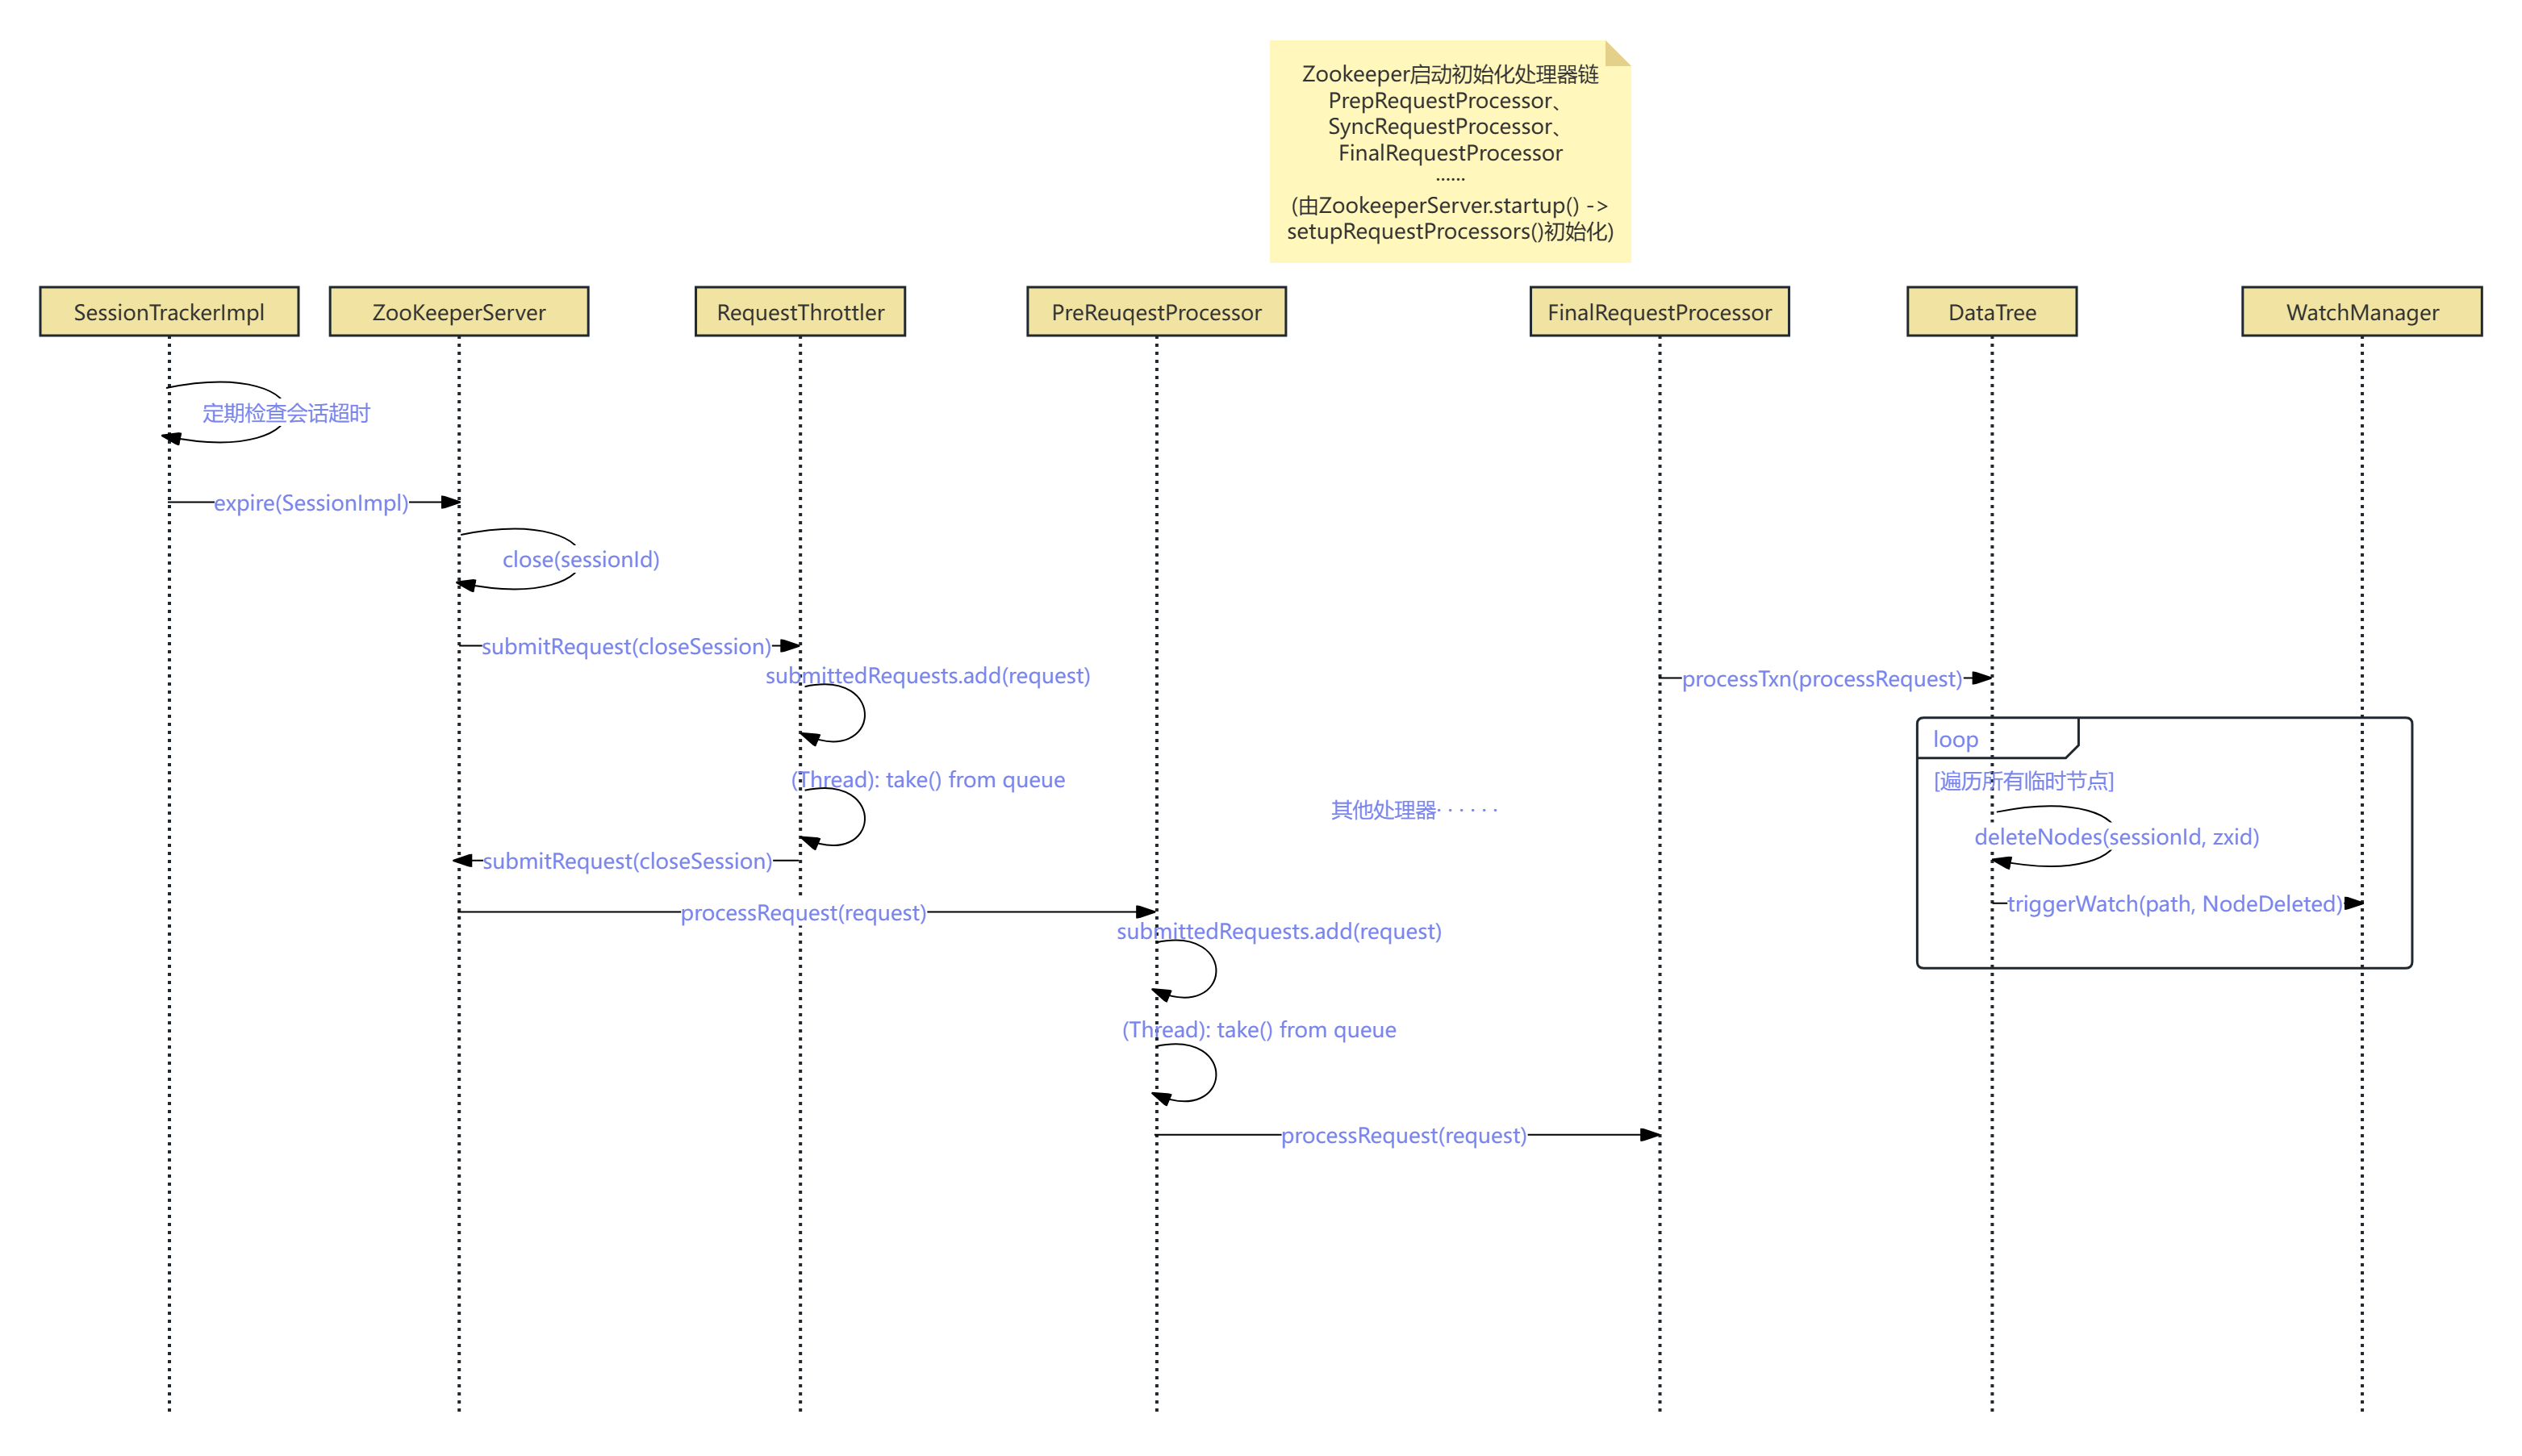
锁拥有方超时机制:Zookeeper 之中其实是通过临时节点来实现分布式锁的占用的,实际上Zookeeper的临时节点的生命周期跟客户端是一样的,这就使得实际上Zookeeper的临时节点是不需要续费的,所以根本不需要类似于Redissson的看门狗机制存在的,Zookeeper的分布式锁机制等同于Redisson的设置看门狗 / setTimeOut(-1)的情况,因此理论上Zookeeper依旧存在分布式锁死锁的可能,并且最大的死锁时间其实是客户端Session的超时时间。 (在客户端连接超时之后,将会由Zookeeper服务器删除这些临时节点 [分布式锁节点就是临时节点])
// 会话超时释放锁
// 设置会话超时时间(毫秒)
CuratorFrameworkFactory.newClient(this.host, new ExponentialBackoffRetry(1000,3));
会话超时释放锁
这部分的源码稍微有点复杂,我将这部分的逻辑做成了UML时序图,有需要可以找一下Curator源码看看。(但本质上其实就是通过客户端超时对这些超时的临时节点做迭代删除,从而实现了分布式锁的超时解锁效果)
-
锁获取方超时设置:除了直接依靠Zookeeper的机制实现的超时处理以外,我们还可以在获取锁的时候设置锁获取的超时时间避免死锁的出现 (当然这样其实本质上并没有改变拥有方能在较长的一段时间拥有锁资源)
mutex.acquire(1000, TimeUnit.MILLISECONDS);
Redis
类似于Zookeeper,Redis作为第三方或者说是集群资源数据库,同样的也可以充当锁标记位的记录者。而较为常见的使用方案是直接使用Redission提供的直接实现方案,下面主要也将从Redisssion开始介绍。需要注意的是,我这里用的是Redisson3.36.0版本的 (Redisson的分布式锁改动还是比较频繁的,具体版本的具体看)
基本原理
Redis作为数据库可以将标记位记录,并且Redis的过期键机制也能很好的跟锁超时机制相吻合 (过期键清除策略在Redis中其实是抽样估算过期键占比来清除过期键,当然这是题外话了)。
但Redis来充当竞争者外的第三方记录需要解决一个关键问题,Redis本身不支持事务控制 (任何中间件都无法直接支持事务控制,这也是分布式常识) ,而实际加锁往往会需要多个命令组成,往往就会导致并发问题。Redission是通过使用lua脚本的方式避免该问题的。
而至于公平锁和非公平锁的实现等具体细节,会在下面展开介绍。
Redission分布式锁示例
@Resource
private RedissonClient redissonClient;
// 非公平锁
private void unfairLockMethod() {
    RLock lock = redissonClient.getLock("unFariLockDemo");
    try {
        /*
        * waitTime: 等待重试时间 - 10s
        * leaseTime: 拥有锁的时间 - 30s
        */
        boolean isLocked = lock.tryLock(10, 30, TimeUnit.SECONDS);
        // boolean isLocked2 = unFairLock.tryLock();
        if (isLocked) {
            try {
                System.out.println("acquired unFair lock");
                /* 业务代码 */
            } finally {
                lock.unlock();
            }
        }
    } catch (InterruptedException e) {
        throw new RuntimeException(e);
    }
}
// 公平锁
private void fairLockMethod() {
    RLock fairLock = redissonClient.getFairLock("fairLockDemo");
    try {
        /*
        * waitTime: 等待重试时间 - 10s
        * leaseTime: 拥有锁的时间 - 30s
        */
        boolean isLocked = fairLock.tryLock(10, 30, TimeUnit.SECONDS);
        // boolean isLocked2 = fairLock.tryLock();
        if (isLocked) {
            try {
                System.out.println("acquired fair lock");
                /* 业务代码 */
            } finally {
                fairLock.unlock();
            }
        }
    } catch (InterruptedException e) {
        throw new RuntimeException(e);
    }
}
核心实现
非公平锁实现 (常用)
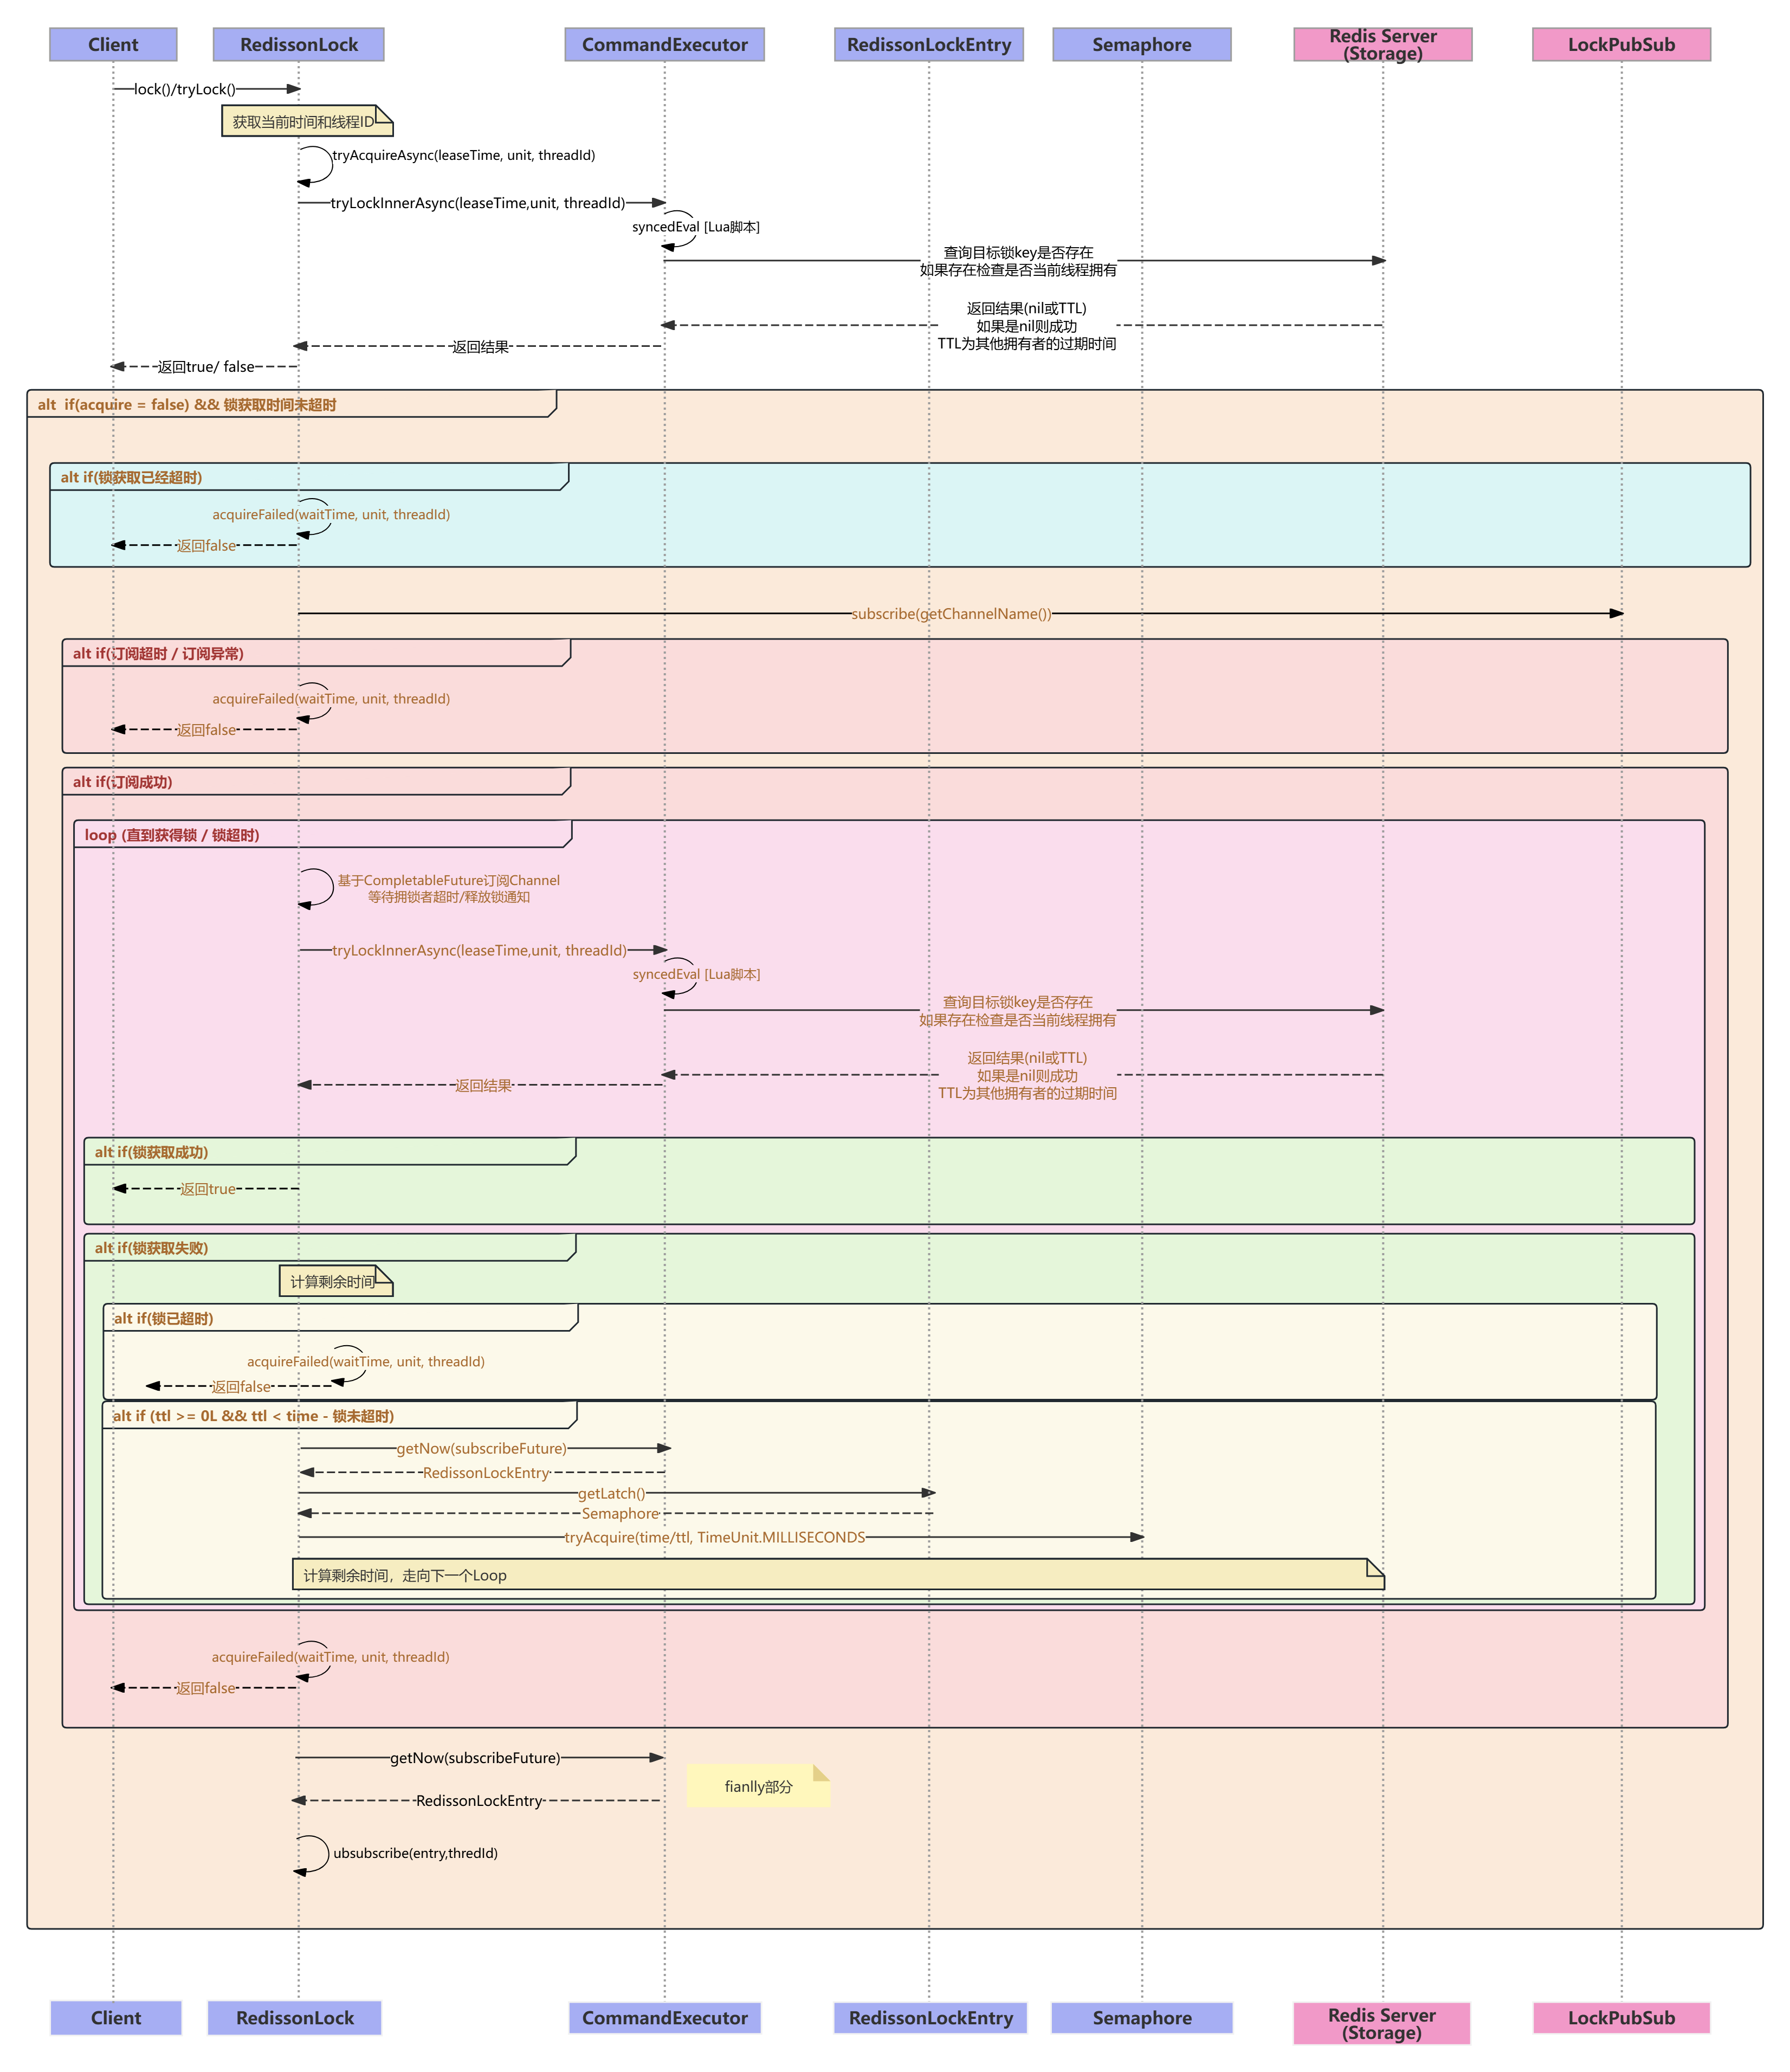
该部分主要涉及五个核心类 (RedissionLock、CommandExecutor、LockPubSub、RedissonLockEntry、Semaphore)
由于这部分涉及的代码相当多,全部贴上来既不雅观也不好理解,为了方便我做了两个图,都已经贴在下方。
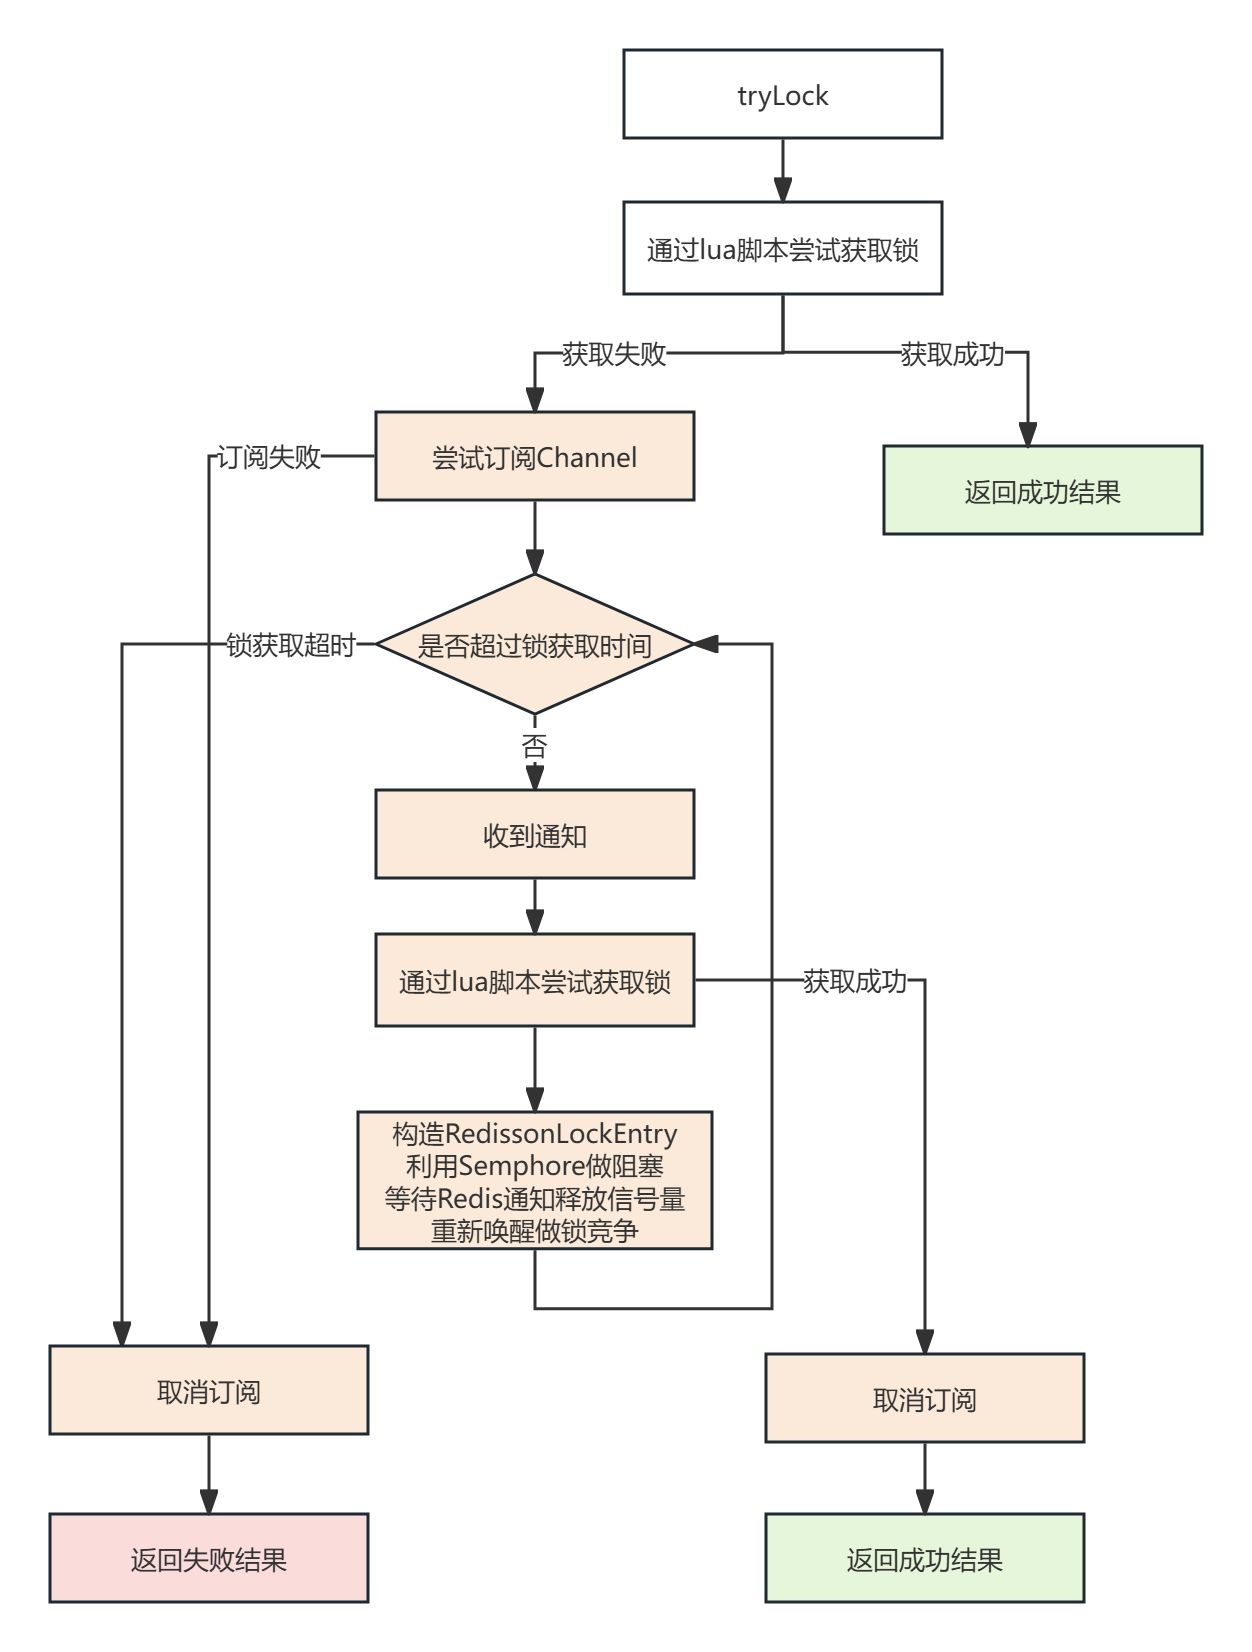
简单的来说,其实整个流程还是比较简明的,无非就是两个关键部分:
- 首次获取尝试
- Loop 在锁超时前重复尝试获取锁 (订阅Channel 构造 RedissonLockEntry 阻塞当前线程直到 Redis 释放信号量后才会继续竞争)
在源码之中整个流程也还是相当好理解的(如果对流程有问题可以参考后续的时序UML图),相对来说比较复杂只有两个第一个是LUA脚本,第二个是基于Semphore阻塞等待通知再竞争锁的实现。
UML脚本
-- 加锁调用的lua
-- PARAMS: KEY:
--             1. KEY[1]=getRawName() - hash表结构名
--         ARGV:
--             1. ARGV[1]=unit.toMillis(leaseTime) - 超时时间
--             2. ARGV[2]=getLockName(threadId) - hash表结构 key 名

-- 是否存在分布式锁 统一管理 hash表 结构
if ((redis.call('exists', KEYS[1]) == 0) or
        -- hash表 结构中如果存在当前 分布式锁key , 判断是否为自己拥有
        (redis.call('hexists', KEYS[1], ARGV[2]) == 1))
then
    -- 只要没有加过锁 / ,那么就对当前分布式锁 key 加锁 / 重入
    redis.call('hincrby', KEYS[1], ARGV[2], 1);
    -- 设置过期时间
    redis.call('pexpire', KEYS[1], ARGV[1]);
    return nil;
end
-- 如果 if 不成立,那么返回当前分布式锁的超时时间
return redis.call('pttl', KEYS[1])

-- 解锁调用的lua
-- PARAMS:KEY:
--           1. KEY[1]=getRawName - 锁名称
--           2. KEY[2]=getChannelName() - 解锁通知订阅Channel名
--           3. KEY[3]=getUnlockLatchName(requestId) - 锁状态缓存键(对解锁进行记录)
--        ARGV:
--           1. ARGV[1]=LockPubSub.UNLOCK_MESSAGE - 解锁消息
--           2. ARGV[2]=internalLockLeaseTime - 拥锁时间
--           3. ARGV[3]=getLockName(threadId) - hash表中 key 值
--           4. ARGV[4]=getSubscribeService().getPublishCommand() - 解除订阅
--           5. ARGV[5]=timeout - (max(slave 操作超时时间 * retry, 1) 最大超时时间

-- 检查是否存在锁状态缓存键
local val = redis.call('get', KEYS[3]);
-- 如果存在直接返回缓存值
if val ~= false
then
   return tonumber(val)
end;
-- 检查 hash表 结构是否存在分布式锁 key
if (redis.call('hexists', KEYS[1], ARGV[3]) == 0)
then
   return nil;
end;
-- 减掉重入计数
local counter = redis.call('hincrby', KEYS[1], ARGV[3], -1);
-- 如果重入次数仍然 > 0,那么设置超时时间
if (counter > 0) then
   redis.call('pexpire', KEYS[1], ARGV[2]);
   redis.call('set', KEYS[3], 0, 'px', ARGV[5]);
   return 0;
else
   -- 如果 < 0,那么直接删除锁 key
   redis.call('del', KEYS[1]);
   -- 推送锁释放消息到 CHANNEL (通知锁竞争)
   redis.call(ARGV[4], KEYS[2], ARGV[1]);
   -- 设置锁状态缓存键 (避免后续的重复工作)
   redis.call('set', KEYS[3], 1, 'px', ARGV[5]);
   return 1;
end;
了解过Redis的都知道,他作为一款内存数据库其实并不支持事务控制 (MULTI - EXEC - DISCARD [WATCH]) 本质上只是将多个命令打包一起交给Redis执行,如果执行的命令格式本身没有错,那么并不会回滚事务中前面命令的操作,从而会出现数据一致性问题。所以Redisson采用了lua脚本的方式来实现分布式锁加、解锁。
当然除此以外,使用lua脚本其实还带来了其他的一些好处:
- 相比multi - exec - discard组合命令到queue再执行的方式造成的网络开销更小 (redis的 scrript load、evalsha 可以实现对lua脚本的复用,进一步降低网络资源消耗)
- 看门狗机制的实现也往往会需要多条命令,而也更加适合lua的使用
订阅通知锁竞争阻塞实现
要了解发布订阅的机制,首先我们还要了解一下 Redisson 的订阅传递机制,在 Redisson 之中定义了一个成员属性 promise ,promise 其实指代的是 CompletableFuture 中的一个操作结果,他可能还没有完成处理。
// Promise
public interface PubSubEntry<E> {
    // 订阅计数 + 1
    void acquire();
    // 释放信号量
    int release();
    CompletableFuture<E> getPromise();
}

// 实现类
public class RedissonLockEntry implements PubSubEntry<RedissonLockEntry> {
    // 订阅计数 (多一个客户端在使用此订阅)
    private volatile int counter;
    // 信号量控制
    private final Semaphore latch;
    private final CompletableFuture<RedissonLockEntry> promise;
    // 用于在锁状态变化时通知等待的客户端
    private final ConcurrentLinkedQueue<Runnable> listeners = new ConcurrentLinkedQueue<Runnable>();
    public RedissonLockEntry(CompletableFuture<RedissonLockEntry> promise) {
        super();
        this.latch = new Semaphore(0);
        this.promise = promise;
    }
    public int acquired() {
        return counter;
    }
    public void acquire() {
        counter++;
    }
    public int release() {
        return --counter;
    }
    public CompletableFuture<RedissonLockEntry> getPromise() {
        return promise;
    }
    public void addListener(Runnable listener) {
        listeners.add(listener);
    }
    public boolean removeListener(Runnable listener) {
        return listeners.remove(listener);
    }
    public ConcurrentLinkedQueue<Runnable> getListeners() {
        return listeners;
    }
    public Semaphore getLatch() {
        return latch;
    }
    @Override
    public String toString() {
        return "RedissonLockEntry{" +
                "counter=" + counter +
                '}';
    }
}
RedissonLock下订阅和解除订阅的方法
// RedissonLock订阅实现 - PublishSubscribe
	public CompletableFuture<E> subscribe(String entryName, String channelName) {
        // 获取 channelName 关联的信号量 (用于避免并发订阅,导致订阅并发问题)
        // 需要注意的是AsynncSemaphore是redisson一个比较特殊的异步信号量类
        AsyncSemaphore semaphore = service.getSemaphore(new ChannelName(channelName));
        // 利用CompletableFuture获取操作结果
        CompletableFuture<E> newPromise = new CompletableFuture<>();
        semaphore.acquire().thenAccept(c -> {
            // 避免并发重复处理 (检查标记位)
            if (newPromise.isDone()) {
                // 释放订阅信号量锁定
                semaphore.release();
                return;
            }
            // 判断订阅订阅记录是否已经存在当前订阅,如果已经存在那么增加计数
            E entry = entries.get(entryName);
            if (entry != null) {
                // 增加计数
                entry.acquire();
                semaphore.release();
                // 获取已经存在订阅条目 Promise, 并对结果进行处理
                entry.getPromise().whenComplete((r, e) -> {
                    if (e != null) {
                        newPromise.completeExceptionally(e);
                        return;
                    }
                    // 标记 promise 已经完成
                    newPromise.complete(r);
                });
                return;
            }
            // 创建新的订阅记录
            E value = createEntry(newPromise);
            value.acquire();
            // putIfAbsent 如果key不存在返回null,否则不进行操作返回原先值
            E oldValue = entries.putIfAbsent(entryName, value);
            // 如果出现了并发冲突 (避免在处理之前有其他线程添加了 PubSubEntry)
            if (oldValue != null) {
                // 增加计数
                oldValue.acquire();
                semaphore.release();
				// 领取另外一个线程的处理结果,并对新订阅记录做处理
                oldValue.getPromise().whenComplete((r, e) -> {
                    if (e != null) {
                        newPromise.completeExceptionally(e);
                        return;
                    }
                    // 标记 promise 已经完成
                    newPromise.complete(r);
                });
                return;
            }

            /** 正常执行订阅处理逻辑 **/
            // 创建 Redis 的订阅监听器
            RedisPubSubListener<Object> listener = createListener(channelName, value);
            // 调用 subscribeNoTimeout 进行实际的 Redis 频道订阅工作
            CompletableFuture<PubSubConnectionEntry> s = service.subscribeNoTimeout(LongCodec.INSTANCE, channelName, semaphore, listener);
            newPromise.whenComplete((r, e) -> {
                if (e != null) {
                    // 如果订阅失败,那么处理异常
                    s.completeExceptionally(e);
                }
            });
            // 操作结果处理
            s.whenComplete((r, e) -> {
                if (e != null) {
                    // 出现异常就移除当前订阅记录、直接返回
                    entries.remove(entryName);
                    value.getPromise().completeExceptionally(e);
                    return;
                }
                // 对结果做消费
                if (!value.getPromise().complete(value)) {
                    if (value.getPromise().isCompletedExceptionally()) {
                        entries.remove(entryName);
                    }
                }
            });
        });
        return newPromise;
    }

// RedissonLock unsubscribe 取消订阅方法
    public void unsubscribe(E entry, String entryName, String channelName) {
        ChannelName cn = new ChannelName(channelName);
        // 获取当前Channel的信号量
        AsyncSemaphore semaphore = service.getSemaphore(cn);
        // 获取成功则执行后续回调处理
        semaphore.acquire().thenAccept(c -> {
            // 如果重入次数为0
            if (entry.release() == 0) {
                // 移除映射记录
                entries.remove(entryName);
                // 调用 subscribeNoTimeout 进行实际 Redis 频道取消订阅工作
                service.unsubscribeLocked(cn)
                        .whenComplete((r, e) -> {
                            semaphore.release();
                        });
            } else {
                // 释放信号量
                semaphore.release();
            }
        });
    }
当然除了上面简单的流程图以外,我还做了一个更为详细的时序UML图,有需要可以看一下
非公平锁UML时序图:
除此以外,为了方便公平锁的理解,这里补充acquireFailed的实现,在非公平锁中不需要再做任何的动作,所以它的实现目前其实是空的
    protected void acquireFailed(long waitTime, TimeUnit unit, long threadId) {
        commandExecutor.get(acquireFailedAsync(waitTime, unit, threadId));
    }

    protected CompletableFuture<Void> acquireFailedAsync(long waitTime, TimeUnit unit, long threadId) {
        return CompletableFuture.completedFuture(null);
    }
公平锁实现
Redisson类似于Zookeeper也提供了公平锁的实现方案,在公平锁的方案之中。Redisson的公平锁的实现其实跟非公平调用流程和方法基本一致,唯一不同的地方在于公平锁方案中RedissonLock被替换为了RedissonLock的子类RedissonFairLock。
需要注意的是tryLock方法本身甚至都是调用RedissonLock的,只有一些方法调用的是RedissonFairLock的方法。
不同点
-
存储结构:为了记录参与竞争的顺序,用到了List记录参与竞争的线程顺序;为了记录各个线程的超时时间,则用到了Sorted Set
-
tryLockInnerAsync:加锁 Lua 的脚本不一样
公平锁的加锁脚本有两个不同的情况:
-
调用tryLock,但是没有传入超时、拥有锁时间时
-- 公平锁加锁 lua 脚本 【当tryLock没有传入超时、拥有锁时间时】 -- params: KEY: -- 1. KEY[1]=getRawName() - 锁名称 -- 2. KEY[2]=threadsQueueName - 线程等待队列名称 List -- 3. KEY[3]=timeoutSetName - 超时集合名称 Sorted Set -- ARGV: -- 1. ARGV[1]=unit.toMillis(leaseTime) - 拥锁时间 -- 2. ARGV[2]=getLockName(threadId) - hash表 key 名 -- 3. ARGV[3]=currentTime - 当前系统时间 -- 4. ARGV[4]=wait - 线程等待时间 (Redisson创建时传入的waittime) -- remove stale threads -- 清除超时线程 while true do -- 循环检查等待队列中线程 local firstThreadId2 = redis.call('lindex', KEYS[2], 0); if firstThreadId2 == false then -- 如果结果是 nil 那么等待队列已空,那么打断循环 break; end; -- 通过zscore利用超时集合获取超时时间 local timeout = redis.call('zscore', KEYS[3], firstThreadId2); -- 如果成功获取超时时间,并且已经已经超时 if timeout ~= false and tonumber(timeout) <= tonumber(ARGV[3]) -- 旧版本中是 local timeout = tonumber(redis.call('zscore', KEYS[3], firstThreadId2)); 存在空值异常误判的问题 then -- remove the item from the queue and timeout set -- NOTE we do not alter any other timeout -- 从超时集合之中移除线程 redis.call('zrem', KEYS[3], firstThreadId2); -- 从等待队列中移除线程 redis.call('lpop', KEYS[2]); else break; end; end; -- 真正尝试获得锁的部分 -- check if the lock can be acquired now -- 检查 hash表、等待队列是否存在 或 等待队列首个元素是否为当前申请 key if (redis.call('exists', KEYS[1]) == 0) and ((redis.call('exists', KEYS[2]) == 0) or (redis.call('lindex', KEYS[2], 0) == ARGV[2])) then -- remove this thread from the queue and timeout set -- 从等待队列移除当前申请 key redis.call('lpop', KEYS[2]); -- 从超时集合中移除当前申请 key redis.call('zrem', KEYS[3], ARGV[2]); -- decrease timeouts for all waiting in the queue -- 对所有仍然处于超时集合的线程的超时时间进行维护 (更新) local keys = redis.call('zrange', KEYS[3], 0, -1); for i = 1, #keys, 1 do redis.call('zincrby', KEYS[3], -tonumber(ARGV[4]), keys[i]); end; -- 设置锁信息 redis.call('hset', KEYS[1], ARGV[2], 1); -- 设置锁的拥锁时间 (超时时间) redis.call('pexpire', KEYS[1], ARGV[1]); return nil; end; -- 对锁重入进行处理 -- 检查锁是否已经存在 if (redis.call('hexists', KEYS[1], ARGV[2]) == 1) then -- 增加锁重入计数 redis.call('hincrby', KEYS[1], ARGV[2], 1); -- 重新设置锁的超时时间 redis.call('pexpire', KEYS[1], ARGV[1]); return nil; end; return 1; -- 对锁重入进行处理 -- check if the lock is already held, and this is a re-entry -- 检查锁是否已经存在 if (redis.call('hexists', KEYS[1], ARGV[2]) == 1) then -- 增加锁重入计数 redis.call('hincrby', KEYS[1], ARGV[2], 1); -- 重新设置锁的超时时间 redis.call('pexpire', KEYS[1], ARGV[1]); return nil; end; return 1; -
调用tryLock,传入超时、拥有锁时间
-- 公平锁加锁 lua 脚本 【当tryLock传入超时、拥有锁时间时】
-- params: KEY:
--           1. KEY[1]=getRawName() - 分布式hash表结构名称
--           2. KEY[2]=threadsQueueName - 线程等待队列名称 List
--           3. KEY[3]=timeoutSetName - 超时集合名称 Sorted Set
--         ARGV:
--           1. ARGV[1]=leastTime   - 拥锁时间
--           2. ARGV[2]=getLockName(threadId) - hash表 key 名
--           3. ARGV[3]=waitTime - 等待时间
--           4. ARGV[4]=currentTime - 当前系统时间

-- remove stale threads
while true do
    local firstThreadId2 = redis.call('lindex', KEYS[2], 0);
-- /* 这部分跟上面的加锁脚本是一样的,有需要看上面的即可 */
-- check if the lock is already held, and this is a re-entry
if (redis.call('hexists', KEYS[1], ARGV[2]) == 1)
then
    redis.call('hincrby', KEYS[1], ARGV[2], 1);
    redis.call('pexpire', KEYS[1], ARGV[1]);
    return nil;
end;
-- the lock cannot be acquired
-- check if the thread is already in the queue
-- 检查当前申请线程 是否存在在超时集合中 (timeout的值 有可能是成员分数、也可能是false[当申请线程不存在在超时集合时])
local timeout = redis.call('zscore', KEYS[3], ARGV[2]);
-- timeout 不等于 nil,zscore如果不存在值,那么返回nil,而nil == false
if timeout ~= false then
    -- 通过pttl获取锁对象,并返回 max(0,pttl) 避免返回负值
    --    [key已经过期,但是由于Redis的抽样定期清除策略可能未删除]
    local ttl = redis.call('pttl', KEYS[1]);
    return math.max(0, ttl);
    -- the real timeout is the timeout of the prior thread
    -- in the queue, but this is approximately correct, and
    -- avoids having to traverse the queue
    -- 真实的超时时间其实是获取前一个节点的超时时间,但是代价是遍历整个Queue来找到前一个节点
    -- 这样带来的性能损耗是得不偿失的,现在的方案是获取 hash表结构的过期时间,取近似值
    -- (只要成功加锁,前面脚本刚刚加锁,执行到这里,哪怕有其他线程加锁,到这里实际差值也不可能大)
    -- return timeout - tonumber(ARGV[3]) - tonumber(ARGV[4]); 这个是之前的写法
end;
-- add the thread to the queue at the end, and set its timeout in the timeout set to the timeout of
-- the prior thread in the queue (or the timeout of the lock if the queue is empty) plus the threadWaitTime
-- 获取等待队列中的最后一个线程
local lastThreadId = redis.call('lindex', KEYS[2], -1);
local ttl;
-- 如果等待队列存在线程,并且不是当前线程
if lastThreadId ~= false and lastThreadId ~= ARGV[2]
then
   -- 那么计算等待队列最后一个线程的超时时间作为ttl (返回等待时间)
   ttl = tonumber(redis.call('zscore', KEYS[3], lastThreadId)) - tonumber(ARGV[4]);
else
   -- 否则返回 hash表结构的超时时间作为 ttl
   ttl = redis.call('pttl', KEYS[1]);
end;
-- 计算当前线程的总超时时间,存入等待队列和超时集合中
local timeout = ttl + tonumber(ARGV[3]) + tonumber(ARGV[4]);
if redis.call('zadd', KEYS[3], timeout, ARGV[2]) == 1 then
   redis.call('rpush', KEYS[2], ARGV[2]);
end;
return ttl;
-
-
unlockInnerAsync:解锁 Lua 脚本不一样
-- 公平锁解锁 lua 脚本 -- params: KEY: -- 1. KEY[1]=getRawName() - 锁名称 -- 2. KEY[2]=threadsQueueName - 线程等待队列名称 List -- 3. KEY[3]=timeoutSetName - 超时集合名称 Sorted Set -- 4. KEY[4]=getChannelName() - 锁解锁通知订阅队列的名 -- 5. KEY[5]=getUnlockLatchName(requestId) - 锁状态缓存键 -- ARGV: -- 1. ARGV[1]=LockPubSub.UNLOCK_MESSAGE - 释放锁消息内容 -- 2. ARGV[2]=internalLockLeaseTime - 锁过期时间 -- 3. ARGV[3]=getLockName(threadId) - 锁的名字 -- 4. ARGV[4]=System.currentTimeMillis() - 当前系统时间 -- 5. ARGV[5]=getSubscribeService().getPublishCommand() - 通知命令 -- 6. ARGV[6]=timeout - 锁状态缓存键过期时间 (max(slave 操作超时时间 * retry, 1) -- 检查是否存在 锁状态缓存键,如果存在直接返回缓存键的值 (避免重复解锁) local val = redis.call('get', KEYS[5]); if val ~= false then return tonumber(val); end ; -- 循环从等待队列中拿线程,将过期线程删除 -- remove stale threads while true do -- 从等待队列中获取首个线程直到等待队列变空 local firstThreadId2 = redis.call('lindex', KEYS[2], 0); if firstThreadId2 == false then break ; end ; -- 从超时集合中获取线程,如果已经超时,那么从等待、超时队列中删除线程 local timeout = redis.call('zscore', KEYS[3], firstThreadId2); if timeout ~= false and tonumber(timeout) <= tonumber(ARGV[4]) then redis.call('zrem', KEYS[3], firstThreadId2); redis.call('lpop', KEYS[2]); else break ; end ; end ; -- 检查Redis分布式锁hash表是否存在 if (redis.call('exists', KEYS[1]) == 0) then -- 如果存在,通知等待队列中的线程 local nextThreadId = redis.call('lindex', KEYS[2], 0); if nextThreadId ~= false then redis.call(ARGV[5], KEYS[4] .. ':' .. nextThreadId, ARGV[1]); end ; -- 设置 锁状态缓存键 redis.call('set', KEYS[5], 1, 'px', ARGV[6]); return 1; end ; -- 真正的解锁操作 -- 检查当前线程是否持有锁,如果没有返回nil if (redis.call('hexists', KEYS[1], ARGV[3]) == 0) then return nil; end ; -- 如果当前线程仍然持有锁,那么减少重入计数 local counter = redis.call('hincrby', KEYS[1], ARGV[3], -1); -- 如果减少后计数仍然大于0,刷新过期时间 if (counter > 0) then redis.call('pexpire', KEYS[1], ARGV[2]); redis.call('set', KEYS[5], 0, 'px', ARGV[6]); -- 返回 0 表示仍然拥有锁 return 0; end ; -- 如果减少后计数小于0,那么完全释放锁,并且设置锁状态缓存键 redis.call('del', KEYS[1]); redis.call('set', KEYS[5], 1, 'px', ARGV[6]); -- 如果等待队列还有其他线程,拿出来通知竞争锁 local nextThreadId = redis.call('lindex', KEYS[2], 0); if nextThreadId ~= false then redis.call(ARGV[5], KEYS[4] .. ':' .. nextThreadId, ARGV[1]); end ; return 1; -
subscribe: 订阅工作 (只有传参不一样,额外加上了threadId)
protected CompletableFuture<RedissonLockEntry> subscribe(long threadId) { return pubSub.subscribe(getEntryName() + ":" + threadId, getChannelName() + ":" + getLockName(threadId)); } -
unsubscribe: 取消订阅 (只有传参不一样,额外加上threadId)
protected void unsubscribe(RedissonLockEntry entry, long threadId) { pubSub.unsubscribe(entry, getEntryName() + ":" + threadId, getChannelName() + ":" + getLockName(threadId)); } -
acquireFailedAsync:对获取失败后的状态进行处理 (非公平锁此处是空实现)
公平锁中为了保证FIFO队列效果,相比非公平锁则需要额外多该方法的实现,保证竞争线程获取超时时,需要完成以下工作:
- 从等待队列之中移除该线程
- 调整队列之中后续所有线程的等待时间
    @Override
    protected CompletableFuture<Void> acquireFailedAsync(long waitTime, TimeUnit unit, long threadId) {
        // 获取锁的等待时间 tryLock 首个参数
        long wait = threadWaitTime;
        if (waitTime > 0) {
            wait = unit.toMillis(waitTime);
        }

        RFuture<Void> f = evalWriteSyncedAsync(getRawName(), LongCodec.INSTANCE, RedisCommands.EVAL_VOID,
                // 读取线程队列
                // get the existing timeout for the thread to remove
                "local queue = redis.call('lrange', KEYS[1], 0, -1);" +
						// 查找当前线程的位置
                        // find the location in the queue where the thread is
                        "local i = 1;" +
                        "while i <= #queue and queue[i] ~= ARGV[1] do " +
                        "i = i + 1;" +
                        "end;" +
						// 查找超时集合中当前线程位置
                        // go to the next index which will exist after the current thread is removed
                        "i = i + 1;" +
                        // decrement the timeout for the rest of the queue after the thread being removed
                        "while i <= #queue do " +
                        "redis.call('zincrby', KEYS[2], -tonumber(ARGV[2]), queue[i]);" +
                        "i = i + 1;" +
                        "end;" +
						// 从等待队列和超时集合中移除当前线程
                        // remove the thread from the queue and timeouts set
                        "redis.call('zrem', KEYS[2], ARGV[1]);" +
                        "redis.call('lrem', KEYS[1], 0, ARGV[1]);",
                Arrays.asList(threadsQueueName, timeoutSetName),
                getLockName(threadId), wait);
        return f.toCompletableFuture();
    }
集群状态下加锁原理
值得一提的是,我们都知道Zookeeper其实是基于Paxos算法的简化实现Zab协议实现了多节点之间的状态一致效果,而Redis集群本身其实遵守的是Gossip协议,而在集群下其实遵守的是Sharding架构。
Paxos的基本原理导致了Zookeeper本质上所有的服务节点其实都会存储分布式锁的记录,但是我们知道Redis集群其实遵守的是Sharding架构。集群将hash表达范围分为16384个hash槽,每个hash值都会通过CRC16映射到特定槽位上。而不同槽位的Redis服务之间本身并不会做主从复制 (除非有钱给他们配置slave,构成多master - follower)。这也注定,Redis的分布式锁标记必然只存在于具体某个槽位的master - slave上。
也正是因为这个区别,导致了Zookeeper的分布式锁可靠性是比Redis的分布式锁要差的。特别是没有特地为不同槽位的master配置follower的情况下,一旦master宕机就会出现分布式锁失效,分布式并发安全问题。
RedLock算法
从上面提到的Redis的实现方式来看,我们知道我们最为常用的Redis分布式锁其实只会在特定槽位对应的master - follower上添加锁记录,这其实导致了可靠性会比较低,为了满足实际需要在较为早期的Redisson之中,其实存在RedLock的分布式加锁方式。
他的实现逻辑其实与 Paxos 和 Raft 等分布式选举协议其实是类似的,旨在一定的时间内对加锁进行判断,如果超过半数加锁成功,那么认为此次加锁成功,但是如果加锁成功的实例少于半数,那么则认为加锁失败。
从源码我们也可以看出来,Redisson其实通过构建多个RLock实例,对这些实例做加锁动作,而并不是依赖于Redis集群的Sharding架构来实现的,这也是分布式加锁记录能同时存在在多个实例的原因。
/**
 * RedLock locking algorithm implementation for multiple locks.
 * It manages all locks as one.
 * @see <a href="http://redis.io/topics/distlock">http://redis.io/topics/distlock</a>
 * @author Nikita Koksharov
 */
@Deprecated
public class RedissonRedLock extends RedissonMultiLock {
    /** Creates instance with multiple {@link RLock} objects.
     * Each RLock object could be created by own Redisson instance.
     * @param locks - array of locks */
    public RedissonRedLock(RLock... locks) {
        super(locks);
    }
    @Override
    protected int failedLocksLimit() {
        return locks.size() - minLocksAmount(locks);
    }
    protected int minLocksAmount(final List<RLock> locks) {
        return locks.size()/2 + 1;
    }
    @Override
    protected long calcLockWaitTime(long remainTime) {
        return Math.max(remainTime / locks.size(), 1);
    }
    @Override
    public void unlock() {
        unlockInner(locks);
    }
}
但是,如果我们也可以看到实际上RedissonRedLock类上有一个 @Deprecated 注解,实际上由于 RedLock 算法在实际应用的多种缺陷,他其实已经被弃用了。他的主要缺陷有:
-
时钟依赖问题:RedLock的实现过于依赖于各个实例的时钟的一致性,如果其中一部分实例时钟不一致,那么就会出现原先应该加锁成功却失败的情况。
-
复杂度与收益问题:RedLock的实现,对多实例的同步一致性带来要求,相比单实例的实现其实复杂很多,但是它带来的收益其实未必值得它带来的可靠性提升。
-
RedLock的可靠性受到了质疑。 在 Martin Kleppmann 编写 Designing Data-Intensive Applications 一书查阅资料的时候,曾经对RedLock的进行过分析,并编写过《How to do distributed locking》一文,以后有机会可以看看。How to do distributed locking — Martin Kleppmann’s blog
其实完整的看完文章,就能大概知道 Martin Kleppmann 的意思其实非常简单,无非就是由以下两个角度决定,RedLock的算法是不合理的:
-
效率的角度:花销最少五个redis node来为分布式锁做实现本身就有些不合理,并且他认为只依靠时间不类似于paxos基于事件序号的方式来实现分布式锁是不合理的,如果再加上额外实现的序列分发器 (也就是他文中提及的Making the lock safe with fencing) 就更显得不合理了。
值得一提的是,他认为Redisson简单的单节点分布式锁本身反而是Redis实现分布式锁的一种特点
-
分布式严谨性:RedLock本身过度的依赖于时间来判断和解决共识,在面对客户端GC、网络超时、多Redis节点的时钟一致性、甚至硬件层面的SMI中断等都有要求,其一出现问题RedLock的严谨性都是无法保证的。
当然RedLock官方作者 Salvatore Sanfilippo (网名:antirez) 其实也对他的观点做了回应,可以参考他文中提及的讨论地址:Is Redlock Safe? Reply to Redlock Analysis | Hacker News ,在antirez的个人网站也有一篇名叫 《Is RedLock Safe》 的文章也对此做了回应 Is RedLock Safe - antriez。
相比这些分布式大佬来说,我肯定是不值一提的。也因此我稍微总结一些比较关键的一些信息:Martin Kleppmann 文章中提到的所有的情况其实是基于设置了超时时间的情况下进行讨论的,如果设置了看门狗那么就不再存在他例子中的严谨性问题,当然如果这样做结果可能是 dead_lock 的到来;当然还有一种方案是监控系统 例如: omega);当然这些措施其实都比不过一个理论上最好的解决方案,避免需要分布式系统中节点做协调的这一情况。
至于RedLock可以确定的是 antriez 虽然说自己后续会尝试对 RedLock 做Jepsen做测试,但直到我编写该长文九年后的今天、RedLock被标记过时的今天,没有看到他提供任何测试结果 (大概率也确实没有成功通过)
虽然设置过期时间的RedLock大概率过不了Jepsen,但是antirez的一段总结还是非常到位的:
Note: you have the same issue with all the other dist locks with auto-release. If you have a mission critical use case you could:
- Try real time kernel extensions.
- Try a time bomb or watchdog process as you suggested.
- Put monitoring systems to avoid load to go over a certain level.
- Tune the Linux scheduler params.
- Use TTLs that are comparatively very large compared to the work you need to do with the lock hold.
挖个坑:以后有兴趣,我可能会在单独拆分的分布式锁的文章中结合论坛中的内容对RedLock的源码实现做一个简单的分析。 (当然Paxos和Raft等分布式共识算法也会总结一下)
-
优点(单节点)
- 性能相对较好
- 符合企业常用缓存框架 (无需额外增加成本)
缺点(单节点)
- 一致性、可靠性相对较弱:因为RedLock的可用性存疑,本质上使用Redis来实现分布式锁的方案的可靠性存疑,实际上真正能在项目中使用的其实只有单节点的加锁方案,而单节点加锁的可靠性问题自然不必多言。
- 超时锁释放:即使改用单节点的方案,其实只要我们不使用watch dog的方案(也就是配置永不超时),那么超时锁释放带来的分布式锁不安全这一问题始终是无法解决。这一点上可以参考上文中提到的antriez的总结。
ETCD
ETCD的底层实现其实跟Zookeeper是类似的,但在存储结构在又跟Redis非常相似,一样都是键对值存储系统。但相比于Zookeeper或者Redis。ETCD其实在现在的行业中还是比较少用于充当实际解决方案,他的底层实现语言是Go。由于ETCD的相关资料比较少,这一篇幅的介绍可能会比较长 (ETCD的 Lease (租约机制)、Revision (版本机制)、Prefix (目录机制)、Watch (观察者机制)、ETCD与Zookeeper、Redis不同的特点) 等的介绍篇幅可能会比较长,后面如果拆开分布式锁内容单独介绍的时候,可能会展开介绍一下这个锁。
(以后有机会展开了解,但不会是现在)
Database
除了Zookeeper、Redis,集群公共的数据库当然也可以直接充当锁标记位的记录者,而且Database还直接支持事务控制,不需要类似于Redis一样使用lua脚本来实现原子性控制,而且Database对于集群服务来说本身就是基础组件,相比Zookeeper和Redis并不需要再额外使用其他中间件,相比起来简单、成本低。
但这种实现方案比较少见,基本也不太可能会在实际场景遇到,简单的来说Database的实现方案,无非利用数据库的唯一约束,让竞争方在预定的表格之中插入同名的数据,谁成功插入数据行,谁就获得资源使用权,这种实现方式往往会对数据库造成压力,并且将从架构设计的角度来看这些工作落到数据库层进行实现本身也是一个不合理的方案。
也正式由于它的缺点,导致Database分布式处理方案几乎不可能出现在实际应用中,这里不打算展开说,只会介绍一些基本的信息。
优点
- 不需要依赖任何第三方新增组件,只需要Database就可以直接实现并发安全
- 满足分布式幂等要求
- 通过serverId + resourceId判断 + filed可实现重入计数
缺点
- 无法支持分布式锁超时锁释放效果
- 无法实现锁自动续费的效果
- 从架构实现角度来看不合理
线程间通讯
Object
wait-notify-notifyAll
首先要明确的一件事是,wait-notify 的机制适用的场景是需要使用到同一个信号量下的线程通讯,这种场景往往适合适用于多线程消费上游生产的消息这一情况。
在介绍Synchronized的实现的时候,我曾在原理图和解释之中写过一段话
- waitSet集合:C++通过WaitSet集合来管理调用wait方法的线程,一旦有notify / notifyAll则会唤醒WaitSet中的线程,使他们前来竞争。
关于 waitSet 集合的底层实现也相当有意思,它的数据结构本身就是个双向链表(如果你有兴趣看一下JVM的源码 (ObjectMonitor的 wait 和 notify / notify及其他们调用的相关方法类似于INotify,会发现**
WaitSet本身其实是一个遵守FIFO的双向链表,当然这只是意味着回到EntrySet中的线程顺序是遵守WaitSet中顺序,但由于锁获取仍要竞争,所以这并不意味着锁本身是遵守FIFO的** 【线程唤醒遵守FIFO、但竞争并不遵守】)
现在,就是回收这个伏笔的时候了,我们可以在Synchronized所包裹的代码块之中,通过 wait - notify 实现不同线程之间的通信效果。我们先来看一个简单的使用示例:
    private final LinkedList<String> buffer = new LinkedList<>();
    private final int maxSize = N;
    public Buffer(int size) {
        this.maxSize = size;
    }
    public void execute() {
        new FutureTask<String>(() -> {
            /** 需要注意的是条件判断必须使用的是 while - 这涉及到虚假唤醒的问题,后面会做介绍 */
            while (buffer.size() == maxSize) {
                // 缓冲区满时等待
                wait();  // 必须在synchronized中,因为生产者需要释放锁给消费者
            }
            buffer.add(item);
            // 通知消费者有新数据可消费
            notify();  // 同样需要在synchronized中,确保状态变更与通知的原子性
            return null;
        }).start();
        new FutureTask<String>(() -> {
            while (buffer.isEmpty()) {
                // 缓冲区空时等待
                wait();  // 必须在synchronized中,因为消费者需要释放锁给生产者
            }
            String item = buffer.removeFirst();
            // 通知生产者有新空间可生产
            notify();  // 同样需要在synchronized中
            return item;
        }).start();
    }
正因为上文的介绍,其实到这里他是怎么实现通讯效果的已经很显然了,整个通讯的逻辑其实就是构建在waitSet的支持下的。如果还是有些疑惑我们可以看一下以下这张图
wait的调用为什么需要加锁
-
从底层实现来看,wait必然需要结合synchronized才能使用,毕竟waitSet本身就跟Synchronized的底层实现捆绑在一起
-
从理论角度来看,我们可以假设如果可以不加锁直接调用 wait 可以看看会有什么样的效果
/* 如果存在直接加wait可以通过编译的情况 */
if(conditionList.isEmpty()) {
    // 判断结束后,如果存在 线程切换,实际上 conditionList 可能已被插入元素
    conditionList.wait();
}
// ->
/* 因此实际上加锁是必然的行为 */
synchronized(conditionList) {
    // 为了里面虚假唤醒,这里必须使用使用while
    while(conditionList.isEmpty()) {
        conditionList.wait();
    }
    // 消费行为
}
显然,如果不加锁就调用wait,实际上会导致永久等待的可能。这一情况又被称为 竞态 / 竞争条件(Race Condition)。而加锁的行为又被称为添加 静态锁/互斥锁(Static Lock / Mutex)。
-
从通讯的角度来看,其实加锁的行为避免了潜在的信号丢失问题 (lost signals/lost notifications),也就是wait实际上在等待一个自身已经错过的通知信号,这势必会导致调用wait的方法会长期的等待
其实不管是信号丢失还是竞态的问题,他们的本质其实都是存在潜在的并发安全问题。也正因如此,wait方法的调用必然是需要加锁来实现的。
为什么加锁后wait前条件判断要用while
实际上决定我们要使用while主要有以下两个原因:
-
虚假唤醒的可能性
虚假唤醒(spurious wakeups)。实际上由于操作系统的信号机制的底层实现上的问题以及硬件等原因,
WaitSet中的线程在没有任何线程调用notify的时候被唤醒,如果我们使用的是 if 判断,那么就可能会出现,实际我们需要等待的资源本身并没有就绪 (或者是某种条件),但是线程已经开始消费 (或者其他业务处理)。这自然并不是我们想要的。这也是我上面提供的实际使用例子中都是用了 while 来判断条件并决定是否调用 wait 的根本原因。JDK官方文档对此有比较详细的介绍,并提供了官方推荐的使用例子,这里贴一小段介绍,有需要可跳转下面的连接查看
A thread can wake up without being notified, interrupted, or timing out, a so-called spurious wakeup. While this will rarely occur in practice, applications must guard against it by testing for the condition that should have caused the thread to be awakened, and continuing to wait if the condition is not satisfied. See the example below.
-
条件再次不满足
如果唤醒的一方是
notifyAll,那么实际上所有参与到该ObjectMonitor锁竞争对象都会参与到竞争之中,如果条件的判断本身类似于生产者消费者的模型*(类似于Collection的isEmpty判断等)*,上一个获取到锁的线程已经消费,那当前线程的消费逻辑是不应该执行的。
而如果将if替换为示例中的 while ,这个问题就能被很好的避免。如果感兴趣,可以按照JDK官方文档的介绍,去看以下两本书之中的相关内容,其中有更为详细的介绍:
For more information on this topic, see section 14.2, "Condition Queues," in Brian Goetz and others' Java Concurrency in Practice (Addison-Wesley, 2006) or Item 81 in Joshua Bloch's Effective Java, Third Edition (Addison-Wesley, 2018).
补充
值得一提的是,实际上我们使用 wait 方法会导致 Synchronized 直接升级为重量级锁。本质上也算是加强并发状态下的可靠性的象征,而这个证明我们可以参考一下JVM的源码 (虽然我很不喜欢贴JVM源码来解释,但为了提供证明,只能贴上一小段)
/* 源码文件名 synchronizer.cpp (顺带一提,objectMonitor enter 和 exit也在这个cpp文件中) */
/*     有需要可以看一看    */
int ObjectSynchronizer::wait(Handle obj, jlong millis, TRAPS) {
  JavaThread* current = THREAD;
  // 如果当前处于偏向锁状态,那么撤销偏向锁
  if (UseBiasedLocking) {
    BiasedLocking::revoke(current, obj);
    assert(!obj->mark().has_bias_pattern(), "biases should be revoked by now");
  }
  // 如果超时值是复数
  if (millis < 0) {
    THROW_MSG_0(vmSymbols::java_lang_IllegalArgumentException(), "timeout value is negative");
  }
  // The ObjectMonitor* can't be async deflated because the _waiters
  // field is incremented before ownership is dropped and decremented
  // after ownership is regained.
  // 直接将锁升级为重量级锁,避免并发安全问题
  ObjectMonitor* monitor = inflate(current, obj(), inflate_cause_wait);
  // 性能监测探针
  DTRACE_MONITOR_WAIT_PROBE(monitor, obj(), current, millis);
  monitor->wait(millis, true, THREAD); // Not CHECK as we need following code

  // This dummy call is in place to get around dtrace bug 6254741.  Once
  // that's fixed we can uncomment the following line, remove the call
  // and change this function back into a "void" func.
  // DTRACE_MONITOR_PROBE(waited, monitor, obj(), THREAD);
  // 再次插入一个DTrace探针,注释解释这次插入探针是为了解决6254741bug,我们不需要知道bug是什么
  int ret_code = dtrace_waited_probe(monitor, obj, THREAD);
  return ret_code;
}
Thread
join
join 方法的效果非常简单,如果A线程执行某个方法之前希望其他的某个线程先执行完毕,我们就可以通过 join 方法来实现
Thread thread = new Thread(() -> {
    try {
        System.out.println("子线程开始执行");
        Thread.sleep(2000);  // 模拟耗时操作
        System.out.println("子线程执行完毕");
    } catch (InterruptedException e) {
        e.printStackTrace();
    }
});
/* 执行顺序 */
System.out.println("主线程开始执行");
thread.start();  // 启动子线程
try {
    System.out.println("主线程调用join()方法");
    thread.join();  // 主线程等待子线程执行完毕
} catch (InterruptedException e) {
    throw new RuntimeException(e);
}
// 子线程执行完毕后,主线程继续执行
System.out.println("主线程继续执行");
值得一提的是,其实 join 方法非常简单,他其实是建立在 wait 方法基础上实现的。比较有意思的是,针对Java19之后的虚拟线程该方法做了一定的提升处理。这里按照当前文章的惯例继续以Java21作为例子进行介绍:
    /**
    Waits at most {@code millis} milliseconds for this thread to terminate. A timeout of {@code 0} means to wait forever. This method returns immediately, without waiting, if the thread has not been {@link #start() started}.
    @implNote
    For platform threads, the implementation uses a loop of {@code this.wait}calls conditioned on {@code this.isAlive}. As a thread terminates the {@code this.notifyAll} method is invoked. It is recommended that applications not use {@code wait}, {@code notify}, or {@code notifyAll} on {@code Thread} instances.
    @param  millis   the time to wait in milliseconds
    @throws  IllegalArgumentException    if the value of {@code millis} is negative
    @throws  InterruptedException      if any thread has interrupted the current thread. The <i>interrupted status</i> of the current thread is cleared when this exception is thrown.
     */
    public final void join(long millis) throws InterruptedException {
        // 如果超时设置为负数
        if (millis < 0)
            throw new IllegalArgumentException("timeout value is negative");
        // 如果当前是虚拟线程
        if (this instanceof VirtualThread vthread) {
            if (isAlive()) {
                long nanos = MILLISECONDS.toNanos(millis);
                // 利用虚拟线程的 joinNanos 来实现 join 效果
                vthread.joinNanos(nanos);
            }
            return;
        }
        // 以被调用的线程本身作为 ObjectMonitor 加锁
        synchronized (this) {
            if (millis > 0) {
                if (isAlive()) {
                    // 如果设置了超时时间,不断循环等待直到超时 (这里的while跟wait一样避免虚假唤醒)
                    final long startTime = System.nanoTime();
                    long delay = millis;
                    do {
                        wait(delay);
                    } while (isAlive() && (delay = millis -
                             NANOSECONDS.toMillis(System.nanoTime() - startTime)) > 0);
                }
            } else {
                // 如果是超时时间没有做设置,那么无线等待
                while (isAlive()) {
                    wait(0);
                }
            }
        }
    }
所以,实际上当我们在A线程的 run 方法之中调用 B.join() 等同于以下的代码:
new Thread(() -> {
	@Override
	public void run() {
		threadB.join();
		// do something
	}
}).start();

/** 等效于 */
new Thread(() -> {
    @Override
    public void run() {

    }
})
那join中的notify什么时候调用呢?
在 join 方法的注释之中,其实有提到JVM会自动的对该线程对线在完成 run 方法后调用 notifyAll 方法,并将其作为JVM内部实现的一部分。没办法还是支持从JVM源码中贴一段代码来佐证。(需要注意的是,我只粘贴关键通知的部分。join方法实际上调用的远不止这部分 thread.cpp 中的 JVMTI线程结束事件、post_run、exit 方法,其实都有关)
static void ensure_join(JavaThread* thread) {
  // We do not need to grab the Threads_lock, since we are operating on ourself.
  Handle threadObj(thread, thread->threadObj());
  assert(threadObj.not_null(), "java thread object must exist");
  // 构建 ObjectLocker 对线程对象加锁
  ObjectLocker lock(threadObj, thread);
  // Ignore pending exception (ThreadDeath), since we are exiting anyway
  thread->clear_pending_exception();
  // Thread is exiting. So set thread_status field in java.lang.Thread class to TERMINATED.
  // 设置线程状态 TERMINATED
  java_lang_Thread::set_thread_status(threadObj(), JavaThreadStatus::TERMINATED);
  // Clear the native thread instance - this makes isAlive return false and allows the join()
  // to complete once we've done the notify_all below
  // 清除本地线程指针
  java_lang_Thread::set_thread(threadObj(), NULL);
  /** 显然在退出的时候,JVM会协助调用 notify_all 让调用 thread.join() 的 threadA 唤醒 */
  lock.notify_all(thread);
  // Ignore pending exception (ThreadDeath), since we are exiting anyway
  thread->clear_pending_exception();
}
补充
由于Thread有一部分线程调用工作,他的效果并非是直接与其他线程直接通讯,而是对当前线程做一些调度和状态上的处理,方法直接和通讯的方法放在一起似乎不太合适,因此就有了当前补充的部分。
sleep
调用sleep可以让某个线程在一定时间内停止工作,并让他在这段时间内过度所有的CPU使用权给其他线程使用。在系统级别调用sleep的线程会被挂起。需要注意的是sleep的方法,线程“睡眠"是 >= 设置的睡眠时间。(因为线程回到操作系统的工作队列后需要重新竞争CPU时间片)
     /** Causes the currently executing thread to sleep (temporarily cease execution) for the specified number of milliseconds, subject to the precision and accuracy of system timers and schedulers. The thread does not lose ownership of any monitors.
      @param  millis   the length of time to sleep in milliseconds
      @throws  IllegalArgumentException    if the value of {@code millis} is negative
      @throws  InterruptedException     if any thread has interrupted the current thread. The <i>interrupted status</i> of the current thread is cleared when this exception is thrown.
     */
    public static void sleep(long millis) throws InterruptedException {
        if (millis < 0) {
            throw new IllegalArgumentException("timeout value is negative");
        }
        long nanos = MILLISECONDS.toNanos(millis);
        // 获取线程休眠事件
        ThreadSleepEvent event = beforeSleep(nanos);
        try {
            // 如果是虚拟线程,那么调用虚拟线程的特殊实现
            if (currentThread() instanceof VirtualThread vthread) {
                vthread.sleepNanos(nanos);
            } else {
                sleep0(nanos);
            }
        } finally {
            afterSleep(event);
        }
    }
而实际JVM之中被调用的方法如下:
// java.lang.Thread.sleep support Returns true if sleep time elapsed as expected, and false if the thread was interrupted.
bool JavaThread::sleep(jlong millis) {
  /** 检查调用者是否当前线程、获取SleepEvent */
  assert(this == Thread::current(),  "thread consistency check");
  ParkEvent * const slp = this->_SleepEvent;
  // Because there can be races with thread interruption sending an unpark() to the event, we explicitly reset it here to avoid an immediate return. The actual interrupt state will be checked before we park().
  /** 重置事件状态,注释意思是避免因为 unpark() 导致直接返回 */
  slp->reset();
  // Thread interruption establishes a happens-before ordering in the Java Memory Model, so we need to ensure we synchronize with the interrupt state.
  /** 构建内存屏障,保证不同线程的可见性 */
  OrderAccess::fence();
  /** 记录开始时间 */
  jlong prevtime = os::javaTimeNanos();
  for (;;) {
    // interruption has precedence over timing out
    /** 检查是否处于中断状态 */
    if (this->is_interrupted(true)) {
      return false;
    }
    /** 如果已经超时 */
    if (millis <= 0) {
      return true;
    }

    /** 将线程挂起,使其进入等待状态 */
    {
      // 标记线程进入阻塞状态
      ThreadBlockInVM tbivm(this);
      // 设置操作系统线程的等待状态,参数为false表明他不是Object.wait带来的等待状态
      OSThreadWaitState osts(this->osthread(), false /* not Object.wait() */);
      // 调用ParkEvent实际挂起线程
      slp->park(millis);
    }

    /** 对休眠时间进行更新,并且进行管理 */
    // Update elapsed time tracking
    jlong newtime = os::javaTimeNanos();
    if (newtime - prevtime < 0) {
      // time moving backwards, should only happen if no monotonic clock not a guarantee() because JVM should not abort on kernel/glibc bugs
      assert(false,
             "unexpected time moving backwards detected in JavaThread::sleep()");
    } else {
      millis -= (newtime - prevtime) / NANOSECS_PER_MILLISEC;
    }
    prevtime = newtime;
  }
}
Sleep的本质其实是通过使用 JVM 提供的原语 (LockSupport底层的 Park、UnPark) 实现的,而并不是我们直觉的认为直接调用操作系统提供的 sleep 方法。在JVM之中,实际调用和处理的逻辑其实是通过 ParkEvent (底层基于PlatformEvent) 事件的消费来实现控制的。而在park方法内部则针对不同的操作系统有着不同的具体实现 (稍加了解即可)。
在Linux之中其实主要是调用了两个 pthread_mutex_lock 和 pthread_cond_wait / pthread_cond_timedwait 方法。
- pthread_mutex_lock:尝试获取线程操作的互斥锁。(内部获取逻辑又分为快速路径和慢速路径,慢速路径有可能会进入挂起,但我们不需要在意这件事)
- pthread_cond_wait / pthread_cond_timedwait:条件变量等待函数,在条件符合之前线程会被挂起。他的实际工作其实就是让线程进入等待状态 (内部会释放互斥锁,待挂起结束再重新获取互斥锁)
- pthread_mutex_unlock:释放线程操作互斥锁
在挂起的具体工作中,操作系统会将线程的状态从 RUNNING(运行态) -> INTERRUPTIBLE(可中断等待) / UNINTERRUPTIBLE(不可中断等待),将线程拥有的CPU时间片资源让给其他线程。而在Windows之中实际调用的是 WaitForSingleObject ,他的具体实现会有不同,但基本是类似的。
yield
yield可以让当前线程放弃获取的CPU时间片,并且过渡给优先级更高的线程,实际使用的时候我们需要设置优先级。当然因为实际让渡是根据优先级来处理的,有可能最后仍然由当前线程获得使用权。
/** The minimum priority that a thread can have. */
public static final int MIN_PRIORITY = 1;
/** The default priority that is assigned to a thread. */
public static final int NORM_PRIORITY = 5;
/** The maximum priority that a thread can have. */
public static final int MAX_PRIORITY = 10;
/** A hint to the scheduler that the current thread is willing to yield its current use of a processor. The scheduler is free to ignore this hint.
<p> Yield is a heuristic attempt to improve relative progression between threads that would otherwise over-utilise a CPU. Its use should be combined with detailed profiling and benchmarking to ensure that it actually has the desired effect.
<p> It is rarely appropriate to use this method. It may be useful for debugging or testing purposes, where it may help to reproduce bugs due to race conditions. It may also be useful when designing concurrency control constructs such as the ones in the {@link java.util.concurrent.locks} package. */
public static void yield() {
    if (currentThread() instanceof VirtualThread vthread) {
        vthread.tryYield();
    } else {
        yield0();
    }
}
private static native void yield0();
而JNI实际会映射到 os::naked_yield() 方法中,在Linux下他的实际实现如下,从注释之中也能看出来,他会将当前调用线程移动到就绪队列的队尾。
// Linux CFS scheduler (since 2.6.23) does not guarantee sched_yield(2) will actually give up the CPU. Since skip buddy (v2.6.28):
// * Sets the yielding task as skip buddy for current CPU's run queue.
// * Picks next from run queue, if empty, picks a skip buddy (can be the yielding task).
// * Clears skip buddies for this run queue (yielding task no longer a skip buddy).
// An alternative is calling os::naked_short_nanosleep with a small number to avoid getting re-scheduled immediately.
void os::naked_yield() {
  sched_yield();
}
而Windows实现如下,类似于Linux,他是直接让出当前的时间片给其他线程执行
void os::naked_yield() {
  // Consider passing back the return value from SwitchToThread().
  SwitchToThread();
}
onSpinWait
onSpinWait的调用效果也是比较简单的,线程调用该方法会向系统发出幸好,表明自身处理自旋等待状态,线程调用该方法之后,操作系统会减少给该线程的资源分配甚至会暂停一小段时间。在超线程的CPU下,处于同一个核心处理的另外一个线程则会获得更多的资源使用机会。
/** Indicates that the caller is momentarily unable to progress, until the occurrence of one or more actions on the part of other activities. By invoking this method within each iteration of a spin-wait loop construct, the calling thread indicates to the runtime that it is busy-waiting. The runtime may take action to improve the performance of invoking spin-wait loop constructions.
* @apiNote
* As an example consider a method in a class that spins in a loop until some flag is set outside of that method. A call to the {@code onSpinWait} method should be placed inside the spin loop.
* {@snippet :
*     class EventHandler {
*         volatile boolean eventNotificationNotReceived;
*         void waitForEventAndHandleIt() {
*             while ( eventNotificationNotReceived ) {
*                 Thread.onSpinWait();
*             }
*             readAndProcessEvent();
*         }
*
*         void readAndProcessEvent() {
*             // Read event from some source and process it
*              . . .
*         }
*     }
* }
* <p>
* The code above would remain correct even if the {@code onSpinWait} method was not called at all. However on some architectures the Java Virtual Machine may issue the processor instructions to address such code patterns in a more beneficial way.
* @since 9
*/
@IntrinsicCandidate
public static void onSpinWait() {}
在实际JNI映射之后,实际负责处理的是该方法,在x86下便直接是通过调用pause来降低当前线程的资源占用;arm下该方法的效果其实并没有实现。
// arm架构下 (c1_LIRAssembler_arm.cpp)
void LIR_Assembler::on_spin_wait() {
  Unimplemented();
}
// x86架构下 (c1_LIRAssembler_x86.cpp)
void LIR_Assembler::on_spin_wait() {
  __ pause ();
}
JUC
除了较为底层的Object和Thread以外,Java的JUC中也提供了一些可以直接使用的线程通讯的工具类,利用它我们可以协助多个线程来处理统一的任务工作。
AQS - await-sign-signAll
await-sign-signAll的机制其实是由 AQS 内部之中的一个通讯实现方案,在上面介绍Object内部的通讯方案的时候,曾经提到过为什么要使用 while 来不断调用 wait 方法,为什么要使用 synchronized 来保证通讯的并发安全问题。(避免竞态条件、信号量丢失、虚假唤醒等问题)。Object通讯存在的局限性在实际使用的时候,显得有些不便,而AQS提供的通讯方案,则是为了解决这些局限性而出现的。
使用示例
class BoundedBuffer<E> {
    final Lock lock = new ReentrantLock();
    final Condition notFull = lock.newCondition();
    final Condition notEmpty = lock.newCondition();

    final E[] items;
    int putIndex, takeIndex, count;

    public void put(E e) throws InterruptedException {
        lock.lock();
        try {
            while (count == items.length)
                notFull.await();  // 队列已满,等待不满条件
            items[putIndex] = e;
            putIndex = (putIndex + 1) % items.length;
            count++;
            notEmpty.signal();  // 通知消费者队列不空
        } finally {
            lock.unlock();
        }
    }

    public E take() throws InterruptedException {
        lock.lock();
        try {
            while (count == 0)
                notEmpty.await();  // 队列为空,等待不空条件
            E e = items[takeIndex];
            takeIndex = (takeIndex + 1) % items.length;
            count--;
            notFull.signal();  // 通知生产者队列不满
            return e;
        } finally {
            lock.unlock();
        }
    }
}

    private final LinkedList<String> buffer = new LinkedList<>();
    private final int maxSize = N;
    public Buffer(int size) {
        this.maxSize = size;
    }
    public void execute() {
        new FutureTask<String>(() -> {
            /** 需要注意的是条件判断必须使用的是 while - 这涉及到虚假唤醒的问题,后面会做介绍 */
            while (buffer.size() == maxSize) {
                // 缓冲区满时等待
                wait();  // 必须在synchronized中,因为生产者需要释放锁给消费者
            }
            buffer.add(item);
            // 通知消费者有新数据可消费
            notify();  // 同样需要在synchronized中,确保状态变更与通知的原子性
            return null;
        }).start();
        new FutureTask<String>(() -> {
            while (buffer.isEmpty()) {
                // 缓冲区空时等待
                wait();  // 必须在synchronized中,因为消费者需要释放锁给生产者
            }
            String item = buffer.removeFirst();
            // 通知生产者有新空间可生产
            notify();  // 同样需要在synchronized中
            return item;
        }).start();
    }
LockSupport - park - unpark
CountDownLatch
CountDownLatch的本质非常接近于大任务拆解的协调工作,有任何较大任务可以拆解为多个小任务分别进行处理,待到小任务完成后,再做需要做某些动作的场景。在业务处理方面,比较经典的处理的案例便是 大数据量的Excel导出工作,可以根据需要以 Sheet 或者 Row 作为单位来拆分线程进行导出,在所有参与导出的子线程完成导出动作后,再写出到Excel文件中。
使用示例
        // before multi thread work
        CountDownLatch countDownLatch = new CountDownLatch(2);

        Thread thread1 = new Thread(() -> {
            // do something this thread work
            countDownLatch.countDown();
            // Completed
        });

        Thread thread2 = new Thread(() -> {
            // do something this thread work2
            countDownLatch.countDown();
            // Completed
        });

        // do something after multi thread work
源码解析
CountDownLatch的源码非常简单,因为实际上他是完全依赖在 AQS 的基础上来实现的。在类声明中,直接定义了一个继承AQS的内部静态类。
private final Sync sync;public class CountDownLatch {
    /**
     * Synchronization control For CountDownLatch.
     * Uses AQS state to represent count.
     */
    private static final class Sync extends AbstractQueuedSynchronizer {
        private static final long serialVersionUID = 4982264981922014374L;
        Sync(int count) {
            setState(count);
        }
        int getCount() {
            return getState();
        }
        protected int tryAcquireShared(int acquires) {
            return (getState() == 0) ? 1 : -1;
        }
        protected boolean tryReleaseShared(int releases) {
            // Decrement count; signal when transition to zero
            for (;;) {
                int c = getState();
                if (c == 0)
                    return false;
                int nextc = c - 1;
                if (compareAndSetState(c, nextc))
                    return nextc == 0;
            }
        }
    }
	private final Sync sync;
    ······
	// 在计数变为0之前,阻塞调用该方法的线程持续等待
    public void await() throws InterruptedException {
        sync.acquireSharedInterruptibly(1);
    }
	// 在计数变为0 / 超时之前,阻塞调用该方法的线程持续等待
    public boolean await(long timeout, TimeUnit unit)
        throws InterruptedException {
        return sync.tryAcquireSharedNanos(1, unit.toNanos(timeout));
    }
	// 计数扣减方法
    public void countDown() {
        sync.releaseShared(1);
    }
    ······
}
关键方法解析
-
**
await**await实际调用的是AQS的acquireSharedInterruptibly方法或者tryAcquireSharedNanos/** Acquires in shared mode, aborting if interrupted. Implemented by first checking interrupt status, then invoking at least once {@link #tryAcquireShared}, returning on success. Otherwise the thread is queued, possibly repeatedly blocking and unblocking, invoking {@link #tryAcquireShared} until success or the thread is interrupted. @param arg the acquire argument. This value is conveyed to {@link #tryAcquireShared} but is otherwise uninterpreted and can represent anything you like. @throws InterruptedException if the current thread is interrupted */ public final void acquireSharedInterruptibly(int arg) throws InterruptedException { // 检查线程是否中断 或 (state计数是否!=0 的同时 if (Thread.interrupted() || (tryAcquireShared(arg) < 0 && acquire(null, arg, true, true, false, 0L) < 0)) throw new InterruptedException(); } protected int tryAcquireShared(int acquires) { return (getState() == 0) ? 1 : -1; } /** Attempts to acquire in shared mode, aborting if interrupted, and failing if the given timeout elapses. Implemented by first checking interrupt status, then invoking at least once {@link #tryAcquireShared}, returning on success. Otherwise, the thread is queued, possibly repeatedly blocking and unblocking, invoking {@link #tryAcquireShared} until success or the thread is interrupted or the timeout elapses. @param arg the acquire argument. This value is conveyed to {@link #tryAcquireShared} but is otherwise uninterpreted and can represent anything you like. @param nanosTimeout the maximum number of nanoseconds to wait @return {@code true} if acquired; {@code false} if timed out @throws InterruptedException if the current thread is interrupted */ public final boolean tryAcquireSharedNanos(int arg, long nanosTimeout) throws InterruptedException { if (!Thread.interrupted()) { if (tryAcquireShared(arg) >= 0) return true; if (nanosTimeout <= 0L) return false; int stat = acquire(null, arg, true, true, true, System.nanoTime() + nanosTimeout); if (stat > 0) return true; if (stat == 0) return false; } throw new InterruptedException(); }他们都调用了通用的 AQS 中的
acquire方法,为了方便理解,我们必须要看AQS中该方法的实现,这个方法比较长,如果没时间,可以简单的理解为:acquire在队列 / 节点为空的时候,会协助我们创建队列和节点;而如果队列和节点已经存在,那么将当前线程作为节点加入到后续节点中。当然有一些特殊情况和代码优化的处理,有时间还是建议看一下。AQS中核心调用方法
acquire// Node status bits, also used as argument and return values static final int WAITING = 1; // must be 1 static final int CANCELLED = 0x80000000; // must be negative static final int COND = 2; // in a condition wait // 关键内部类,为了理解acquire,他是必须的 abstract static class Node { volatile Node prev; // initially attached via casTail volatile Node next; // visibly nonnull when signallable Thread waiter; // visibly nonnull when enqueued volatile int status; // written by owner, atomic bit ops by others // methods for atomic operations final boolean casPrev(Node c, Node v) { // for cleanQueue return U.weakCompareAndSetReference(this, PREV, c, v); } final boolean casNext(Node c, Node v) { // for cleanQueue return U.weakCompareAndSetReference(this, NEXT, c, v); } final int getAndUnsetStatus(int v) { // for signalling return U.getAndBitwiseAndInt(this, STATUS, ~v); } final void setPrevRelaxed(Node p) { // for off-queue assignment U.putReference(this, PREV, p); } final void setStatusRelaxed(int s) { // for off-queue assignment U.putInt(this, STATUS, s); } final void clearStatus() { // for reducing unneeded signals U.putIntOpaque(this, STATUS, 0); } private static final long STATUS = U.objectFieldOffset(Node.class, "status"); private static final long NEXT = U.objectFieldOffset(Node.class, "next"); private static final long PREV = U.objectFieldOffset(Node.class, "prev"); } /* Main acquire method, invoked by all exported acquire methods. @param node null unless a reacquiring Condition 等待节点 (除非是Condition重新获取锁,否则必为null) @param arg the acquire argument 交由给tryAcquire / tryAcquireShared 的参数 @param shared true if shared mode else exclusive 共享模式 还是 独占模式 @param interruptible if abort and return negative on interrupt 是否允许响应中断 @param timed if true use timed waits 是否支持超时 @param time if timed, the System.nanoTime value to timeout 超时时间 @return positive if acquired, 0 if timed out, negative if interrupted 如果 >0 获取成功 0 超时 <0 中断 */ final int acquire(Node node, int arg, boolean shared, boolean interruptible, boolean timed, long time) { Thread current = Thread.currentThread(); // 自旋重试计数 byte spins = 0, postSpins = 0; // retries upon unpark of first thread // 中断标记位、判断当前是否为AQS的第一个节点 boolean interrupted = false, first = false; // 前驱节点 Node pred = null; // predecessor of node when enqueued /* Repeatedly: Check if node now first if so, ensure head stable, else ensure valid predecessor if node is first or not yet enqueued, try acquiring else if queue is not initialized, do so by attaching new header node resort to spinwait on OOME trying to create node else if node not yet created, create it resort to spinwait on OOME trying to create node else if not yet enqueued, try once to enqueue else if woken from park, retry (up to postSpins times) else if WAITING status not set, set and retry else park and clear WAITING status, and check cancellation */ for (;;) { // 判断当前节点是否为队列首个节点 if (!first && (pred = (node == null) ? null : node.prev) != null && !(first = (head == pred))) { if (pred.status < 0) { // 前驱节点已经被取消,直接清空队列 cleanQueue(); // predecessor cancelled continue; } else if (pred.prev == null) { // 如果前驱节点目前为null,那么可能出现并发操作(其他线程正在设置头结点) // 调用onSpinWait,告知操作系统当前线程在自旋等待,降低资源损耗 [有需要可以回顾 Thread onSpinWait 方法介绍] Thread.onSpinWait(); // ensure serialization continue; } } // 如果首节点为空,或者前置节点为空 if (first || pred == null) { boolean acquired; try { if (shared) // 在共享模式下,调用 tryAcquireShared acquired = (tryAcquireShared(arg) >= 0); else // 在独享模式下,调用 tryAcquire acquired = tryAcquire(arg); } catch (Throwable ex) { cancelAcquire(node, interrupted, false); throw ex; } // 如果获取成功 if (acquired) { // 并且是首个节点,那么设置他为新的头节点 if (first) { node.prev = null; head = node; pred.next = null; node.waiter = null; if (shared) // 如果是共享模式,那么唤醒后继节点 signalNextIfShared(node); if (interrupted) // 如果是独享模式,那么恢复中断状态 current.interrupt(); } return 1; } } // 初始化队列或者创建节点 Node t; // 如果队列不存在 if ((t = tail) == null) { // 尝试初始化队列 if (tryInitializeHead() == null) // 如果初始化失败 (JVM内存空间不足,那么就调用 acquireOnOOME 方法处理) return acquireOnOOME(shared, arg); } // 如果节点不存在 else if (node == null) { // allocate; retry before enqueue try { // 如果是Shared那么创建 SharedNode 节点;否则创建 ExclusiveNode 节点 node = (shared) ? new SharedNode() : new ExclusiveNode(); } catch (OutOfMemoryError oome) { // 如果节点创建失败 (JVM内存空间不足,那么调用 acquireOnOOME 方法处理) return acquireOnOOME(shared, arg); } } else if (pred == null) { // try to enqueue // 尝试当前节点的 waiter 为当前线程 node.waiter = current; // 设置节点的前驱为当前的尾节点 /** setPrevRelaxed 的底层是通过 UnSafe 更加底层进行操作, 相比对 volatile [prev在Node声明时,使用到volatile关键字,其就是依靠内存屏障实现的可见性] 的写入 相比,避免了内存屏障的使用 */ node.setPrevRelaxed(t); // avoid unnecessary fence - 避免没必要的内存屏障 // 使用CAS操作设置新的尾节点 if (!casTail(t, node)) node.setPrevRelaxed(null); // back out - 如果入队失败,那么回滚前面的设置 else t.next = node; // 如果CAS成功,那么设置原尾节点的next指向新节点 } // 如果当前是 首节点 并且自旋计数未耗尽,那么继续自旋 else if (first && spins != 0) { // 减少不公平问题 --spins; // reduce unfairness on rewaits // 通知操作系统当前线程处理自旋状态 Thread.onSpinWait(); } /** 如果节点的状态是 0 (Node类中 status的是int,初始值在不做任何处理是便是 0,当然clearStatus也可能是 0), 那么设置状态为 WAITING */ else if (node.status == 0) { node.status = WAITING; // enable signal and recheck - 启动信号,并且重新检查 } else { long nanos; // 更新 自旋重试计数 spins = postSpins = (byte)((postSpins << 1) | 1); // 检查是否设置定时等待 if (!timed) // 调用park阻塞线程 LockSupport.park(this); else if ((nanos = time - System.nanoTime()) > 0L) // 调用parkNanos阻塞线程 LockSupport.parkNanos(this, nanos); else break; // 唤醒后清除节点状态 node.clearStatus(); // 检查是否被中断 if ((interrupted |= Thread.interrupted()) && interruptible) break; } } // 如果在循环之中被打断跳出来,那么取消获取结果并直接返回 return cancelAcquire(node, interrupted, interruptible); } static final int CANCELLED = 0x80000000; // must be negative /* Cancels an ongoing attempt to acquire. @param node the node (may be null if cancelled before enqueuing) @param interrupted true if thread interrupted @param interruptible if should report interruption vs reset */ private int cancelAcquire(Node node, boolean interrupted, boolean interruptible) { if (node != null) { node.waiter = null; node.status = CANCELLED; if (node.prev != null) cleanQueue(); } // 如果当前正在中断 if (interrupted) { if (interruptible) // 返回取消结果 return CANCELLED; else // Thread.currentThread().interrupt(); } return 0; } -
countdowncountdown实际调用的是 AQS 中的releaseShared/* Releases in shared mode. Implemented by unblocking one or more threads if {@link #tryReleaseShared} returns true. @param arg the release argument. This value is conveyed to {@link #tryReleaseShared} but is otherwise uninterpreted and can represent anything you like. @return the value returned from {@link #tryReleaseShared} */ public final boolean releaseShared(int arg) { if (tryReleaseShared(arg)) { signalNext(head); return true; } return false; } // 关联方法1 tryReleaseShared 对 state 计数 -1,如果扣减后 == 0,那么返回 true 否则返回 false protected boolean tryReleaseShared(int releases) { // Decrement count; signal when transition to zero for (;;) { int c = getState(); // 如果 connter 不为 0 ,那么-1 if (c == 0) return false; int nextc = c - 1; if (compareAndSetState(c, nextc)) return nextc == 0; } } // 关联方法2 signalNext 释放AQS队列中所有的等待线程 private static void signalNext(Node h) { Node s; // 从 AQS 队列中 head 开始往后遍历 if (h != null && (s = h.next) != null && s.status != 0) { s.getAndUnsetStatus(WAITING); // 清除等待状态 LockSupport.unpark(s.waiter); // 唤醒线程 } }
CyclicBarrier
CyclicBarrier与CountDownLatch类似,他们都是通过 共享模式的AQS 实现的控制,但相比于 CountDownLatch 主要的目的的计数以外,CyclicBarrier更像是一个栅栏他要求N个线程都对同一个 CyclicBarrier 调用 await 后,在允许他们和主线程继续执行后续的工作。
使用示例
CyclicBarrier cyclicBarrier = new CyclicBarrier(2);
Thread thread1 = new Thread(() -> {
    // do something this thread work
    try {
        cyclicBarrier.await();
    } catch (InterruptedException e) {
        throw new RuntimeException(e);
    } catch (BrokenBarrierException e) {
        throw new RuntimeException(e);
    }
    // do something after passing the CyclicBarrier

    // Completed
});

Thread thread2 = new Thread(() -> {
    // do something this thread work2
    try {
        cyclicBarrier.await();
    } catch (InterruptedException e) {
        throw new RuntimeException(e);
    } catch (BrokenBarrierException e) {
        throw new RuntimeException(e);
    }
    // do something after passing the CyclicBarrier

    // Completed
});

// do something after passing the CyclicBarrier
源码解析
CyclicBarrier的实现相比于 CountDownLatch 要复杂一些,他的底层为了实现CyclicBarrier的重复使用,内部实现包含了 内部类Generation ,用于表示当前这一代之中屏障是否被处罚已经是否被重置。单也正因如此,实际上在调用 await 方法中需要判断当前调用的和实际扣减时的 Generation 是否为同一个,并在一些特殊场景下做处理,避免出现不可预测的错误结果。
// 用于保护屏障入口的锁
private final ReentrantLock lock = new ReentrantLock();
// 线程等待的条件
private final Condition trip = lock.newCondition();
// 参与的线程数
private final int parties;
// 当屏障被触发时执行的命令
private final Runnable barrierCommand;
// 当前代
private Generation generation = new Generation();
// 还在等待的线程数,从parties减到0
private int count;
/** 内部类 */
private static class Generation {
    Generation() {}// 防止外部创建构造函数
    boolean broken;                 // 初始值为false
}
/** Updates state on barrier trip and wakes up everyone.Called only while holding lock. */
private void nextGeneration() {
    // signal completion of last generation
    trip.signalAll();
    // set up next generation
    count = parties;
    generation = new Generation();
}
/** 设置当前代为中断状态,并且唤醒所有人 */
private void breakBarrier() {
    generation.broken = true;
    count = parties;
    trip.signalAll();
}
······
关键方法解析
CyclicBarrier的关键方法比较少,主要就是两个方法 await 和 CyclicBarrier 的构造器
-
awaitawait主要调用的是dowait方法,利用 dowait 便可以让我们基于 CyclicBarrier 实现屏障对线程的控制/* Waits until all {@linkplain #getParties parties} have invoked {@code await} on this barrier. If the current thread is not the last to arrive then it is disabled for thread scheduling purposes and lies dormant until one of the following things happens: The last thread arrives; or Some other thread {@linkplain Thread#interrupt interrupts} the current thread; or Some other thread {@linkplain Thread#interrupt interrupts} one of the other waiting threads; or Some other thread times out while waiting for barrier; or Some other thread invokes {@link #reset} on this barrier. If the current thread: has its interrupted status set on entry to this method; or is {@linkplain Thread#interrupt interrupted} while waiting then {@link InterruptedException} is thrown and the current thread's interrupted status is cleared. If the barrier is {@link #reset} while any thread is waiting, or if the barrier {@linkplain #isBroken is broken} when {@code await} is invoked, or while any thread is waiting, then {@link BrokenBarrierException} is thrown. If any thread is {@linkplain Thread#interrupt interrupted} while waiting, then all other waiting threads will throw {@link BrokenBarrierException} and the barrier is placed in the broken state. If the current thread is the last thread to arrive, and a non-null barrier action was supplied in the constructor, then the current thread runs the action before allowing the other threads to continue. If an exception occurs during the barrier action then that exception will be propagated in the current thread and the barrier is placed in the broken state. @return the arrival index of the current thread, where index {@code getParties() - 1} indicates the first to arrive and zero indicates the last to arrive @throws InterruptedException if the current thread was interrupted while waiting @throws BrokenBarrierException if <em>another</em> thread was interrupted or timed out while the current thread was waiting, or the barrier was reset, or the barrier was broken when {@code await} was called, or the barrier action (if present) failed due to an exception */ public int await() throws InterruptedException, BrokenBarrierException { try { return dowait(false, 0L); } catch (TimeoutException toe) { throw new Error(toe); // cannot happen } } /** Main barrier code, covering the various policies. */ private int dowait(boolean timed, long nanos) throws InterruptedException, BrokenBarrierException, TimeoutException { final ReentrantLock lock = this.lock; lock.lock(); try { final Generation g = generation; // 如果当前代已经 broken if (g.broken) throw new BrokenBarrierException(); // 检查线程是否已经中断 if (Thread.interrupted()) { breakBarrier(); throw new InterruptedException(); } // 等待的线程数 -1 int index = --count; // 如果当前调用的是 需要的最后一个线程 if (index == 0) { // tripped // 在构造 CyclicBarrier 传入的屏障触发后要执行的 命令 (一般不需要用到该参数) Runnable command = barrierCommand; if (command != null) { try { command.run(); } catch (Throwable ex) { breakBarrier(); throw ex; } } // 将 CyclicBarrier 切换到下一代 nextGeneration(); return 0; } // 如果不是最后一个线程,那么做等待逻辑处理 (循环等待,直到被唤醒、中断、超时或屏障被破坏) for (;;) { try { // 如果不设置超时,那么持续等待 (AQS 底层方法) if (!timed) trip.await(); // 如果设置超时,超时时间目前仍然 > 0 else if (nanos > 0L) // 调用 带超时时间等待 (AQS 底层方法) nanos = trip.awaitNanos(nanos); } catch (InterruptedException ie) { // 如果目前仍然处于同一代,并且屏障没有被破坏 if (g == generation && ! g.broken) { // 破坏屏障 breakBarrier(); throw ie; } else { // 否则,重新设置线程的中断状态 (因为当前等待即将结束,中断属于后续需要执行的一部分) // We're about to finish waiting even if we had not been interrupted, so this interrupt is deemed to "belong" to subsequent execution. Thread.currentThread().interrupt(); } } // 如果当前代已经被破坏,那么抛出异常 if (g.broken) throw new BrokenBarrierException(); // 如果当前代已经切换 if (g != generation) // 返回当前还需要调用 await 的线程数 return index; // 如果设置了超时,并且目前已经超时 if (timed && nanos <= 0L) { // 破坏屏障并且抛出超时异常 breakBarrier(); throw new TimeoutException(); } } } finally { // 释放锁对象 lock.unlock(); } }AQS关联方法
CyclicBarrier的实现依靠在 AQS 的
await和awaitNanos两个关键方法之中,值得一提的是这两个方法其实都有用到 LockSuport 做实现。他们的大概的步骤是一致的,
awaitNanos唯一的区别是增加了重试的处理机制- 构建当前线程对应的节点,设置线程状态为 COND ,并添加到条件队列中 - (
enableWait中实现 ) - 释放当前线程锁、保存锁状态 - (
enableWait中实现 ) - 循环检查不断等待 signal 信号 - (while的存在同时也是为了避免虚假唤醒 )
- 在循环中检查中断
- 调用线程阻塞使其等待
- 被唤醒后,清除等待状态、并重新获取锁
辅助方法
/* Adds node to condition list and releases lock.
  @param node the node
  @return savedState to reacquire after wait
 */
private int enableWait(ConditionNode node) {
    if (isHeldExclusively()) {
        node.waiter = Thread.currentThread();
        node.setStatusRelaxed(COND | WAITING);
        ConditionNode last = lastWaiter;
        if (last == null)
            firstWaiter = node;
        else
            last.nextWaiter = node;
        lastWaiter = node;
        int savedState = getState();
        if (release(savedState))
            return savedState;
    }
    node.status = CANCELLED; // lock not held or inconsistent
    throw new IllegalMonitorStateException();
}

/* Returns true if a node that was initially placed on a condition
  queue is now ready to reacquire on sync queue.
  @param node the node
  @return true if is reacquiring
 */
private boolean canReacquire(ConditionNode node) {
    // check links, not status to avoid enqueue race
    Node p; // traverse unless known to be bidirectionally linked
    return node != null && (p = node.prev) != null &&
        (p.next == node || isEnqueued(node));
}
核心方法
/* 无限期的中断等待方法实现 Implements interruptible condition wait. If current thread is interrupted, throw InterruptedException.Save lock state returned by {@link #getState}. Invoke {@link #release} with saved state as argument, throwing IllegalMonitorStateException if it fails. Block until signalled or interrupted. Reacquire by invoking specialized version of {@link #acquire} with saved state as argument. If interrupted while blocked in step 4, throw InterruptedException. */ public final void await() throws InterruptedException { // 检查是否已经处于中断状态 if (Thread.interrupted()) throw new InterruptedException(); // 创建当前线程的条件节点 ConditionNode node = newConditionNode(); if (node == null) return; /* 1. 保存当前线程的锁状态、 2. 并且释放当前持有的锁、 3. 将当前线程节点加入到等待队列中 */ int savedState = enableWait(node); // 设置阻塞者引用为当前线程 (目的是调试和监控) LockSupport.setCurrentBlocker(this); // for back-compatibility boolean interrupted = false, cancelled = false, rejected = false; // 循环等待线程 被 singal 唤醒 / 线程被调用中断 while (!canReacquire(node)) { // 是否被中断 if (interrupted |= Thread.interrupted()) { // 如果已经被中断,取消线程的 COND 状态 (将节点从条件队列移除) if (cancelled = (node.getAndUnsetStatus(COND) & COND) != 0) // 取消成功,那说明 已经被 sign 可以跳转循环 break; // else interrupted after signal } // 如果节点仍然处于 COND 状态 中等待 else if ((node.status & COND) != 0) { try { // 如果之前尝试用 ForkJoinPool 进行阻塞但失败,那么调用 LockSupport.park 实现阻塞 if (rejected) node.block(); else // 尝试用 ForkJoinPool 的 managedBlock 阻塞 ForkJoinPool.managedBlock(node); } catch (RejectedExecutionException ex) { rejected = true; } catch (InterruptedException ie) { interrupted = true; } } else // 如果没有被中断,并且节点已经不在 COND ,先进入自旋状态,并告诉操作系统当前线程正处于自旋状态 Thread.onSpinWait(); // awoke while enqueuing } // 清除阻塞者设置、清除节点状态、使用保存下来的新状态获取锁 LockSupport.setCurrentBlocker(null); node.clearStatus(); acquire(node, savedState, false, false, false, 0L); // 如果前面发生中断 if (interrupted) { // 等待被取消的情况下,抛出 InterruptedException if (cancelled) { unlinkCancelledWaiters(node); throw new InterruptedException(); } // 等待没有被取消 - 被调用signal,保留中断状态 Thread.currentThread().interrupt(); } } /* 携带超时的条件等待 Implements timed condition wait. If current thread is interrupted, throw InterruptedException. Save lock state returned by {@link #getState}. Invoke {@link #release} with saved state as argument, throwing IllegalMonitorStateException if it fails. Block until signalled, interrupted, or timed out. Reacquire by invoking specialized version of {@link #acquire} with saved state as argument. If interrupted while blocked in step 4, throw InterruptedException. */ public final long awaitNanos(long nanosTimeout) throws InterruptedException { // 检查线程是否已经发生中断 if (Thread.interrupted()) throw new InterruptedException(); // 创建条件节点 ConditionNode node = newConditionNode(); if (node == null) // 如果创建结果返回的是 null,那么更新超时时间 return nanosTimeout - OOME_COND_WAIT_DELAY; // 保存锁的状态 int savedState = enableWait(node); // 更新超时时间、计算 deadline 时间 long nanos = (nanosTimeout < 0L) ? 0L : nanosTimeout; long deadline = System.nanoTime() + nanos; boolean cancelled = false, interrupted = false; // 循环等待条件符合重新获取锁 while (!canReacquire(node)) { // 如果已经中断 或者 已经超时 if ((interrupted |= Thread.interrupted()) || (nanos = deadline - System.nanoTime()) <= 0L) { // 如果已经被中断,取消线程的 COND 状态 (将节点从条件队列移除) if (cancelled = (node.getAndUnsetStatus(COND) & COND) != 0) // 取消成功,那说明 已经被 sign 可以跳转循环 break; } else // 否则只要没有中断 或者 还没有超时,就通过 LockSupport 继续做有限时间的阻塞 LockSupport.parkNanos(this, nanos); } // 清除节点状态 node.clearStatus(); // 用新的状态重新尝试获取锁 acquire(node, savedState, false, false, false, 0L); // 是否已经进入过取消状态 if (cancelled) { // 将当前节点从 非等待队列和条件队列中移除 unlinkCancelledWaiters(node); // 如果已经中断 if (interrupted) throw new InterruptedException(); } // 如果线程状态没有取消过,并且已经中断过 else if (interrupted) // 设置线程为中断 Thread.currentThread().interrupt(); // 计算并且返回最终剩余的等待时间 long remaining = deadline - System.nanoTime(); // avoid overflow 避免堆栈溢出 return (remaining <= nanosTimeout) ? remaining : Long.MIN_VALUE; } - 构建当前线程对应的节点,设置线程状态为 COND ,并添加到条件队列中 - (
-
构造器
构造器的实现其实相当简单,只是单纯的设置了栅栏的线程计数量,而
barrierCommand则是允许我们可以主动的设置屏障触发之后可以执行的命令。/* Creates a new {@code CyclicBarrier} that will trip when the given number of parties (threads) are waiting upon it, and which will execute the given barrier action when the barrier is tripped, performed by the last thread entering the barrier. @param parties the number of threads that must invoke {@link #await} before the barrier is tripped @param barrierAction the command to execute when the barrier is tripped, or {@code null} if there is no action @throws IllegalArgumentException if {@code parties} is less than 1 */ public CyclicBarrier(int parties, Runnable barrierAction) { if (parties <= 0) throw new IllegalArgumentException(); this.parties = parties; this.count = parties; this.barrierCommand = barrierAction; } /** Creates a new {@code CyclicBarrier} that will trip when the given number of parties (threads) are waiting upon it, and does not perform a predefined action when the barrier is tripped. @param parties the number of threads that must invoke {@link #await} before the barrier is tripped @throws IllegalArgumentException if {@code parties} is less than 1 */ public CyclicBarrier(int parties) { this(parties, null); }
Semaphore
使用示例
public class ExcelExporter {
    private static final int MAX_CONCURRENT_TASKS = 5;
    private static final int QUERY_LIMIT = 2000;

    private final ExecutorService executor; // 公共线程池
    private final Semaphore semaphore = new Semaphore(MAX_CONCURRENT_TASKS);

    public ExcelExporter(ExecutorService executor) {
        this.executor = executor;
    }

    public void exportExcel(List<Sheet> sheets) {
        CountDownLatch latch = new CountDownLatch(sheets.size());
        for (Sheet sheet : sheets) {
            try {
                semaphore.acquire();          // 在提交任务前获取信号量许可
                executor.submit(() -> {
                    try {
                        exportSheet(sheet);   // 具体导出逻辑
                    } finally {
                        semaphore.release(); // 任务完成后释放信号量许可
                        latch.countDown();
                    }
                });
            } catch (InterruptedException e) {
                Thread.currentThread().interrupt();
                latch.countDown(); // 确保在中断时也减少计数
            }
        }
		// 等待所有任务完成
        try {
            latch.await();
        } catch (InterruptedException e) {
            Thread.currentThread().interrupt();
        }
    }
}
IPC - 进程间通讯
相比于狭义下的线程间的通讯 (在同一台设备下的线程),进程间的通讯既可以发生在同一台设备,也往往会发生在跨设备的通讯上。(进程间通讯其实也算是线程间的通讯,我将线程间通讯强行分开狭义和广义两种其实是为了方便理解,不必细究) 。
进程间的通讯往往并不是由JVM通过内部封装实现通讯的,并且实现进程间通讯的方式五花八门,针对这个部分的实现和介绍会比较少,往往会敷于表面不会深入扩展介绍。(同设备下的在实际场景中过于少见;跨设备下的往往会涉及到网络和操作系统的底层实现,涉及内容过于宽广且要求对操作系统了解较深,我对各操作系统的了解并不算深刻,所以综合以上原因,IPC部分目前并不打算展开介绍)
同设备下的进程通讯
从操作系统的角度来看,不同的进程本身还留存在同一个设备上的时候,我们可以使用以下手段来实现不同进程之间的通讯。
-
Unix套接字 (UDS) - 双向通讯
Java16之后支持的套接字方案,基于Unix域套接字可以实现跨进程的通讯。UDS通过创建指定路径的文件并以该文件路径作为标识符用于客户端的连接。在通道创建完毕之后,就可以利用套接字缓冲区(socket buffer 网络缓冲区结构) 来实现通讯。该缓冲区实际上使用的 SOCK_DGRAM 模式。他的本质跟网络套接字非常相似,但是他并不需要使用任何网络协议的处理,只可以跑在本地的特性上,这也使得Unix套接字的性能上相比网络套接字要好得多。
因为实际上使用的场景非常少,以下仅提供一个简单的demo.
/* server */ // 服务端 UnixDomainSocketAddress address = UnixDomainSocketAddress.of(Path.of("/tmp/java-socket")); ServerSocketChannel server = ServerSocketChannel.open(StandardProtocolFamily.UNIX); server.bind(address); SocketChannel channel = server.accept(); /** Client */ SocketChannel channel = SocketChannel.open(StandardProtocolFamily.UNIX); channel.connect(address); -
共享文件
共享文件的实现方案算是少数的Java支持比较好的进程间通讯方案。
我们可以通过
FileChannel和FileLock实现对文件加锁和写入操作,避免进程间并发带来的安全问题;如果有需要可以结合WatchService监听文件变化。// 写入进程 try (FileOutputStream fos = new FileOutputStream("shared.dat"); FileChannel channel = fos.getChannel()) { // 获取独占锁 FileLock lock = channel.lock(); try { ByteBuffer buffer = ByteBuffer.wrap("Hello from Process A".getBytes()); channel.write(buffer); } finally { lock.release(); } } // 读取进程 try (FileInputStream fis = new FileInputStream("shared.dat"); FileChannel channel = fis.getChannel()) { // 获取共享锁(只读) FileLock lock = channel.lock(0, Long.MAX_VALUE, true); try { ByteBuffer buffer = ByteBuffer.allocate(1024); channel.read(buffer); buffer.flip(); System.out.println("Received: " + new String(buffer.array()).trim()); } finally { lock.release(); } } // 监听进程 Path dir = Paths.get("/path/to/shared/directory"); try (WatchService watcher = FileSystems.getDefault().newWatchService()) { dir.register(watcher, StandardWatchEventKinds.ENTRY_CREATE, StandardWatchEventKinds.ENTRY_MODIFY); while (true) { WatchKey key = watcher.take(); // 阻塞直到有事件发生 for (WatchEvent<?> event : key.pollEvents()) { Path changed = (Path) event.context(); System.out.println("Detected change: " + changed); // 读取更改的文件内容 Path fullPath = dir.resolve(changed); String content = new String(Files.readAllBytes(fullPath)); System.out.println("Content: " + content); } if (!key.reset()) { break; } } } catch (IOException | InterruptedException e) { e.printStackTrace(); }或者我们可以用性能更好,更优雅的方式来通过共享文件来实现通讯 -- mmap
学过ZGC或者Kafka等实现原理的话,我们都知道虚拟地址映射技术 (或者用更为熟知的词 零拷贝技术),将系统文件映射到内存之中。这样可以使得我们对文件的修改会直接写出到磁盘文件之中。这样其他进程也可以直接从磁盘文件中读取到实际上通讯的信息。我们可以利用
nio包之中的MappedByteBuffer类来实现这个映射效果。// 写入进程 private static final int BUFFER_SIZE = 1024; private static final String FILE_PATH = "/tmp/mmap_ipc.dat" FileChannel fileChannel = new RandomAccessFile(new File("db.data"), "rw").getChannel(); MappedByteBuffer mappedByteBuffer = fileChannel.map(FileChannel.MapMode.READ_WRITE, 0,// 起始位置 BUFFER_SIZE// 映射大小 ); // 写入数据长度标记(前4字节表示实际数据长度) String message = "Hello from Java mmap IPC!"; byte[] data = message.getBytes(StandardCharsets.UTF_8); buffer.putInt(data.length); buffer.put(data); // 读取进程 private static final int BUFFER_SIZE = 1024; private static final String FILE_PATH = "/tmp/mmap_ipc.dat" RandomAccessFile file = new RandomAccessFile(FILE_PATH, "r");// 获取文件通道 FileChannel channel = file.getChannel(); // 创建与文件相同的内存映射 MappedByteBuffer buffer = channel.map(FileChannel.MapMode.READ_ONLY, 0, // 起始位置 BUFFER_SIZE // 映射大小 ); // 读取数据长度 int dataLength = buffer.getInt(); // 读取实际数据 byte[] data = new byte[dataLength]; buffer.get(data); -
D-Bus (Linux专有)
D-Bus其实是Linux中提供的基于进程总线来实现进程之间消息传递的方式,Java提供了dbus-java库,我们可以通过该库实现进程间通讯。如果有需要可以查看以下 github项目地址 : dbus-java · GitHub
通过D-Bus可以发出通知信号、发出消息体等,通知方面又支持广播机制。在Github项目中有对应的demo,有需要再看吧。
除了Java内部具有直接支持机制的通讯机制以外,还有一些操作系统支持的通讯方式
-
Binder
Android系统的专有机制,它提供了不同的应用之间数据交换和功能调用的机制。(我不太了解安卓,就不献丑了)
-
信号 / 信号量
Java对操作系统底层的 信号和信号量 没有做支持,也就根本没有可以讨论的。(Semphore本身只支持同一个JVM内的线程间控制,既然是同一个JVM,那么自然他的本质并不支持进程间通信)
-
共享内存
由于相比于C语言等较为底层可以直接对内存做操作的语言,Java的封装更加彻底,实际上Java并没有直接提供任何的API可以直接构建一块共享内存并对其进行操作。如果对内存的掌控要求比较低,mmap也是共享内存的实现方案
-
管道 / 命名管道 - 单向通讯
利用操作系统的OS缓冲区 (大小固定,单个内存页面大小4KB) 实现通讯,必须明确的是管道看起来像是文件,因为他实际上有着文件描述符,但实际上他并不是真正意义上的文件 - [Java只支持Process API,但Process API是创建自身的子进程与子进程通讯]
跨设备下的进程通讯
既然实际上的信息本身会发生在不同的设备上,那么再类似于线程间通讯(Object 、Thread、JUC)一样依托于操作系统和JVM中的机制来实现通讯的方式必然是不可行的,因此我们必须考虑其他的一些方式。
RPC / HTTP网络请求
利用网络请求,基于RPC / HTTP向其他服务的接口发起请求,并获取调用结果。这种方式其实非常常见,在分布式或者更细化的微服务架构的系统之中更是常见,往往一个业务处理逻辑会涉及到多个服务间的请求调用 (当然这也衍生出分布式可用性、可靠性的问题)。这种方式也是最为常见的跨进程和服务之间的通讯方式。
在实际的应用中,具体使用的方式肯定是多样的。这里仅以 Http 请求为例举一些例子:比如最早期的利用 okHttp 构建HTTP请求、到直接使用 Spring 提供的 RestTemplate 发起请求、基于RestTemplate 发展出来的 Feign 和 OpenFeign。当然同一个功能接口其实集群中也有多实例,因此也扩展出了 Ribbon 和 LoadBalancer 的负载均衡组件。不过这些都跟本文关系不密切,也因此在此就不扩展叙述了。
存储介质暂存
本质上,其实存储介质暂存的方案并不能完全算是一种独立方案。严格意义来说,算是在 RPC / HTTP 网络请求基础上的进一步扩展,它相当于充当 信息发出方 和 信息接收方 的第三者,临时将信息保存到第三者中存储起来 (它可以是 文件系统[HDFS]、 数据库Database[公共数据库]、MQ等方式,具体是哪一种与本文关系并不密切,在此不对此做详细介绍)。信息的接受者则从第三者之中获取消息。
这种方式好处和缺点都相当明显,相当于直接基于RPC / HTTP的通讯方式,由于消息本身一旦被存储介质接收,那么整个沟通本身得到了一定程度的解耦,消息的接收和处理不再完全依托于发送方发起,这让我们可以根据某些需要对消息接收做多次重试等处理。当然它的缺点也很明显,由于额外添加了第三方使得消息本身并不适合实时性要求较高的场景,并且在整个项目中我们还需要保证第三者自身是稳定的。